Culinary Explorer

A cooking platform built around craft, culture, and the stories behind what we eat.
Discover Culinary Explorer
How to Beat the Whites of Eggs

How to Beat the Whites of Eggs

Created by Chef Juliette

Based on No. 2342, How to Beat the Whites of Eggs, from Le Guide Culinaire (1907) by Auguste Escoffier

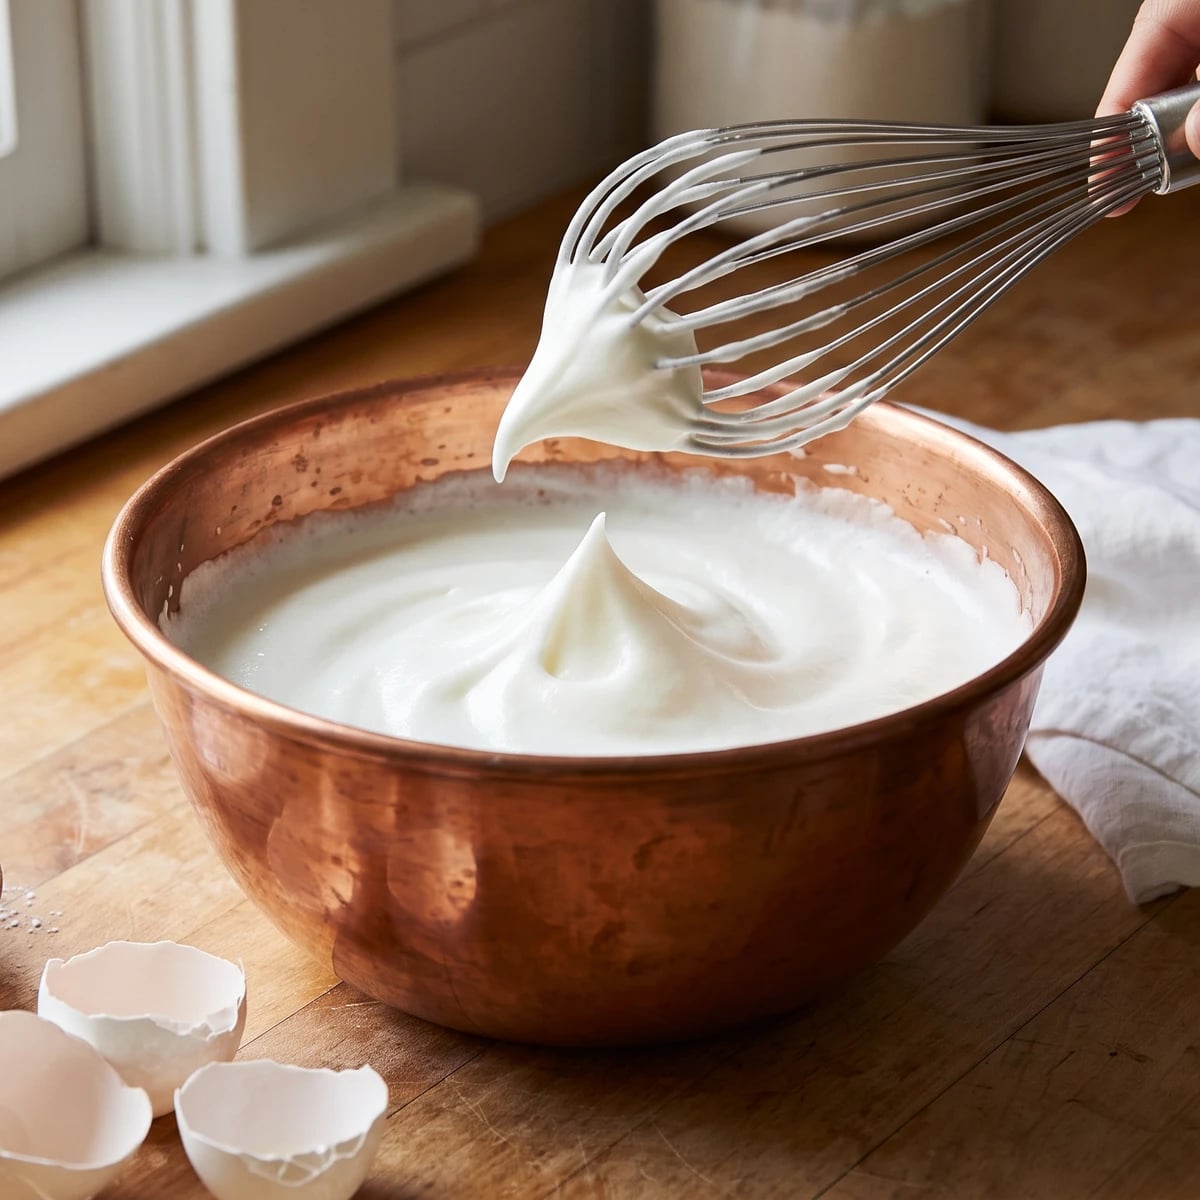
Four whites, one spotless bowl, and a patient change of speed: whisk gently until loosened, then briskly to glossy stiffness, with powdered sugar waiting if the foam begins to granulate.

Desserts
French
Meal Prep
Quick Meal
10 min
Active Time
0 min cook10 min total
YieldAbout 2 cups (475 ml), enough for 4 dessert portions

Blancs en neige teach the essential grammar of every soufflé, mousse, biscuit, and meringue: air must be added gradually to proteins kept utterly free of fat. The one true thing to know before you lift the whisk is that a trace of yolk or grease can prevent the whites from reaching full stiffness. Clean tools first. Everything after that is rhythm.

The original method assumed ten whites, a spherical copper or nickel basin, and an arm accustomed to brigade quantities. At home, four whites in a 2 1/2 to 3-quart copper bowl give the same advantage; impeccably clean stainless steel is the honest alternative, and a balloon whisk or clean electric beaters provide the motion. The rare nickel basin and the large batch are brigade scaffolding, so they go. The rounded bowl, gentle beginning, brisk finish, and proportional sugar rescue are the technique itself, so they stay. One cook, one bowl, ten minutes.

Begin gently, drawing the whites up until their ropey structure loosens into one even foam, then increase speed only as they stiffen. The step that matters is stopping at smooth, glossy stiff peaks, just before dry grains appear; keep the measured powdered sugar beside you, because if granulation begins, ça se rattrape.

Blancs en neige belong to French pâtisserie and the sweet-course work of the classical kitchen, not to one particular province. Copper and nickel basins became standard professional tools because their round walls let a whisk sweep through a large batch cleanly; copper also joins with egg-white proteins and delays the dry, grainy tightening caused by overbeating. The operation passed readily to home tables, where the same foam gives height to soufflés, mousses, biscuits, and meringues.

The technique, the tradition, and the story behind every dish.

Discover Culinary Explorer

Ingredients

large egg whites

Quantity

4 large (about 1/2 cup / 120 ml / 120 g)

at cool room temperature

fine salt (optional)

Quantity

1 tiny pinch (less than 1/16 teaspoon / less than 0.3 ml / about 0.2 g)

powdered sugar (optional)

Quantity

1 teaspoon plus a scant 1/4 teaspoon (6 ml / 3 g)

sifted and reserved only for rescuing granulation

Equipment Needed

  • 2 1/2 to 3-quart rounded copper beating basin or impeccably clean stainless-steel bowl
  • Large balloon whisk or electric hand mixer with clean beaters
  • Small clean cup for separating each egg

Instructions

  1. 1

    Degrease the tools

    Wash the basin and whisk or mixer beaters in hot soapy water, rinse them thoroughly, and dry them with a fresh towel. Inspect the bowl with your fingertips. It must feel perfectly clean, because even an invisible film of butter, oil, or yolk interferes with the proteins that hold the air. A rounded copper basin is best; impeccably clean stainless steel is the practical home equivalent.

    Avoid plastic bowls. Fine scratches can retain grease after washing, and the whites may remain slack however long you whisk.
  2. 2

    Separate the whites

    Separate each egg over a small clean cup, then transfer the white to the beating basin before opening the next egg. This keeps one broken yolk from spoiling the whole batch. If a piece of yolk falls in, lift out every trace with a clean piece of shell; if it disperses through the whites, begin again. Sugar can rescue granulation, but it cannot remove fat.

  3. 3

    Begin whisking gently

    Add the tiny pinch of salt now, if using. Begin with slow, broad strokes, drawing the whites up from the basin rather than beating furiously against its floor. Continue until the ropey strands have loosened and the whites form an even, large-bubbled foam with no clear liquid slipping beneath it. This gentle beginning disaggregates the whites so they can take air evenly.

  4. 4

    Whisk to stiffness

    Increase to a brisk rhythm once the foam begins to stiffen, rotating the bowl as you work so the whisk reaches every part of its rounded surface. With an electric hand mixer, move the beaters steadily around the bowl rather than holding them in one place. Stop when the whites are smooth and glossy, the whisk can lift much of the mass bodily, and an upright peak holds its point. Don't continue merely for certainty; beyond this stage the foam begins to dry and granulate.

    The peak is a better test than turning the bowl upside down. Lift the whisk vertically: a stiff, glossy point that remains standing tells you everything without putting the whites on the floor.
  5. 5

    Rescue any granulation

    If the whites lose their gloss near the finish and begin to look dry, flecked, or slightly clotted, act immediately. Scatter in the measured powdered sugar and whisk briskly just until the foam becomes smooth and cohesive again. Ça se rattrape. The rescue works when granulation has only begun; stop as soon as the whites return to stiff, glossy peaks.

  6. 6

    Use without delay

    Carry the finished blancs en neige straight into the mousse, soufflé, biscuit, or meringue that calls for them. Fold rather than stir when the receiving recipe directs it, preserving the air you have just built. Whipped whites do not wait gracefully, and refrigeration will not restore volume once it begins to drain.

Chef Tips

  • Eggs separate most cleanly while cold, but the whites take air more readily after losing the refrigerator's chill. Separate them first, cover them, and let them stand for about twenty minutes before whisking.
  • Copper is functional, not decorative. It helps produce a stable foam with a fine texture, while the spherical shape keeps every part within reach of the whisk. If you use stainless steel, cleanliness and careful timing matter even more.
  • The source permits salt or alum at the beginning. For this four-white batch, a tiny pinch of fine salt preserves that instruction without introducing an ingredient most home cooks keep for pickling; the addition is optional, and no more than a trace is needed.
  • The powdered sugar is medicine, not a routine ingredient. Keep it sifted beside the bowl and add it only when the whites begin to granulate near the end, in the quantity scaled directly from the original ten-white formula.
  • If the finished dessert will serve these whites without further cooking, use pasteurized egg whites specifically labelled as suitable for whipping. Some carton whites are heat-treated too firmly to reach a full, stable volume.

Advance Preparation

  • The basin and whisk can be washed, thoroughly dried, and covered with a clean towel earlier in the day. Check them again for any trace of grease before beginning.
  • The whites may be separated up to one day ahead and kept covered in the refrigerator. Bring them toward cool room temperature before whisking.
  • Do not whip the whites ahead. Once aerated, they should pass directly into the preparation that needs them.

Frequently Asked Questions

Nutrition Information

1 serving (about 31g)

Calories
20 calories
Total Fat
0 g
Saturated Fat
0 g
Trans Fat
0 g
Unsaturated Fat
0 g
Cholesterol
0 mg
Sodium
70 mg
Total Carbohydrates
1 g
Dietary Fiber
0 g
Sugars
1 g
Protein
3 g

Note: Chef personas and recipes are created with AI assistance. Cook with care: follow safe food-handling practices, check doneness with a thermometer when needed, and adapt for allergies and your kitchen.

Where cooking meets culture.

Culinary guides, cultural storytelling, and the editorial depth that makes cooking meaningful.

Discover Culinary Explorer

More from Entremets (Sweets)

Browse the full collection