Culinary Explorer

A cooking platform built around craft, culture, and the stories behind what we eat.
Discover Culinary Explorer
Temple Simmered Vegetables (お煮しめ, Onishime)

Temple Simmered Vegetables (お煮しめ, Onishime)

Created by

Obon's temple plate looks complicated because every vegetable keeps its shape. The secret is careful simmering: each piece drinks the same dashi while keeping its own character.

Side Dishes
Japanese
Holiday
Make Ahead
Special Occasion
45 min
Active Time
1 hr cook9 hr 45 min total
Yield4 to 6 servings

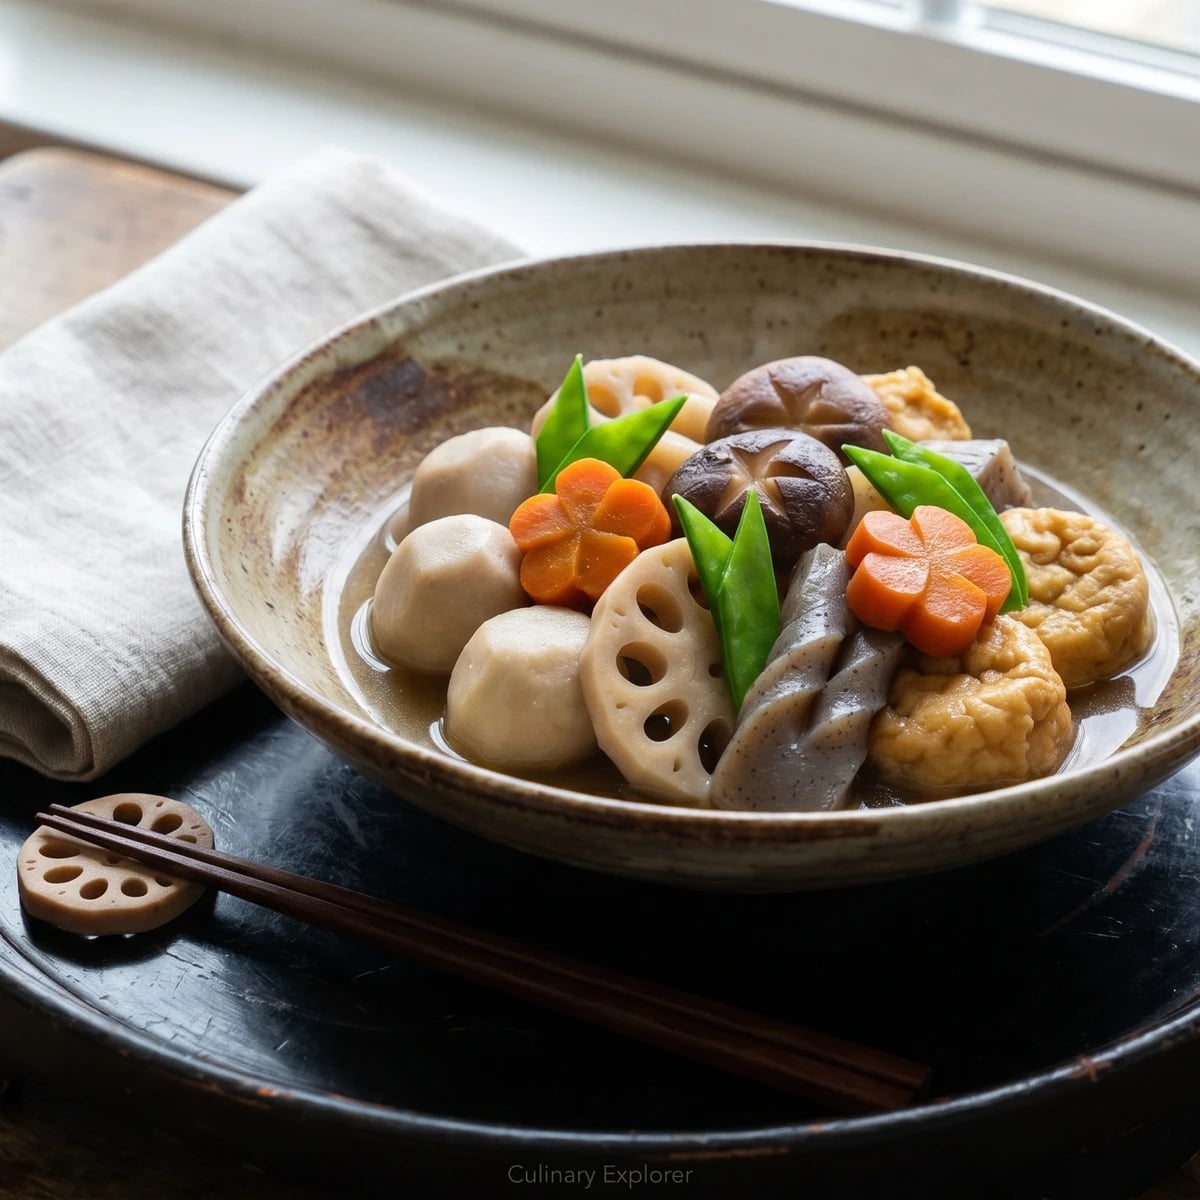
Onishime looks like a little gathering of vegetables, each one still itself: taro, lotus root, carrot, konnyaku, shiitake, ganmodoki. That neatness is what makes people nervous. It shouldn't. This is the method, not the menu: prepare each ingredient so it can cook cleanly, then let it simmer quietly until it drinks a clear konbu-shiitake stock.

The one detail that decides it is restraint in the pot. Don't stir. A wooden drop-lid, otoshibuta, keeps the broth moving over the pieces while your hands stay out of it; a circle of parchment will do the same work. Stirring breaks the taro, clouds the broth, and rubs the careful cuts off the lotus and carrot. A chopstick is for placing, not plowing.

For Obon and other memorial tables, we make this on shōjin dashi, the temple stock of konbu and dried shiitake. That's 本物, honmono, not a lesser version. The seasoning is modest, soy, mirin, and a little sugar, because the pleasure is in each vegetable keeping its own nature. Cook it ahead, let it cool in the broth, and serve it calmly. The resting is when the dish becomes itself.

Nishime began as a method before it became a fixed holiday dish: the verb nishimeru means to simmer until flavor is drawn into the ingredient and the liquid is reduced. The polite o- gives onishime, a name often used for festive or careful preparations. Regional versions appear in osechi ryōri at New Year and in Buddhist memorial meals such as Obon, with the meatless shōjin version relying on konbu and dried shiitake.

The technique, the tradition, and the story behind every dish.

Discover Culinary Explorer

Ingredients

dried shiitake mushrooms

Quantity

6 mushrooms (about 30g)

soaked for dashi

konbu (dried kelp)

Quantity

1 piece (about 10g)

cold water

Quantity

4 cups

satoimo (taro)

Quantity

8 small (about 500g)

peeled and rounded

coarse salt

Quantity

1 tablespoon

for rubbing the satoimo

konnyaku

Quantity

1 block (about 250g)

cut and twisted

lotus root

Quantity

1 small (about 200g)

peeled and sliced

rice vinegar

Quantity

1/2 teaspoon

for the soaking water

carrot

Quantity

1 large (about 150g)

cut into rounds or flower shapes

egg-free ganmodoki (fried tofu fritters)

Quantity

6 small

rinsed with hot water

kinusaya (snow peas) (optional)

Quantity

8

strings removed

usukuchi shōyu (light soy sauce)

Quantity

2 tablespoons

koikuchi shōyu (regular soy sauce)

Quantity

1 tablespoon

mirin

Quantity

3 tablespoons

sugar

Quantity

1 tablespoon

sea salt (optional)

Quantity

pinch

Equipment Needed

  • Wide shallow pot
  • Wooden drop-lid (otoshibuta), or a circle of parchment
  • Fine-mesh strainer lined with a clean cloth
  • Small paring knife for rounding satoimo and cutting carrot shapes
  • Chopsticks or small tongs for plating

Instructions

  1. 1

    Soak the dashi

    Wipe the konbu lightly with a damp cloth if it is sandy, but don't scrub it. The pale bloom on the surface is flavor. Put the konbu, dried shiitake, and cold water in a pot, cover, and soak in the refrigerator for 8 hours or overnight. Set the pot over low heat and bring it up slowly. When the water trembles and small bubbles climb the sides, lift out the konbu before it boils. Boiled konbu gives bitterness and a slick body, and this dish wants a clean broth. Simmer the shiitake 5 minutes more, then strain the liquid through cloth. Trim the stems from the shiitake caps and keep the caps for the pot.

    Use 3 cups of the strained dashi for simmering. If you have less, add a little water. The stock should taste quiet and deep, not salty.
  2. 2

    Clean the satoimo

    Peel the satoimo and round off the sharp corners with a small knife. Rub the pieces with the coarse salt until the surface turns slick, then rinse. Boil them in fresh water for 4 minutes, drain, and rinse gently again. This takes away the surface starch that would cloud the final broth, and the rounded edges help the taro keep its shape.

    If raw satoimo bothers your skin, wear gloves. Once cooked through, it becomes tender and creamy.
  3. 3

    Twist the konnyaku

    Cut the konnyaku into 1/2-inch slices. Make a short slit in the center of each slice and pull one end through the slit to make tazuna konnyaku, the rein-shaped twist used for festive simmered dishes. Boil the pieces for 2 minutes and drain. The boil removes the alkaline smell and roughens the surface just enough for the seasoning to enter.

    The twist is not decoration only. It gives the konnyaku more surface, and konnyaku needs help because it doesn't drink broth as eagerly as a root vegetable.
  4. 4

    Cut the vegetables

    Peel the lotus root and cut it into 1/2-inch rounds or half-moons. Soak it for 5 minutes in water with the rice vinegar, then drain. The vinegar water keeps it pale and rinses away excess starch while preserving its crisp bite. Peel the carrot and cut it into 1/2-inch rounds, or into plum shapes if you want the holiday look. Pour hot water over the ganmodoki and drain well. That rinse removes surface oil, which would otherwise float on the broth and dull its clarity.

  5. 5

    Start the simmer

    In a wide pot, combine 3 cups of the dashi, the usukuchi shōyu, koikuchi shōyu, mirin, and sugar. Bring it to a gentle simmer and taste. It should be a little stronger than you want at the table, because the vegetables will soften it as they cook. Add the satoimo, lotus root, carrot, konnyaku, and shiitake caps in separate clusters, ideally in one layer. Set an otoshibuta over the surface and simmer quietly for 20 minutes.

    The drop-lid keeps the shallow broth circulating over the food without stirring. No otoshibuta? Cut a circle of parchment with a small hole in the center.
  6. 6

    Add the ganmodoki

    Tuck the ganmodoki into the pot, replace the drop-lid, and simmer 10 to 12 minutes more, until the satoimo is tender when pierced and the ganmodoki feels heavier with broth. Add a splash of dashi or water if the pot becomes nearly dry. Ganmodoki goes in late because it only needs to drink and warm through; cook it too long and it begins to break down.

  7. 7

    Rest the pot

    Turn off the heat and leave everything in the broth for at least 30 minutes. Better still, cool it completely and refrigerate it overnight. This waiting is not idle time. As the pot cools, seasoning moves inward. If you try to force that by boiling harder, the edges break before the centers taste seasoned.

    Onishime is often better the next day. Make-ahead cooking isn't a compromise here; it is part of the method.
  8. 8

    Plate with ma

    Blanch the kinusaya in salted boiling water for 30 seconds, then cool under running water and cut on the diagonal. Serve the onishime at room temperature or gently warmed. Lift each piece with chopsticks or small tongs and arrange in a shallow bowl with a little height: taro, lotus root, carrot, konnyaku, shiitake, ganmodoki, and the green kinusaya set last. Spoon over only a little broth. Leave at least a third of the bowl empty. That empty space, ma, lets the careful work be seen.

Chef Tips

  • Choose vegetables by condition, not romance. Satoimo should feel firm and heavy, lotus root should look pale and clean at the cut ends, and dried shiitake should smell deep and clear. If the lotus root is tired, use good frozen renkon rather than hiding a poor one in sauce.
  • Keep this dashi on konbu and dried shiitake. For a temple table, that is honmono. Powder would give you salt and flatness, and the stock is the dish's backbone.
  • Use a wide pot. Onishime suffers in a deep crowded pot because the pieces knock together and the cook starts stirring. Give the vegetables space and the broth can do its work.
  • The otoshibuta is the quiet helper here. A wooden one is traditional, but parchment works because it solves the same problem: it keeps the seasoning moving while your hands stay still.
  • If ganmodoki is hard to find, use thick fried tofu, atsuage, and be plain about it. The simmer will still be good, but ganmodoki has its own tender pockets and roundness.

Advance Preparation

  • Soak the konbu and dried shiitake the night before. Cold soaking gives a clearer, rounder shōjin dashi than rushing them in hot water.
  • The finished onishime keeps well for 3 days refrigerated in its broth. Bring it back to room temperature before serving, or warm it gently without boiling.
  • Blanch the kinusaya on the day you serve. The green should stay bright, so it belongs at the end, not in the simmering pot.
  • If making this for a holiday table, cook it one day ahead and plate it shortly before serving. The flavor will be deeper and the pieces will be calmer to handle.

Frequently Asked Questions

Nutrition Information

1 serving (about 230g)

Calories
200 calories
Total Fat
5 g
Saturated Fat
1 g
Trans Fat
0 g
Unsaturated Fat
4 g
Cholesterol
0 mg
Sodium
930 mg
Total Carbohydrates
34 g
Dietary Fiber
7 g
Sugars
10 g
Protein
8 g

Note: Chef personas and recipes are created with AI assistance. Cook with care: follow safe food-handling practices, check doneness with a thermometer when needed, and adapt for allergies and your kitchen.

Where cooking meets culture.

Culinary guides, cultural storytelling, and the editorial depth that makes cooking meaningful.

Discover Culinary Explorer

More from Shojin Ryori: Buddhist Temple Cuisine

Browse the full collection