Culinary Explorer

A cooking platform built around craft, culture, and the stories behind what we eat.
Discover Culinary Explorer
Kkaennip-jangajji (Pickled Perilla Leaves)

Kkaennip-jangajji (Pickled Perilla Leaves)

Created by

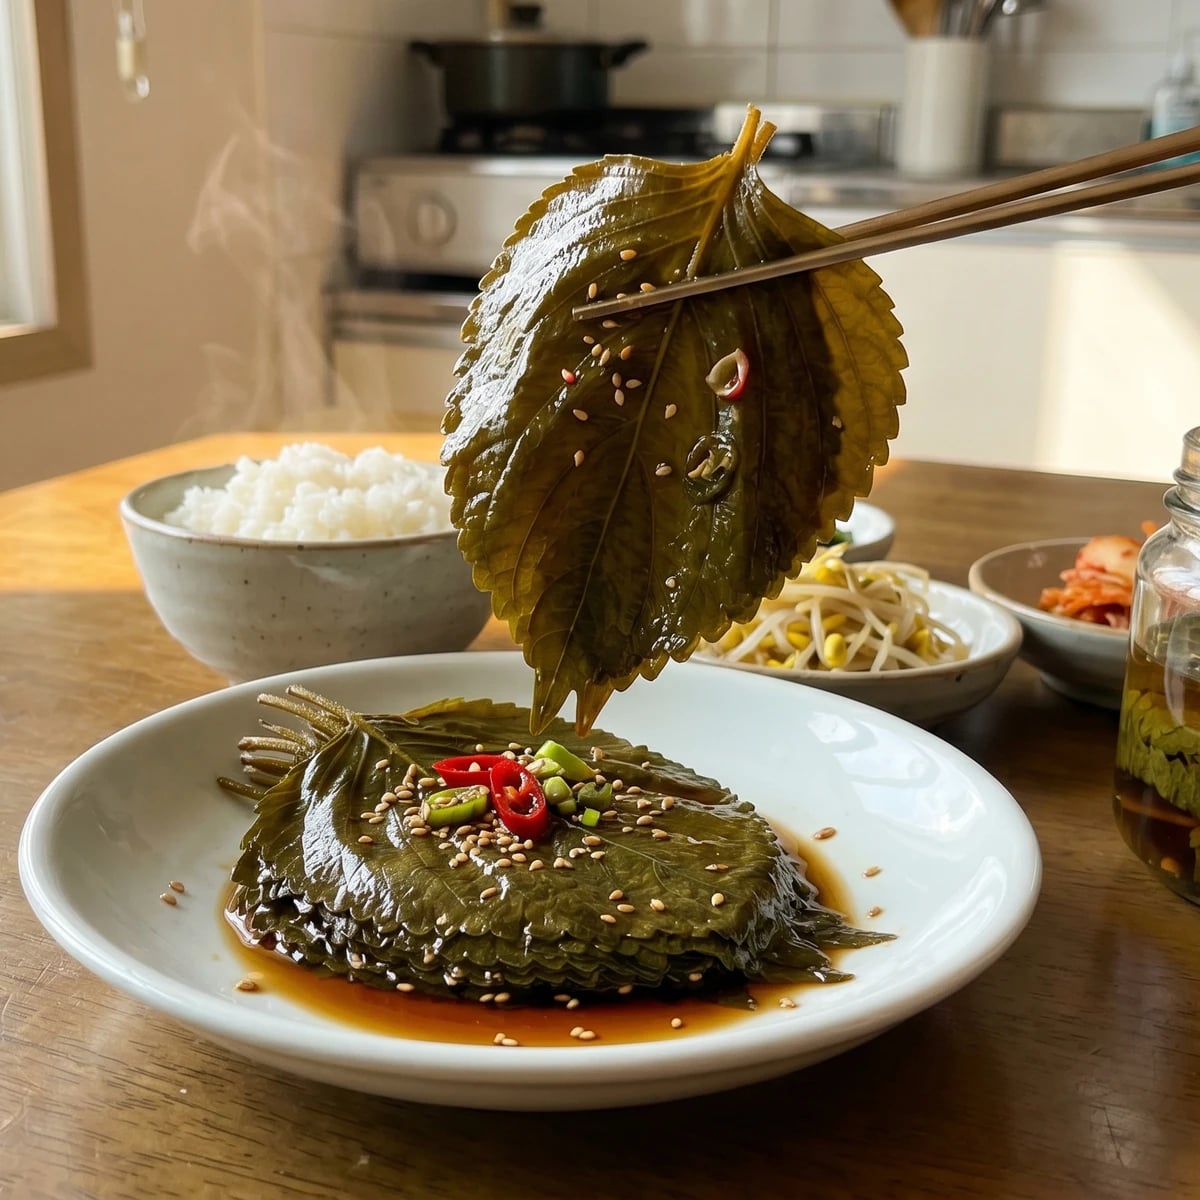
Fragrant perilla leaves layered with soy, garlic, scallion, and chili, then pressed under brine until each leaf becomes a sharp, savory wrap for hot rice.

Sauces & Condiments
Korean
Make Ahead
Budget Friendly
35 min
Active Time
5 min cook24 hr 40 min total
Yield1 quart jar, about 8 banchan servings

Kkaennip is best when the leaves are young and broad, late spring through summer, stacked in market bundles with their stems lined up like someone already meant to pickle them. Cook the month you're standing in. If the leaves are thick and tired, make a different banchan tonight, because jangajji asks the leaf itself to carry the dish.

This is not a loud pickle. Perilla has its own green, peppery perfume, and the soy cure should preserve that, not bury it under sugar or gochujang. You will wash the leaves well, dry them better than you think necessary, layer seasoning between small stacks, and press everything under brine. A leaf that surfaces is a leaf that spoils. My teacher said that once and did not repeat herself.

Eat one leaf at a time wrapped around warm rice, or set it beside grilled fish, barley rice, or a plain bowl of kongnamul-guk (soybean sprout soup). It keeps a table honest. Strong flavor, small portion, no waste. Write down the saltiness of your soy sauce after the first batch, because ganjang (soy sauce) changes by brand and by house, and this pickle remembers every difference.

Jangajji is Korea's broad family of soy, salt, or vinegar pickles, developed as a practical way to preserve vegetables through seasons when fresh produce was limited. Kkaennip, the leaf of Korean perilla, is especially common in home gardens and summer markets, and its strong aroma made it a natural candidate for soy preservation rather than long lactic fermentation like kimchi. Modern refrigerators shortened the curing time and lowered the salt level, but the old rule remains: the leaves must stay submerged under brine.

The technique, the tradition, and the story behind every dish.

Discover Culinary Explorer

Ingredients

fresh perilla leaves (kkaennip)

Quantity

80 leaves, about 4 market bundles

kosher salt

Quantity

1 teaspoon

for washing

Korean soy sauce (ganjang)

Quantity

3/4 cup

water

Quantity

1/2 cup

rice vinegar

Quantity

1/4 cup

maesil-cheong (green plum syrup) or sugar

Quantity

2 tablespoons maesil-cheong or 1 tablespoon sugar

mirin or rice wine

Quantity

2 tablespoons

garlic

Quantity

4 cloves

finely minced

scallions

Quantity

2

finely sliced

Korean green chili or jalapeño

Quantity

1 small

thinly sliced

red chili (optional)

Quantity

1 small

thinly sliced

gochugaru (Korean chili flakes)

Quantity

1 tablespoon

toasted sesame seeds

Quantity

1 tablespoon

Equipment Needed

  • Large bowl for washing greens
  • Clean 1-quart glass or ceramic container with lid
  • Small saucepan
  • Clean small plate, glass weight, or brine-filled zip-top bag for pressing
  • Clean tongs

Instructions

  1. 1

    Wash the leaves

    Fill a large bowl with cold water and the teaspoon of salt. Swish the perilla leaves gently, lifting them out instead of pouring the grit back over them. Change the water once or twice until no sand remains. Perilla leaves have fine fuzz on both sides, and that fuzz holds dirt, so this is not a ceremonial rinse.

  2. 2

    Dry them well

    Shake off the leaves and lay them between clean towels, or spin them gently in a salad spinner and pat them dry. Leave only a little surface dampness. Too much water weakens the brine and invites spoilage; dry leaves cure cleanly and keep their shape.

  3. 3

    Trim the stems

    Line up the leaves in small stacks and trim the stems to about 1/2 inch. Do not cut them off completely. That little stem gives you something to lift later, so the leaf does not tear when you pull one out for rice.

  4. 4

    Boil the brine

    In a small saucepan, combine the soy sauce, water, rice vinegar, maesil-cheong or sugar, and mirin. Bring it just to a boil, stirring to dissolve the sweetener, then turn off the heat. Boiling wakes the brine and dissolves it evenly; cooking it hard for a long time makes the soy taste flat.

    Taste the brine after it cools slightly. It should be saltier than you want to eat by the spoon, because the leaves will dilute and absorb it.
  5. 5

    Season the layers

    Let the brine cool for 10 minutes, then stir in the garlic, scallions, green chili, red chili if using, gochugaru, and toasted sesame seeds. In a clean glass or ceramic container, lay down 4 to 5 perilla leaves at a time, spooning a little seasoned brine over each stack. Do not try to season every single leaf. Small stacks are enough, and they keep the leaves from tearing.

  6. 6

    Press under brine

    Pour in all remaining brine, scraping the garlic and chili over the top. Press the leaves down with a clean small plate, glass weight, or zip-top bag filled with extra brine. Every leaf must sit below the liquid. This is the rule that matters most: a leaf that surfaces is a leaf that spoils.

  7. 7

    Cure and turn

    Cover and refrigerate. After 6 hours, turn the stack once with clean tongs, moving the top leaves to the bottom so the cure reaches evenly. The leaves will darken from bright green to olive and soften into the brine. They are ready after 24 hours, better after 2 days.

  8. 8

    Serve one leaf

    Serve cold or at room temperature, one leaf at a time, with warm rice. Lift by the stem, let the extra brine drip back into the jar, and wrap it around a spoonful of rice. It should taste savory, sharp, a little hot, and still unmistakably like perilla.

Chef Tips

  • Buy leaves that are broad, flexible, and deeply green, with no black spots or dry edges. If the stems are woody, the leaves will be tough after curing. My market rule is simple: if I would not use it for ssam (wraps), I will not pickle it.
  • Do not replace perilla with shiso and expect the same dish. They are relatives, but kkaennip is larger, stronger, and more savory. Shiso can be pickled this way in a small batch, but it will taste brighter and thinner.
  • For longer keeping, pour off the brine after 2 days, bring it back to a boil, cool it completely, and pour it over the leaves again. This old home step tightens the preservation. Keep it refrigerated and use clean chopsticks every time.
  • If your soy sauce is very salty, reduce it to 2/3 cup and increase the water to 7 tablespoons. 손맛 is real; I measure it anyway. The first batch tells you what your bottle of ganjang wants.

Advance Preparation

  • Kkaennip-jangajji needs at least 24 hours in the refrigerator before serving, and the flavor is fuller after 2 days.
  • Stored fully submerged in the refrigerator and handled only with clean utensils, it keeps well for 2 to 3 weeks. Discard it if the brine turns cloudy in an unpleasant way, smells off, or any exposed leaves grow mold.
  • The leaves can be washed and dried earlier in the day. Keep them wrapped in a clean towel in the refrigerator, then layer and brine them at night.

Frequently Asked Questions

Nutrition Information

1 serving (about 85g)

Calories
65 calories
Total Fat
1 g
Saturated Fat
0 g
Trans Fat
0 g
Unsaturated Fat
1 g
Cholesterol
0 mg
Sodium
1400 mg
Total Carbohydrates
10 g
Dietary Fiber
2 g
Sugars
5 g
Protein
3 g

Note: Chef personas and recipes are created with AI assistance. Cook with care: follow safe food-handling practices, check doneness with a thermometer when needed, and adapt for allergies and your kitchen.

Where cooking meets culture.

Culinary guides, cultural storytelling, and the editorial depth that makes cooking meaningful.

Discover Culinary Explorer

More from Jangajji & Jeotgal: The Preserved Pantry

Browse the full collection