Culinary Explorer

A cooking platform built around craft, culture, and the stories behind what we eat.
Discover Culinary Explorer
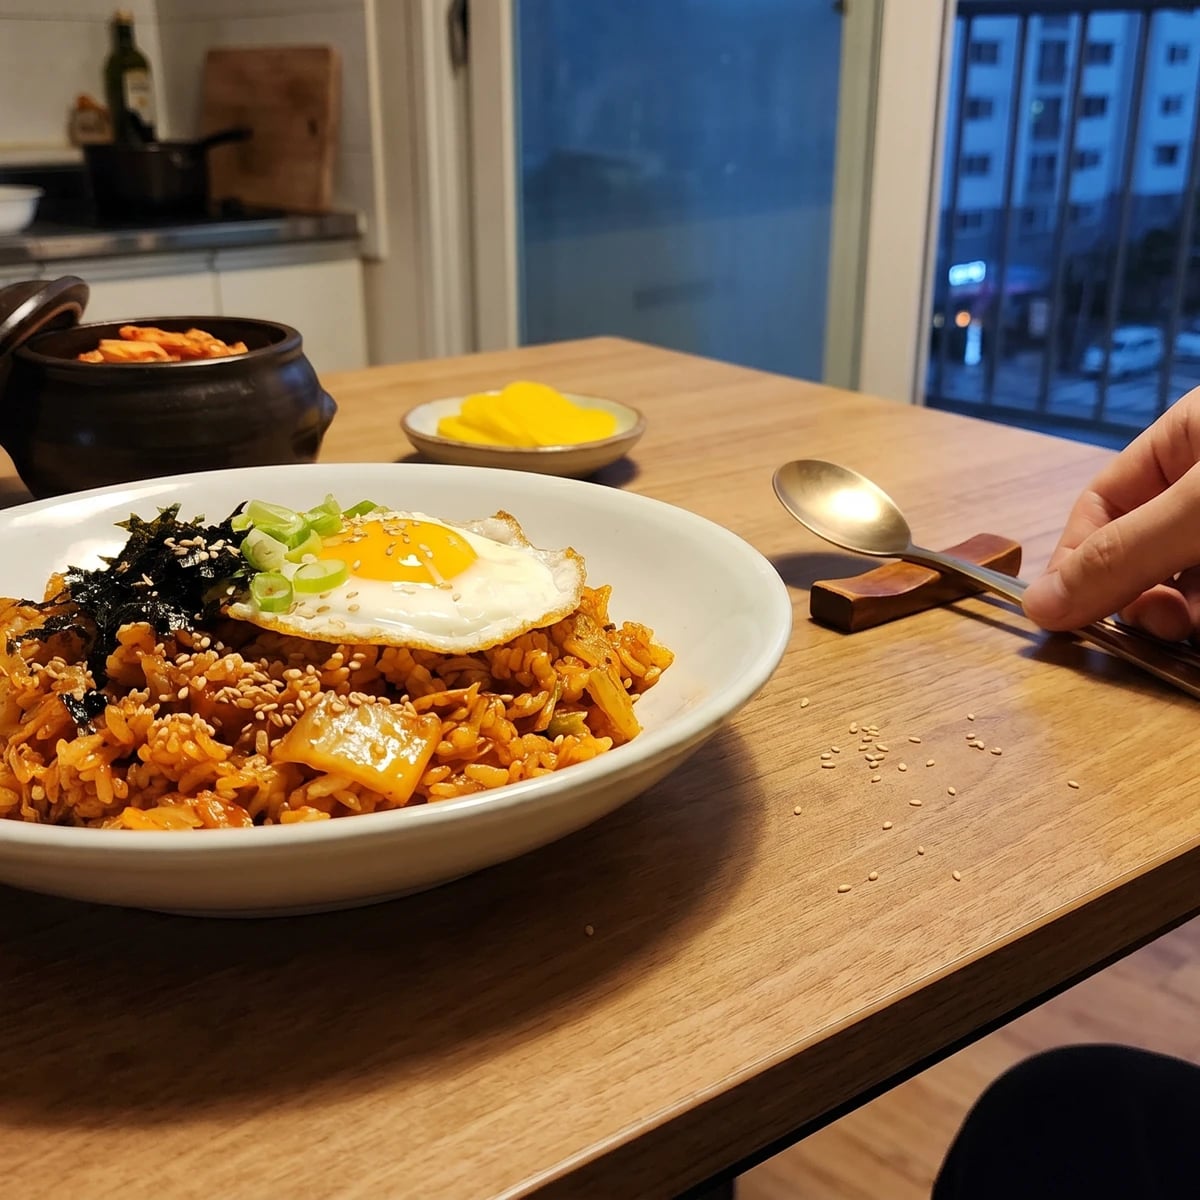
Kimchi-bokkeumbap (Kimchi Fried Rice)

Kimchi-bokkeumbap (Kimchi Fried Rice)

Created by

Sour napa kimchi, cold rice, and a hot pan become the weeknight fried rice that Korean kitchens make when the refrigerator looks empty but the kimchi jar is alive.

Main Dishes
Korean
Weeknight
Budget Friendly
10 min
Active Time
12 min cook22 min total
Yield2 generous servings

Kimchi-bokkeumbap lives or dies by the pan, not by how many things you throw into it. People treat it like a place to hide leftovers, and it can do that, yes, but the rice still has to fry. Wet rice and shy heat give you a red mash. A hot pan, chopped sour kimchi, and cold rice give you separate grains with crisp edges.

This is the dish for the night after the table looks tired. There is half a bowl of rice, a jar of kimchi gone properly sour, a strip of pork belly if the house is lucky, or only an egg if it isn't. That is enough. Old kimchi is not a problem here, it is the reason for the dish. Fresh kimchi tastes too bright and raw; aged kimchi has the acid and depth to season the rice without needing much else.

Notebook 41 says 220 grams of kimchi to 3 cups of cooked rice. More than that and the rice steams instead of fries. Less and you are eating red rice with a memory of kimchi. Squeeze and save the kimchi juice, fry the solids first, then add back only what the rice can carry. 손맛 is real. I still measure it, so it can be handed on.

Kimchi-bokkeumbap is a modern home dish shaped by two Korean pantry habits: keeping fermented kimchi through its sour stage and never wasting cooked rice. Fried rice became common in Korean homes in the twentieth century as cooking oil, gas ranges, and skillet cooking became ordinary, and kimchi gave the form a distinctly Korean backbone. It belongs to the everyday table, not court cooking, and its best versions still begin with well-aged baechu-kimchi from the family jar.

The technique, the tradition, and the story behind every dish.

Discover Culinary Explorer

Ingredients

day-old cooked short-grain rice

Quantity

3 cups

cold, grains loosened by hand

sour napa cabbage kimchi

Quantity

220g

chopped into 1/2-inch pieces

kimchi juice

Quantity

3 tablespoons

saved from the jar, divided

pork belly or bacon (optional)

Quantity

80g

cut into 1/2-inch pieces

neutral oil

Quantity

1 tablespoon

plus more if needed

onion

Quantity

1/2 small

finely diced

scallion

Quantity

1

white and green parts separated, thinly sliced

gochugaru (Korean chili flakes) (optional)

Quantity

1 teaspoon

soy sauce

Quantity

1 teaspoon

toasted sesame oil

Quantity

1 teaspoon

sugar (optional)

Quantity

1/2 teaspoon

only if the kimchi is very sharp

large eggs

Quantity

2

roasted gim (seaweed)

Quantity

1 sheet

crumbled

toasted sesame seeds

Quantity

1 teaspoon

freshly ground black pepper (optional)

Quantity

to taste

Equipment Needed

  • 12-inch wide skillet, wok, or well-seasoned cast-iron pan
  • Rice paddle or firm spatula
  • Small skillet for frying eggs

Instructions

  1. 1

    Ready the rice

    Break up the cold rice with your fingers before the pan goes on the heat. If it is clumped, wet your hands lightly and loosen it grain by grain. Fried rice is fast once it starts, and rice that goes in as lumps stays as lumps.

    Fresh rice can work only if you spread it on a tray for 20 minutes so surface moisture leaves. Day-old rice is better because it fries instead of collapsing.
  2. 2

    Chop and squeeze

    Chop the kimchi into small pieces, then squeeze it lightly over a bowl and save the juice. Do not wring it dry like laundry. You only want enough liquid out so the kimchi can fry first. The saved juice goes back later, measured, when the rice can absorb it.

  3. 3

    Render the pork

    Set a wide skillet or wok over medium-high heat. Add the pork belly or bacon, if using, and cook 3 to 4 minutes until the fat renders and the edges brown. If you are skipping pork, add 1 tablespoon neutral oil and heat it until it moves quickly across the pan. The fat carries the kimchi flavor through every grain.

  4. 4

    Fry the kimchi

    Add the onion, scallion whites, and chopped kimchi. Fry 4 to 5 minutes, stirring often, until the kimchi darkens slightly, smells rounded instead of raw, and any watery liquid has cooked away. Add the gochugaru now if you want deeper color and gentle heat. Do not add gochujang here. It makes the rice heavy and sweet when the kimchi has already done the seasoning work.

  5. 5

    Season the pan

    Push the kimchi to one side and pour the soy sauce onto the bare hot pan. Let it bubble for 5 seconds, then stir it through the kimchi. That quick contact with the metal takes off the raw edge and gives the rice a deeper savor than soy sauce poured over everything at the end.

  6. 6

    Fry the rice

    Add the loosened rice and raise the heat to high. Press and fold for 3 to 4 minutes until the grains are evenly stained red-orange and the rice begins to make a faint crackle against the pan. Add 2 tablespoons of kimchi juice, one tablespoon at a time, only after the rice looks dry enough to take it. If your kimchi is sharply sour, add the 1/2 teaspoon sugar now, not more. The sugar should soften the acid, not make the dish sweet.

  7. 7

    Crisp the bottom

    Spread the rice into an even layer and leave it alone for 60 to 90 seconds. This is where the edges crisp. Stirring without pause makes seasoned rice, not fried rice. Taste one spoonful, then add the last tablespoon of kimchi juice only if the rice needs more sourness and salt.

  8. 8

    Finish cleanly

    Turn off the heat and fold in the sesame oil, scallion greens, and black pepper. Sesame oil goes in off the heat because its fragrance fades when boiled in the pan. Divide the rice between two bowls or plates.

  9. 9

    Fry the eggs

    In a small skillet, fry the eggs sunny-side up until the whites are set and the yolks still run, 2 to 3 minutes. Put one egg on each serving. Scatter with crumbled gim and toasted sesame seeds. Break the yolk at the table and mix only as you eat, so the first spoonful stays bright and the last one turns rich.

Chef Tips

  • Use kimchi that is sour enough to make you blink a little when eaten cold. If yours is still young, leave a measured cup of it on the counter for a few hours, covered, then refrigerate again before cooking.
  • Keep the pan wide. A crowded pan traps moisture, and kimchi already brings plenty. If you double the recipe, cook in two batches or accept softer rice.
  • Tuna from a can, diced spam, or no meat at all are honest weeknight versions. Drain tuna well and add it with the rice. Dice spam small and brown it before the kimchi, the same way you would pork belly.
  • Do not bury the dish under cheese unless that is the version you mean to make. Cheese kimchi-bokkeumbap is its own modern comfort dish, good in its place, but this recipe keeps the sour kimchi as the main voice.

Advance Preparation

  • Cook the rice the day before and refrigerate it uncovered for 30 minutes, then covered overnight. That little drying time matters.
  • Chop the kimchi and save its juice up to 2 days ahead. Keep both refrigerated in a sealed container.
  • Leftovers keep 2 days in the refrigerator. Reheat in a skillet with a few drops of oil so the rice fries again instead of turning soft in a microwave.

Frequently Asked Questions

Nutrition Information

1 serving (about 435g)

Calories
755 calories
Total Fat
29 g
Saturated Fat
8 g
Trans Fat
0 g
Unsaturated Fat
18 g
Cholesterol
215 mg
Sodium
1370 mg
Total Carbohydrates
105 g
Dietary Fiber
5 g
Sugars
6 g
Protein
18 g

Note: Chef personas and recipes are created with AI assistance. Cook with care: follow safe food-handling practices, check doneness with a thermometer when needed, and adapt for allergies and your kitchen.

Where cooking meets culture.

Culinary guides, cultural storytelling, and the editorial depth that makes cooking meaningful.

Discover Culinary Explorer

More from Bap & Bibimbap

Browse the full collection