
Chef Lupita
Almendrados Conventuales Poblanos
Puebla's convent almond cookies, made from blanched almonds, sugar syrup, egg yolks, canela, and patient hands, the kind of sweet that belongs beside coffee in talavera, not in a plastic bakery box.
A cooking platform built around craft, culture, and the stories behind what we eat.
Created by
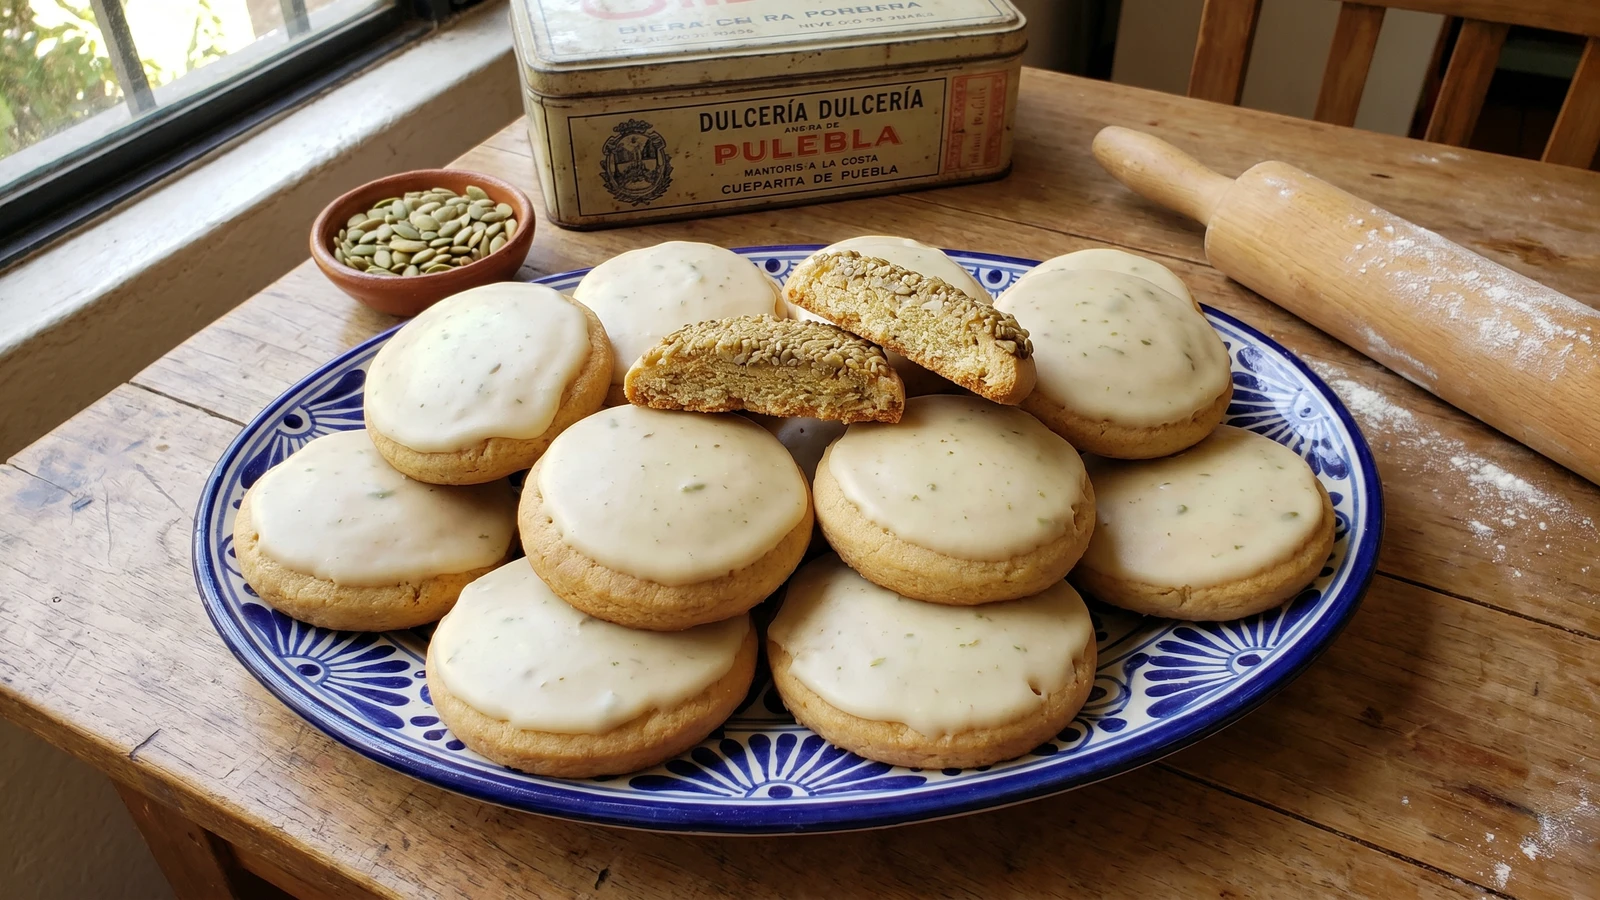
Puebla's convent cookie, a crisp lard-and-wheat tortita capped with sweet pepita glaze, belongs to the city's old convent kitchens and to the talavera plates that still carry it at celebrations.
Puebla, in the central highlands, owns these tortitas. They belong to the city of Puebla, to its convent kitchens, and to the sweet shops around the Centro Historico where talavera is not decoration, it is the plate on the table. This is not food from a single Mexico. Cada estado, su propia cocina, and this cookie is poblana.
Santa Clara's mark is the pepita glaze. Pumpkin seed is old Mexican knowledge; wheat flour, sugar, and pork lard came through the colonial kitchen. The Clarisa nuns put them together with discipline: a thin, sandy base, a raised rim, and a sweet seed paste cooked until it sets like a soft cap. There is no chile here. Not all Mexican food has to shout. Puebla knows restraint.
I learned this version from a señora on 6 Oriente, the Calle de los Dulces, where the counters are full of camotes, muéganos, borrachitos, and these pale tortitas lined up like little convent windows. She watched me roll the dough and told me not to brown the shells. The tortita should break clean under your teeth, then give you that thick, sweet pepita finish. La cocina no es decoración, es trabajo.
The Convento de Santa Clara in Puebla was established in 1607, and its Clarisa nuns became part of the city's powerful convent confectionery tradition alongside Santa Rosa and Santa Monica. Tortitas de Santa Clara show the colonial exchange in one bite: Indigenous calabaza seeds ground into a sweet paste on top of a Spanish-style wheat and lard pastry. By the 19th and 20th centuries, Puebla's Calle de los Dulces had carried these convent sweets out of the cloister and into boxes for baptisms, holidays, visits, and family celebrations.
Quantity
1 1/2 cups
unsalted
Quantity
1/4 teaspoon
for soaking the pepitas
Quantity
4 cups
for soaking the pepitas
Quantity
2 1/2 cups, plus more for rolling
Quantity
1/2 cup
Quantity
1/2 teaspoon
for the dough
Quantity
1/4 teaspoon
Quantity
3/4 cup
cool but pliable
Quantity
2 large
Quantity
1/4 cup, plus 1 to 2 tablespoons if needed
Quantity
1 cup
Quantity
1/2 cup
for the syrup
Quantity
1 small
Quantity
1 cup
Quantity
1/4 teaspoon
for the pepita glaze
Quantity
1/4 teaspoon
| Ingredient | Quantity |
|---|---|
| raw hulled pumpkin seeds (pepitas)unsalted | 1 1/2 cups |
| baking sodafor soaking the pepitas | 1/4 teaspoon |
| waterfor soaking the pepitas | 4 cups |
| all-purpose flour | 2 1/2 cups, plus more for rolling |
| powdered sugar | 1/2 cup |
| fine sea saltfor the dough | 1/2 teaspoon |
| baking powder | 1/4 teaspoon |
| pork lard (manteca de cerdo)cool but pliable | 3/4 cup |
| egg yolks | 2 large |
| cold water | 1/4 cup, plus 1 to 2 tablespoons if needed |
| granulated sugar | 1 cup |
| waterfor the syrup | 1/2 cup |
| Mexican canela stick | 1 small |
| whole milk | 1 cup |
| fine sea saltfor the pepita glaze | 1/4 teaspoon |
| ground anise seed | 1/4 teaspoon |
The night before, combine the raw hulled pepitas, baking soda, and 4 cups water in a bowl. Cover and let them soak for 8 hours. The baking soda loosens the thin green skin that clings to the seed. This is how you get the pale Puebla filling, not a bright green paste that looks like it belongs somewhere else.
Drain the pepitas and rinse them well. Rub them between clean kitchen towels, then pick out the loosened skins. They will not become perfectly white unless you found true pepita blanca from a good vendor, and that is fine. Spread the seeds on a dry towel for 30 minutes so they are no longer wet. Do not toast them. Toasted pepita belongs in moles and pipianes. Santa Clara needs a sweet, clean seed flavor.
Whisk the flour, powdered sugar, salt, and baking powder in a wide bowl. Add the manteca de cerdo and rub it into the flour with your fingertips until the mixture looks like coarse meal. Add the egg yolks and 1/4 cup cold water. Mix just until the dough comes together. If it crumbles dry in your hand, add cold water one tablespoon at a time. Knead three or four times, wrap, and rest for 30 minutes. The lard gives the tortita its sandy break. Butter makes a different cookie. La manteca es el sabor.
Heat the oven to 350F. Roll the dough on a lightly floured table to 1/8 inch thick. Cut 3 1/4-inch rounds and transfer them to parchment-lined baking sheets. Press a smaller cutter, about 2 1/2 inches, lightly into the center of each round to mark a shallow well without cutting through. Pinch the outer edge gently so it stands a little higher, then prick the center with a fork. That rim is not decoration. It holds the pepita glaze.
Bake for 14 to 16 minutes, rotating the pans halfway through, until the shells are dry and just pale gold at the edges. Do not chase a brown cookie. A señora on Puebla's Calle de los Dulces once stopped me for this exact mistake: pale, she said, or ya la regaste. She was right. Let the shells cool completely on the pan.
Put the dried pepitas in a food processor and grind until they look like damp sand. Add the whole milk and blend until you have a thick, smooth paste, scraping the bowl as needed. A metate gives the finest texture. A processor works in a modern kitchen. No me vengas con atajos that change the dish, but a good tool is still a good tool.
Combine the granulated sugar, 1/2 cup water, and canela stick in a heavy saucepan. Bring to a steady boil over medium heat and cook until the syrup reaches 235F, the soft-ball stage, 7 to 9 minutes. If you do not have a thermometer, drop a little syrup into cold water. It should gather into a soft ball between your fingers. Remove and discard the canela.
Lower the heat and stir the pepita-milk paste into the hot syrup. Add the salt and ground anise. Cook, stirring constantly with a wooden spoon, for 6 to 8 minutes, until the glaze thickens, turns glossy, and leaves a clean path on the bottom of the pan for two seconds before closing. If it runs like milk, it is not ready. If it turns grainy, the heat was too high. The texture should mound softly on a spoon.
While the glaze is still warm, spoon 1 to 1 1/2 tablespoons into the center of each baked shell and spread it to the raised rim. Work steadily. If the glaze stiffens before you finish, loosen it over low heat with a spoonful of warm milk or water. Let the tortitas stand at room temperature for at least 1 hour, until the surface sets into a smooth cap.
Arrange the tortitas on a Puebla talavera platter, slightly overlapping, with one broken open so the sandy base and dense pepita topping show. Serve with cafe de olla, chocolate de agua, or nothing at all. They keep in an airtight tin at room temperature for 3 days. Do not refrigerate them. Cold makes the lard pastry dull. Asi se hace y punto.
1 serving (about 60g)
Culinary guides, cultural storytelling, and the editorial depth that makes cooking meaningful.
Discover Culinary ExplorerChef Lupita
Puebla's convent almond cookies, made from blanched almonds, sugar syrup, egg yolks, canela, and patient hands, the kind of sweet that belongs beside coffee in talavera, not in a plastic bakery box.

Chef Lupita
Ciudad de Mexico's panaderia banderillas are long sticks of hojaldre pressed with sugar, baked until amber, and finished with a hard glaze for coffee at the kitchen table.

Chef Lupita
Mérida's pale egg-yolk-and-vanilla kisses, tiny cookies built on eight yolks and a perfume of orange blossom, sandwiched with guava paste and dusted heavy with powdered sugar.

Chef Lupita
Hidalgo's bisquet de nata carries Pachuca's mining history into the breakfast table: a Cornish-style bread softened by Mexican nata, split warm and eaten with café de olla.