Culinary Explorer

A cooking platform built around craft, culture, and the stories behind what we eat.
Discover Culinary Explorer
Shyshky (шишки, wedding pine-cone buns)

Shyshky (шишки, wedding pine-cone buns)

Created by

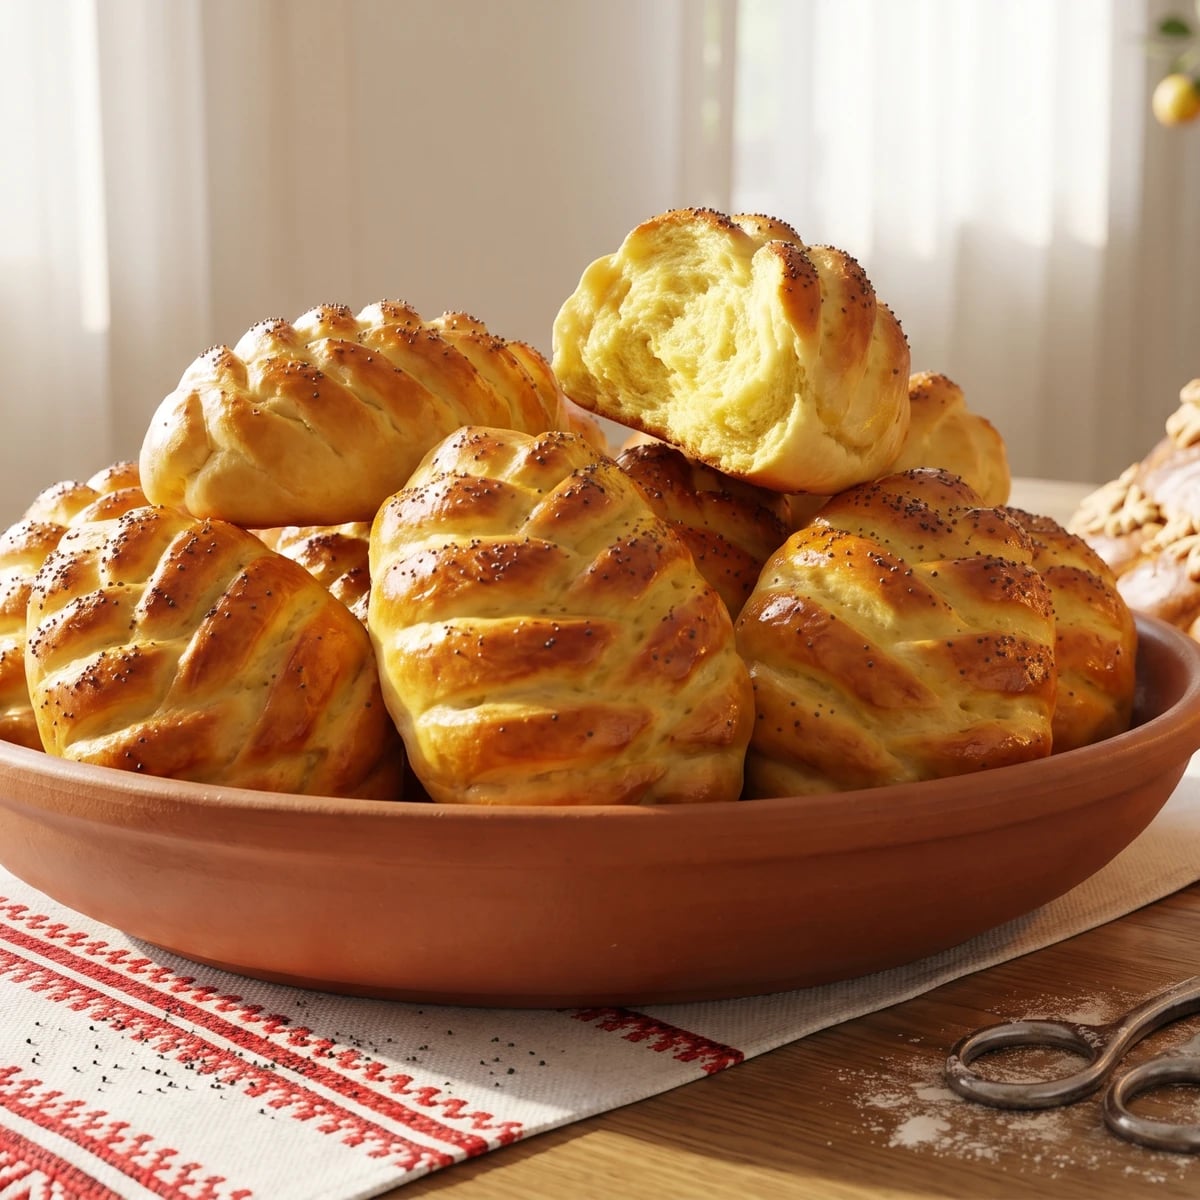
A Ukrainian wedding can start with a small bun in your palm: golden, pinched into pine-cone scales, sweet with milk and egg, carrying the invitation before the feast begins.

Breads
Ukrainian
Special Occasion
Celebration
45 min
Active Time
22 min cook3 hr 37 min total
Yield24 small buns

Awedding can begin with bread small enough to close your fist around. Before the korovai, before the singing, before the long table starts making room for elbows and plates, there is often a shyshka: a little pine cone of enriched dough, pinched scale by scale and sent into someone's hand as a summons. Come. Eat with us. Witness this.

The shape is the dish. You can make any soft milk dough into a bun, but shyshky need those scales, lifted with scissors or pinched fingers so the surface catches egg glaze and bakes sunflower-gold at the edges. Don't rush the dough. It should rise until it feels light and elastic under your hand, not just until the timer says so, because a wedding bread that tears heavy is a sad thing and everyone will pretend not to notice.

Aunt Nadia's letter says only, "make the dough rich enough for guests," which is exactly useful and exactly useless. So I give you butter, egg yolks, milk, and enough sugar to make the crumb tender without turning it into cake. My hands remember the kind of dough that wants to be shaped: soft, warm, a little vain.

Make more than you think. Shyshky travel from table to table, pocket to pocket, child to child, and one always disappears before the bread basket reaches the room.

Shyshky belong to the Ukrainian korovai wedding tradition, especially in central and northern regions where ritual breads were baked by married women whose good fortune was meant to bless the couple. The pine-cone shape carries old fertility symbolism: evergreen, seeded, multiplying, a small edible promise of a household that will grow. In many villages the same enriched dough used for decorating or accompanying the korovai was shaped into shyshky and distributed to invited guests, wedding helpers, and children.

The technique, the tradition, and the story behind every dish.

Discover Culinary Explorer

Ingredients

strong white bread flour

Quantity

500g

plus extra for dusting

whole milk

Quantity

200ml

warm but not hot

dried yeast

Quantity

7g

sugar

Quantity

70g

large eggs

Quantity

2

egg yolks

Quantity

2

unsalted butter

Quantity

80g

softened

unrefined sunflower oil

Quantity

1 tablespoon

plus more for the bowl

fine sea salt

Quantity

1 teaspoon

vanilla sugar or vanilla extract (optional)

Quantity

1 teaspoon vanilla sugar or 1/2 teaspoon extract

egg yolk beaten with milk

Quantity

1 yolk plus 1 tablespoon milk

for glazing

poppy seeds (optional)

Quantity

1 tablespoon

Equipment Needed

  • Large mixing bowl or stand mixer
  • Two lined baking trays
  • Small clean scissors for cutting the scales
  • Pastry brush

Instructions

  1. 1

    Wake the yeast

    Stir the warm milk with the yeast and a spoonful of the sugar, then leave it until the surface looks creamy and a little swollen. If it sits flat and silent, your yeast is tired. Start again now, before the eggs and butter go in.

  2. 2

    Mix the dough

    Put the flour, remaining sugar, and salt in a large bowl. Add the foamy milk, whole eggs, egg yolks, vanilla if using, and sunflower oil, then mix until a rough dough forms. Work in the soft butter a little at a time. At first it will smear and complain, then it will take the butter in and become satin-soft.

    The butter goes in after the dough has begun to form so the flour can drink the milk first. Add all the fat too early and the dough gets lazy under your hands.
  3. 3

    Knead until alive

    Knead by hand for 10 to 12 minutes, or in a mixer until the dough pulls cleanly from the bowl. It should feel soft, elastic, and slightly warm, like something awake. If it sticks badly, dust with flour in teaspoons, not handfuls. Too much flour makes wedding bread sulk.

  4. 4

    Let it rise

    Oil a bowl lightly, turn the dough in it, cover, and leave it in a warm place until doubled and airy. Press a floured finger into it; the dent should come back slowly, not spring shut like a frightened thing. Watch that, not the clock.

  5. 5

    Shape the cones

    Tip the dough out and divide it into 24 pieces, about 40g each if you want them even. Roll each piece into a short oval, fatter at one end and tapered at the other, like a small pine cone. Set them on lined trays with space between them, because they puff more than pride lets on.

  6. 6

    Pinch the scales

    Using small clean scissors, snip shallow V-shaped cuts in staggered rows across each oval, starting near the tapered end and working down. Lift the scissors slightly as you cut so each scale stands proud. Don't cut too deep. You want scales, not a chopped-up bun.

    Dip the scissor tips in flour if they drag. This is the step that makes a shyshka a shyshka, so take your time and make the rows uneven in a living way.
  7. 7

    Prove and glaze

    Cover the shaped buns loosely and let them rise again until puffy and light. The cut scales will open a little, which is what you want. Brush gently with the egg yolk and milk glaze, getting the tops and raised edges without flooding the cuts. Scatter with poppy seeds if you like.

  8. 8

    Bake golden

    Bake at 190C until the buns are deep golden, glossy on the scales, and sound hollow when tapped underneath, about 18 to 22 minutes. The smell will change from milky dough to sweet crust. That is your better signal.

  9. 9

    Cool and share

    Move the shyshky to a rack and let them settle until just warm. Serve piled generously in a basket or around a korovai if you are making the full wedding table. They should tear soft, with a yellow crumb and browned little ridges where the glaze caught.

Chef Tips

  • Small scissors are easier than a knife for the scales. Use clean manicure scissors kept for kitchen work, and flour the tips when the dough gets clingy.
  • The shaping forgives you. Some pine cones will look tidy, some will look like they heard gossip and puffed up. The table needs both.
  • For a bit more modern softness, replace 50ml of the milk with sour cream. It makes the crumb tender and keeps the buns fresher the next day.
  • Do not overflour the dough. It should be soft enough to feel generous under your palms, or the finished shyshky will bake dry.
  • If serving with a wedding bread, pile the buns around the korovai rather than making them precious. They are meant to be taken.

Advance Preparation

  • The dough can rise slowly overnight in the fridge after kneading. Bring it back to room temperature until soft and workable before shaping.
  • Baked shyshky keep well for one day wrapped in a clean towel. Rewarm gently, then brush with a little melted butter if they need waking up.
  • For a wedding table, shape and bake the morning of serving. The scales look best the day they are made.

Frequently Asked Questions

Nutrition Information

1 serving (about 40g)

Calories
140 calories
Total Fat
5 g
Saturated Fat
2 g
Trans Fat
0 g
Unsaturated Fat
3 g
Cholesterol
50 mg
Sodium
110 mg
Total Carbohydrates
19 g
Dietary Fiber
1 g
Sugars
4 g
Protein
4 g

Note: Chef personas and recipes are created with AI assistance. Cook with care: follow safe food-handling practices, check doneness with a thermometer when needed, and adapt for allergies and your kitchen.

Where cooking meets culture.

Culinary guides, cultural storytelling, and the editorial depth that makes cooking meaningful.

Discover Culinary Explorer

More from Ritual & Festive Breads

Browse the full collection