Culinary Explorer

A cooking platform built around craft, culture, and the stories behind what we eat.
Discover Culinary Explorer
Pane di Lariano

Pane di Lariano

Created by

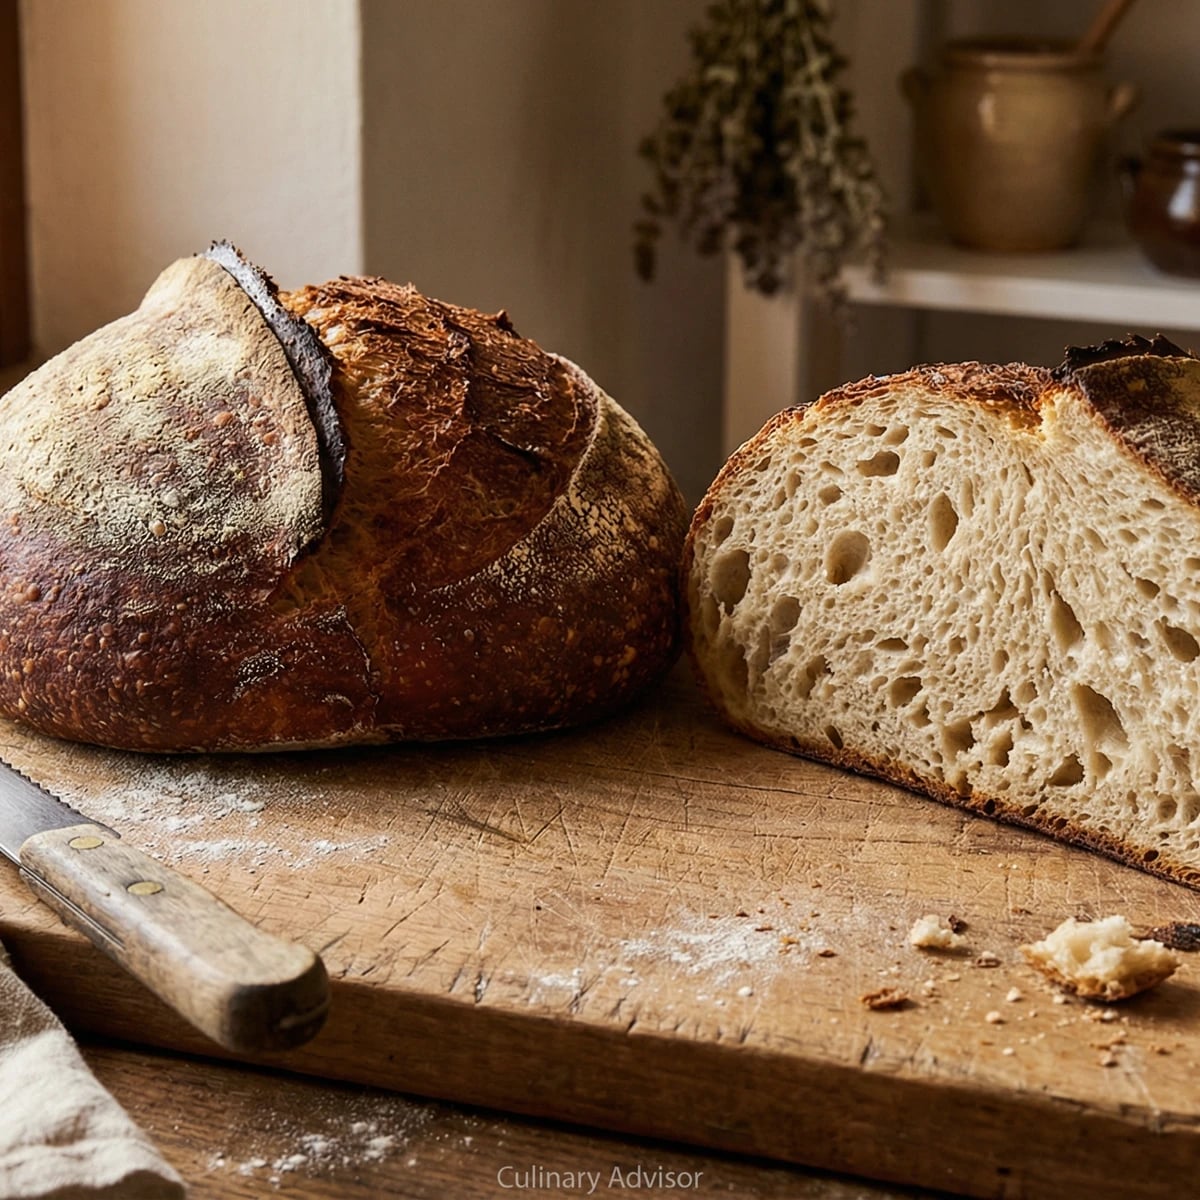
The bread of the Castelli Romani, with a crust like armor and a crumb that stays moist for a week. This is what Romans mean when they speak of bread worth eating.

Breads
Italian, Roman
Make Ahead
Dinner Party
45 min
Active Time
1 hr 15 min cook26 hr total
Yield2 large loaves (about 1 kg each)

In the hills south of Rome, in the town of Lariano, bakers have made this bread since before anyone thought to write down recipes. The women who shaped these loaves did not measure. They knew by the feel of the dough against their hands, by the sound of the crust when tapped, by the way the crumb tore when pulled. You will learn to know these things too.

This is not a bread for the impatient. The dough ferments slowly, developing the complex sourness that distinguishes true sourdough from the imposters. The loaves are large because they must be: the thick crust that forms in a proper oven would overwhelm a small loaf. Inside, the crumb stays moist for days, improving in flavor as the starches continue to change.

Americans expect bread to be soft. They expect it the day it is baked. Pane di Lariano asks you to wait. Cut into it on the second day and you will understand. By the third day, the flavor has deepened into something that makes you reconsider everything you thought you knew about bread. What you keep out, the preservatives and the dough conditioners, is as significant as what you put in.

Lariano's bakers have produced this bread since Roman times, when the town supplied loaves to travelers on the Via Appia. The tradition nearly died in the 1970s as industrial bakeries spread, but a consortium of local bakers revived the ancient methods. Today, authentic Pane di Lariano carries a protected designation, though the bread's fame extends far beyond official recognition.

The technique, the tradition, and the story behind every dish.

Discover Culinary Explorer

Ingredients

active sourdough starter

Quantity

200g

100% hydration, fed within 8 hours

bread flour

Quantity

800g

12-13% protein content

whole wheat flour

Quantity

200g

water

Quantity

700g

at room temperature

fine sea salt

Quantity

22g

Equipment Needed

  • Large mixing bowl
  • Bench scraper
  • Two 9-inch proofing baskets (bannetons) or bowls with floured towels
  • Heavy 5-quart Dutch oven with lid
  • Razor blade or sharp knife for scoring
  • Instant-read thermometer
  • Wire cooling rack

Instructions

  1. 1

    Mix the dough

    In a large bowl, combine the flours and water. Mix with your hands until no dry flour remains. The dough will be shaggy and rough. This is correct. Cover with a damp cloth and let rest for 45 minutes to one hour. This autolyse allows the flour to hydrate fully and begins gluten development before you add the salt, which would otherwise tighten the proteins too soon.

    The water temperature matters. In summer, use cold water to slow fermentation. In winter, use water slightly warm to the touch. The dough should feel comfortable against your skin, neither cold nor warm.
  2. 2

    Add starter and salt

    Add the sourdough starter and salt to the rested dough. Squeeze the dough through your fingers repeatedly until the starter is fully incorporated. This takes several minutes. The dough will become sticky and resistant, then smooth out. When you can no longer see streaks of starter, the mixing is complete.

  3. 3

    Develop the gluten

    Over the next three hours, perform four sets of stretch and folds. Wet your hands, slide them under one side of the dough, stretch it upward, and fold it over itself. Rotate the bowl 90 degrees and repeat. Complete four folds, rotating each time. Cover and wait 45 minutes before the next set. By the final set, the dough should feel cohesive and spring back when poked.

  4. 4

    Bulk fermentation

    After the final fold, leave the dough covered at room temperature until it has increased in volume by roughly 50 percent and shows bubbles on the surface and sides. This takes 4 to 6 hours depending on the temperature of your kitchen and the vigor of your starter. Do not rush this. The flavor develops here.

    In a warm kitchen above 76°F, the dough may ferment too quickly, producing an overly sour, slack loaf. Move it to a cooler spot or refrigerate for part of the bulk fermentation.
  5. 5

    Divide and preshape

    Turn the dough onto a lightly floured surface. Divide it in half. Each piece should weigh approximately 950 grams. Working with one piece at a time, use a bench scraper to fold the edges toward the center, then flip it seam-side down. Cup your hands around the dough and drag it toward you, allowing the friction against the counter to create surface tension. The dough should form a rough round. Let rest uncovered for 30 minutes.

  6. 6

    Final shaping

    Flour the top of each round lightly. Flip one over so the floured side is down. Stretch the bottom edge away from you, then fold it up to the center. Stretch each side and fold to the center. Finally, stretch the top edge and roll the dough toward you, creating a tight cylinder with a seam along the bottom. Cup your hands and roll gently to seal. The loaf should be oblong, about 25 centimeters long.

    Traditional Pane di Lariano is round, not oblong. Shape yours as a boule if you prefer: after the preshape rest, simply repeat the cupping motion until the surface is taut and smooth, then invert into the proofing basket seam-side up.
  7. 7

    Cold proof overnight

    Place each shaped loaf seam-side up in a well-floured proofing basket or a bowl lined with a heavily floured kitchen towel. Cover loosely with plastic or a damp cloth and refrigerate for 12 to 18 hours. This slow, cold fermentation develops the complex flavors that distinguish this bread from ordinary loaves.

  8. 8

    Prepare the oven

    One hour before baking, place a Dutch oven or heavy lidded pot in your oven. Heat to 500°F (260°C) or as high as your oven allows. The pot must be blazing hot. The initial blast of heat creates the thick crust that defines this bread. A home oven cannot replicate a wood-fired oven, but this method comes closest.

  9. 9

    Score and bake covered

    Remove one loaf from the refrigerator. Invert it onto a piece of parchment paper. The dough should feel pillowy and spring back slowly when pressed. Using a razor blade or very sharp knife, score the top with one decisive slash about half an inch deep. Carefully lower the loaf, parchment and all, into the screaming hot pot. Cover immediately. Bake for 25 minutes.

    The lid traps steam from the dough, allowing the crust to stay flexible while the loaf expands. This creates the dramatic ear along the score and the blistered, crackling crust. Without this steam, the crust sets too soon and the loaf cannot reach its full volume.
  10. 10

    Finish uncovered

    Remove the lid. Reduce oven temperature to 450°F (230°C). Continue baking until the crust is deeply browned, almost mahogany, and the loaf sounds hollow when tapped on the bottom. This takes another 25 to 35 minutes. Do not underbake. The thick crust requires time to develop. Internal temperature should reach 210°F (99°C).

  11. 11

    Cool completely

    Transfer the loaf to a wire rack and let it cool completely before cutting. This takes at least two hours, preferably longer. The bread continues cooking as it cools, and the crumb sets. Cut too soon and the interior will be gummy. Repeat with the second loaf, reheating the pot for 15 minutes before loading.

Chef Tips

  • Your sourdough starter must be vigorous and active, doubling within 6 to 8 hours of feeding. A sluggish starter produces a dense, overly sour loaf. If your starter is not reliable, feed it twice daily for a week before attempting this bread.
  • The hydration is high at 70 percent. If you are new to sourdough, reduce the water to 650 grams until your hands learn to manage wet dough. The crumb will be slightly tighter but the bread will still be excellent.
  • Traditional Lariano bakers use a blend of tipo 1 and tipo 2 flours, coarser than American bread flour but finer than whole wheat. The combination here approximates that texture. If you can find Italian tipo 1 flour, use 600g tipo 1 and 400g bread flour.
  • This bread improves dramatically on the second and third day. Store it cut-side down on a board, not in plastic, which softens the crust. In a cool kitchen, it remains excellent for five days.

Advance Preparation

  • Feed your sourdough starter 8 to 12 hours before mixing the dough. It should be at peak activity when you add it.
  • The shaped loaves can remain in the refrigerator for up to 24 hours before baking. A longer cold proof deepens the sour flavor.
  • Baked loaves freeze well for up to two months. Thaw at room temperature, then refresh in a 350°F oven for 10 minutes to restore the crust.

Frequently Asked Questions

Nutrition Information

1 serving (about 60g)

Calories
120 calories
Total Fat
0 g
Saturated Fat
0 g
Trans Fat
0 g
Unsaturated Fat
0 g
Cholesterol
0 mg
Sodium
260 mg
Total Carbohydrates
24 g
Dietary Fiber
1 g
Sugars
0 g
Protein
4 g

Note: Chef personas and recipes are created with AI assistance. Cook with care: follow safe food-handling practices, check doneness with a thermometer when needed, and adapt for allergies and your kitchen.

Where cooking meets culture.

Culinary guides, cultural storytelling, and the editorial depth that makes cooking meaningful.

Discover Culinary Explorer

More from Chef Graziella's Italian Bread Collection

Browse the full collection