Culinary Explorer

A cooking platform built around craft, culture, and the stories behind what we eat.
Discover Culinary Explorer
Marmita PF Montada

Marmita PF Montada

Created by

You don't need talent to feed yourself all week. You need rice, beans, chicken, greens, and one quiet Sunday hour that turns tired Tuesdays into comida de verdade.

Main Dishes
Brazilian
Meal Prep
Batch Cooking
Make Ahead
35 min
Active Time
1 hr 40 min cook2 hr 15 min total
Yield6 marmitas

You know that little voice saying, isso não é pra mim, I can't be the person with lunch ready in the freezer? I know that voice. I had a cheap caderno, burned onions, and a lot of embarrassment before I could feed myself properly. Cozinhar não é dom, é um aprendizado. Anota aí.

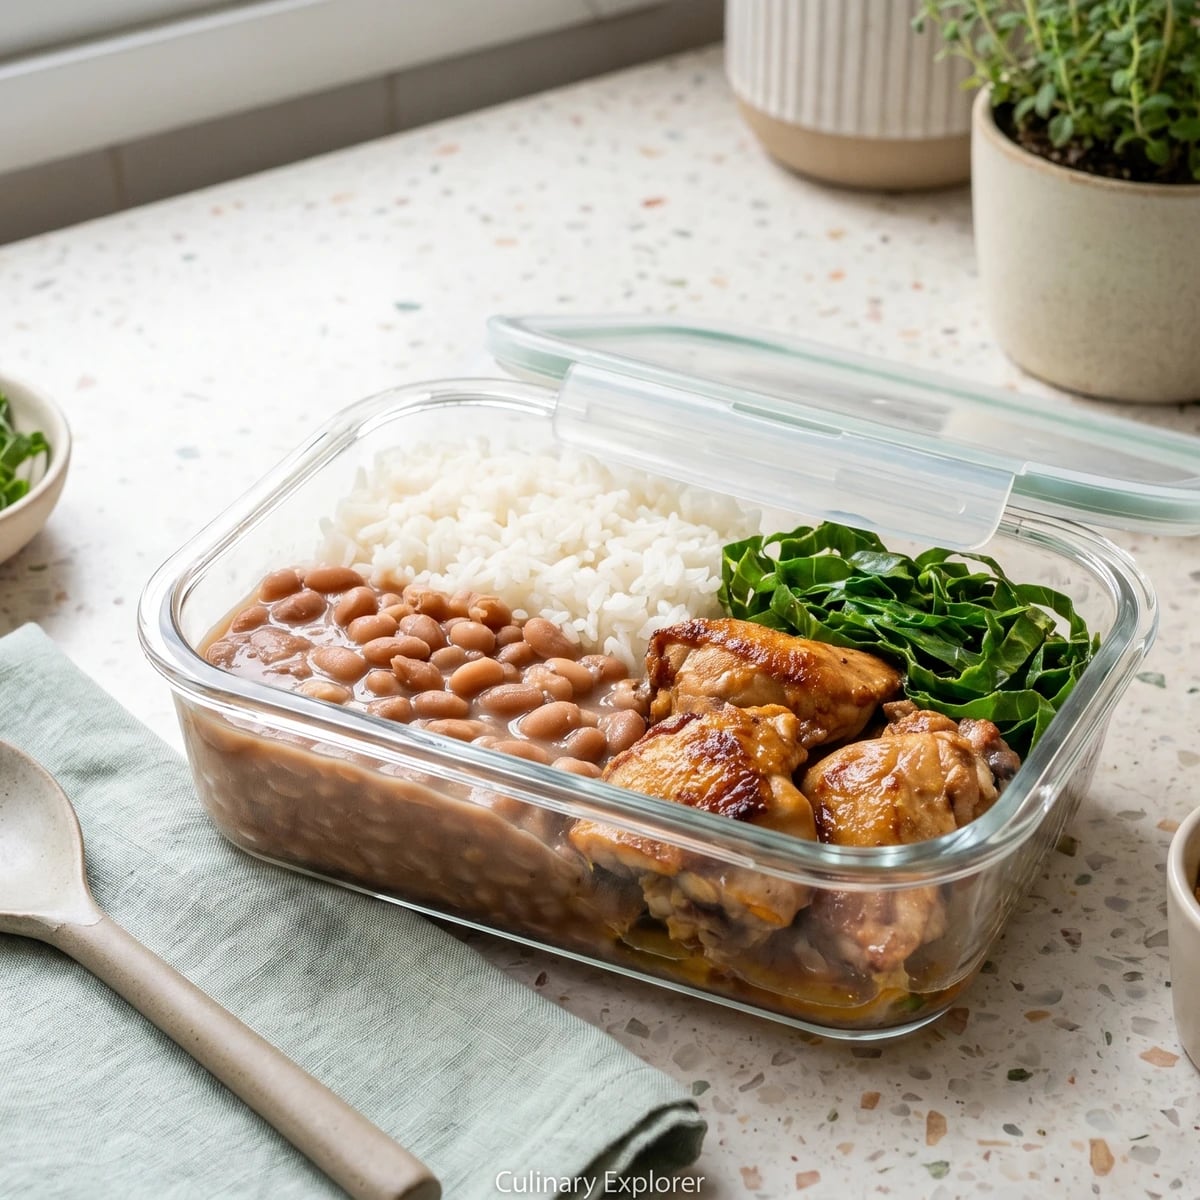
A marmita PF is the everyday Brazilian plate packed for later: arroz soltinho, feijão cremoso, something browned in the pan, and something green. It's not sad meal prep. It's the pê-efe doing what it has always done, solving dinner and lunch with ordinary food that behaves when you teach it properly.

The method matters because each part has a job. Soak the beans so they cook evenly and sit easier. Build a real refogado so the pot tastes like home, not like a packet. Mash one ladle of beans into that refogado so the caldo turns creamy instead of watery. Brown the chicken in batches so it gets color instead of steaming itself grey in a crowded pan. Cook the rice once, then leave it alone, because stirring rice is how good intentions become glue.

By the end, you portion everything warm, cool it safely, and freeze the plate that will rescue you when Tuesday arrives tired and shameless. This is comida de verdade with a lid on it.

The prato feito, often shortened to PF, became the everyday urban lunch of Brazil's bars, lunch counters, and home kitchens in the twentieth century: rice, beans, a main item, salad or greens, and often farofa. The marmita, carried to work by students, office workers, construction crews, and families managing the week, turned that same plate into a portable system. Its history is less about one inventor and more about the Brazilian table adapting to workdays without giving up rice and beans.

The technique, the tradition, and the story behind every dish.

Discover Culinary Explorer

Ingredients

dried carioca beans

Quantity

2 cups

soaked overnight

water for the beans

Quantity

8 cups, plus more as needed

bay leaves

Quantity

2

oil

Quantity

5 tablespoons

divided

onions

Quantity

2 medium

finely chopped, divided

garlic

Quantity

8 cloves

minced, divided

salt for the beans

Quantity

2 teaspoons, plus more to taste

long-grain white rice

Quantity

2 cups

hot water for the rice

Quantity

4 cups

boneless chicken thighs

Quantity

1 1/2 pounds

cut into bite-size pieces

lime juice

Quantity

1 tablespoon

salt for the chicken

Quantity

1 teaspoon

black pepper

Quantity

1/2 teaspoon

sweet paprika or colorau

Quantity

1 teaspoon

water for deglazing

Quantity

1/2 cup

collard greens

Quantity

2 bunches

stems removed and leaves thinly sliced

butter or oil for the greens

Quantity

1 tablespoon

farofa (optional)

Quantity

1/2 cup

lime wedges or orange wedges (optional)

Quantity

6

Equipment Needed

  • Heavy 4-liter pot for beans
  • Medium 2-liter pot with lid for rice
  • Wide 30 cm skillet for browning chicken
  • Large skillet for greens
  • 6 freezer-safe containers, 3-cup capacity each

Instructions

  1. 1

    Soak the beans

    Put the beans in a bowl, cover with plenty of water, and soak for at least 8 hours. They should look plumper and a little wrinkled by morning. This isn't fussiness: soaked beans cook more evenly and sit easier in your stomach, which matters when you're eating them all week.

  2. 2

    Cook the beans

    Drain the soaked beans and put them in a heavy pot with 8 cups water and the bay leaves. Bring to a boil, then lower to a gentle simmer with the lid slightly open. Cook until a bean crushes easily against the roof of your mouth, about 1 to 1 1/2 hours. If the water drops below the beans, add more hot water. Dry beans scorch, and scorched beans are a grudge in a pot.

    No seasoning packet. The packet is salt and powder wearing a little costume. A real refogado will give you better flavor and teach your hand what good beans need.
  3. 3

    Build the refogado

    Warm 2 tablespoons oil in a small pan over medium heat. Add half of one chopped onion and cook until soft and see-through, about 5 minutes. Add 3 minced garlic cloves and cook for 1 minute, just until you smell it. Garlic burns fast and turns bitter, so stay there. This base is where the beans become feijão, not just beans in water.

  4. 4

    Thicken the caldo

    Scoop one ladle of cooked beans and liquid into the refogado and mash it hard with a spoon. Stir this mashed mixture back into the pot, add 2 teaspoons salt, and simmer 10 minutes. The mashed beans thicken the caldo naturally, making it glossy and creamy instead of watery. No powder doing a bean's job.

  5. 5

    Make arroz soltinho

    Warm 1 tablespoon oil in a medium pot. Add the remaining half onion and cook until it murcha, soft and translucent, about 4 minutes. Add 2 minced garlic cloves and stir for 1 minute. Add the rice and stir for 2 minutes, until the grains look shiny and separate. Pour in 4 cups hot water and 1 teaspoon salt, bring to a boil, then lower the heat, cover, and cook 15 minutes. Turn off the heat and rest 10 minutes before fluffing. Don't stir while it cooks. Stirring releases starch, and starch is how fluffy rice turns into paste.

  6. 6

    Season the chicken

    Toss the chicken with lime juice, 1 teaspoon salt, black pepper, paprika or colorau, and 2 minced garlic cloves. Let it sit while the rice rests, about 10 minutes. That's enough time for the surface seasoning to do its work without turning this into a project.

  7. 7

    Brown in batches

    Heat 2 tablespoons oil in a wide pan until it looks loose and shiny. Add the chicken in batches, leaving space between the pieces, and cook until deeply browned on both sides, about 3 minutes per side. Pull each batch out before adding the next. I know dumping it all in feels efficient. Don't. Crowd the pan and the chicken releases water, the heat drops, and you're steaming grey pieces instead of dourar, building color and flavor.

  8. 8

    Finish the chicken

    Return all the chicken to the pan. Add 1/2 cup water and scrape the browned bits from the bottom with a spoon. Simmer 5 to 8 minutes, until the chicken is cooked through and the pan liquid turns glossy and coats the pieces. Those brown bits are flavor you already paid for, so bring them back into the food.

  9. 9

    Refogar the greens

    Warm 1 tablespoon butter or oil in a large pan. Add the remaining 3 minced garlic cloves and stir for 30 seconds, then add the sliced collards with a pinch of salt. Toss until the greens turn bright, glossy, and just tender, about 3 minutes. Stop there. Cook them too long and they go dull and tired, and a gente didn't do all this work to put sad greens in a good marmita.

  10. 10

    Assemble the marmitas

    Set out 6 freezer-safe containers. Add about 3/4 cup rice to each one, then 1/2 cup beans with caldo, a portion of chicken, and a portion of greens. Keep farofa in a separate little container if using, because frozen farofa loses its crunch. The plate should look like a PF, not a pile: rice, beans, browned chicken, green. Order helps you eat well even when you're tired.

  11. 11

    Cool and store

    Let the open containers cool until they are no longer hot to the touch, about 20 to 30 minutes, then lid them and refrigerate or freeze. Don't leave them sitting out all afternoon while you admire your organization. Food safety is not decoration. Refrigerate what you'll eat within 4 days and freeze the rest for up to 3 months.

  12. 12

    Reheat properly

    Reheat from chilled with the lid loose until hot all the way through, adding a spoonful of water over the rice or beans if they look dry. From frozen, thaw overnight in the fridge or reheat gently in stages. The water brings back moisture, because freezing and reheating steal it. Finish with the lime or orange wedge if using, and add farofa after heating.

Chef Tips

  • Make the beans first, because they take the longest and forgive you the most. While they simmer, cook the rice, slice the greens, and season the chicken. That's not chef magic. That's just using the waiting time.
  • Chicken thighs are friendlier for marmita than breast. They stay juicier after freezing and reheating. Use breast if that's what you have, but cook it a little less aggressively or it'll turn dry and start acting superior.
  • The honest shortcut: use canned beans on a desperate Tuesday, rinse them, simmer with bay leaf, and still build the refogado. It won't taste like a slow pot, but it will be real food. The packet pretending to season dinner can stay on the shelf.
  • Keep farofa separate until serving. In the container, it drinks moisture and gives up. On top after reheating, it brings crunch back to the plate.
  • Swap the chicken for a fried egg only if you're eating the marmita fresh, not freezing it. Eggs are wonderful, but frozen reheated egg is not my fight today.

Advance Preparation

  • Soak the beans overnight, at least 8 hours, before cooking.
  • Cooked beans can be made up to 3 days ahead and refrigerated, or frozen in portions for up to 3 months.
  • Assembled marmitas keep 4 days in the refrigerator or up to 3 months in the freezer.
  • Slice the collards and chop onions and garlic the day before if you want Sunday to move faster. Store them covered in the refrigerator.

Frequently Asked Questions

Nutrition Information

1 serving (about 570g)

Calories
825 calories
Total Fat
25 g
Saturated Fat
6 g
Trans Fat
0 g
Unsaturated Fat
19 g
Cholesterol
120 mg
Sodium
1400 mg
Total Carbohydrates
107 g
Dietary Fiber
16 g
Sugars
3 g
Protein
43 g

Note: Chef personas and recipes are created with AI assistance. Cook with care: follow safe food-handling practices, check doneness with a thermometer when needed, and adapt for allergies and your kitchen.

Where cooking meets culture.

Culinary guides, cultural storytelling, and the editorial depth that makes cooking meaningful.

Discover Culinary Explorer

More from The Everyday Plate: Arroz, Feijão & Refogado

Browse the full collection