Culinary Explorer

A cooking platform built around craft, culture, and the stories behind what we eat.
Discover Culinary Explorer
Kritiko Paximadi (Κρητικό Παξιμάδι) - Cretan Barley Sourdough Rusk

Kritiko Paximadi (Κρητικό Παξιμάδι) - Cretan Barley Sourdough Rusk

Created by

Crete's barley paximadi is bread made for keeping: sourdough, barley flour, a firm bake, then a slow second drying until it waits for water, tomato, and oil.

Breads
Greek
Make Ahead
Budget Friendly
Meal Prep
30 min
Active Time
3 hr cook15 hr 30 min total
Yield10 large rusks

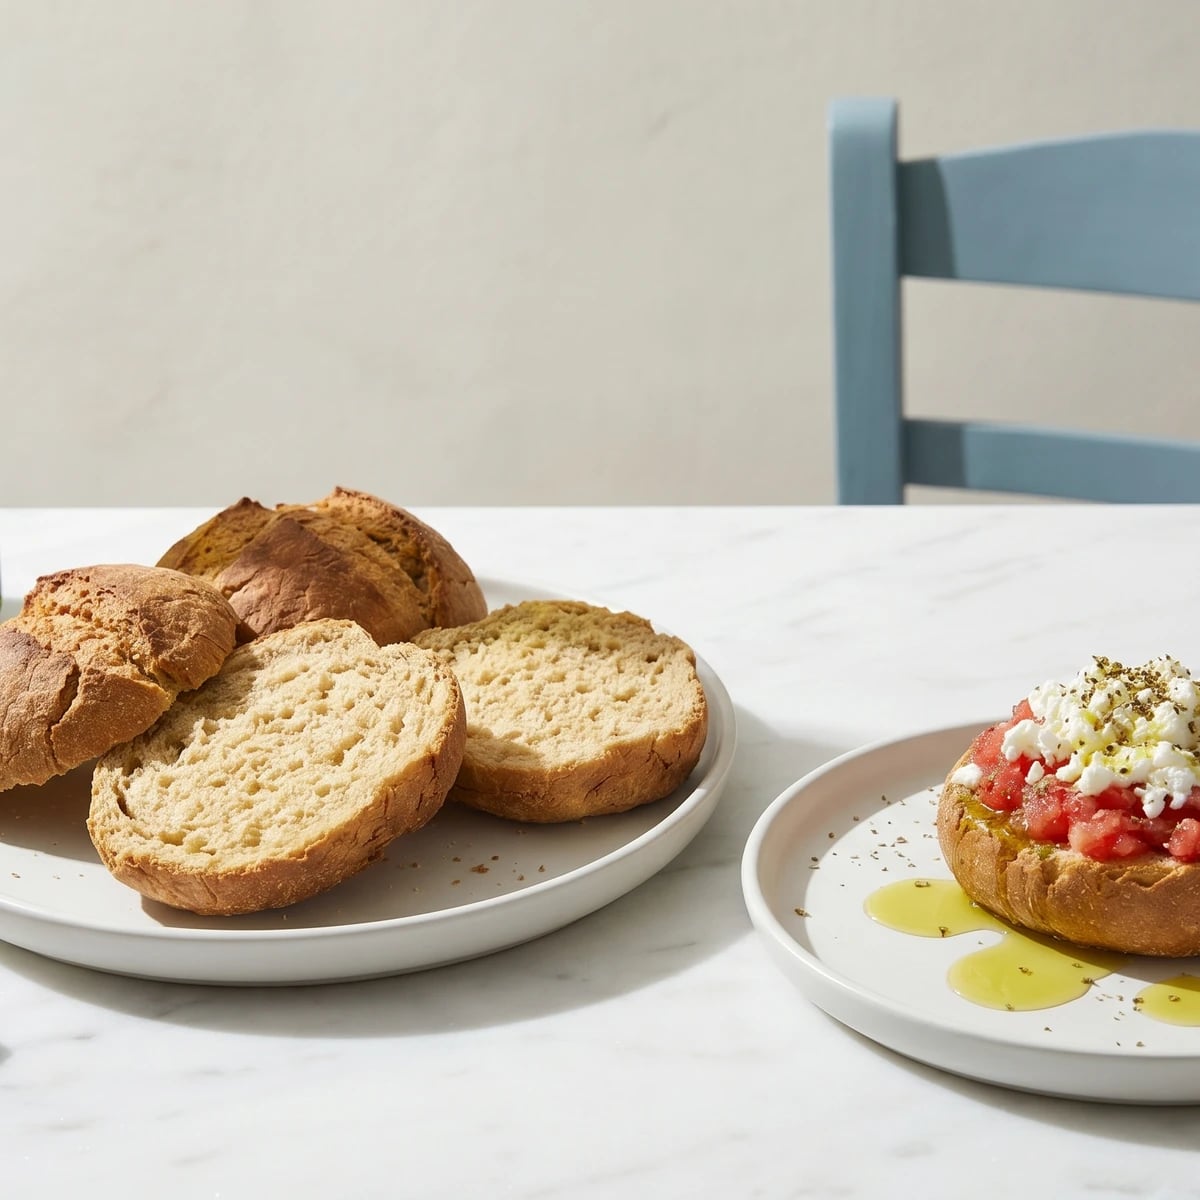
Kritiko paximadi is Crete's barley rusk, the bread that became harder so it could last longer. It is not a cracker and not a biscuit. It is sourdough bread, shaped low and sturdy, baked once to set, then baked again until dry enough to keep for weeks in a tin or cloth sack.

The method that decides it is the second bake. Dry it low and long until the cut face is pale, sandy, and hard all the way through. If the center keeps even a little softness, the rusk will stale badly or grow mold instead of keeping. Dip it quickly in water before serving and it comes back to life, just enough to drink tomato juice and green-gold olive oil without collapsing.

For dakos, I wet one paximadi under the tap for a breath, then pile it with grated ripe tomato, fresh mizithra or xinomizithra, oregano, olives, and oil. Λίγα και καλά. A few things, and good ones. The region is the dish's surname, and Crete knew how to make bread for shepherds, sailors, and anyone whose meal had to wait.

Cretan paximadi belongs to an older bread economy built around barley, the grain that tolerated the island's dry fields better than wheat. Rusks were baked and dried so they could travel with shepherds, sailors, and farm workers, then softened with water, tomato, oil, or broth at the table. The round barley rusk used for dakos, often called kritharokouloura, is one of Crete's clearest examples of bread made for storage before daily baking was possible.

The technique, the tradition, and the story behind every dish.

Discover Culinary Explorer

Ingredients

active sourdough starter

Quantity

200g

100% hydration, bubbly and recently fed

lukewarm water

Quantity

350g

barley flour

Quantity

300g

finely milled

strong bread flour

Quantity

300g

whole wheat flour

Quantity

150g

extra virgin olive oil

Quantity

20g

fine sea salt

Quantity

14g

barley flour (optional)

Quantity

as needed

for dusting

Equipment Needed

  • two rimmed baking trays, about 30 x 40cm
  • serrated bread knife
  • wire cooling rack

Instructions

  1. 1

    Mix the dough

    Stir the sourdough starter into the lukewarm water until cloudy. Add the barley flour, bread flour, whole wheat flour, olive oil, and salt. Mix until no dry flour remains. The dough will feel dense and a little rough because barley has little gluten, so don't expect a silky wheat dough.

  2. 2

    Rest and fold

    Cover the bowl and rest the dough for 30 minutes. With wet hands, fold the edges into the center 8 to 10 times, turning the bowl as you go. You are building just enough strength for low, firm rings, not a high loaf.

  3. 3

    Ferment slowly

    Cover and let the dough rise at room temperature for 4 to 6 hours, until it looks slightly puffed and smells pleasantly sour. It will not double like white bread. Barley keeps it modest, and that is correct.

  4. 4

    Shape the rusks

    Lightly flour the bench with barley flour. Divide the dough into 10 pieces of about 100g each. Shape each piece into a thick ring or low round, about 10cm across, pressing a hole through the center if making rings. Set them on two lined baking trays with space between them.

  5. 5

    Proof the shapes

    Cover with a clean cloth and proof for 1 1/2 to 2 hours, until the rings look fuller and a finger pressed gently into the side leaves a slow mark. They should still feel firm. If they overproof, they spread and bake weak.

  6. 6

    Bake once

    Heat the oven to 200 C. Bake the rings for 25 to 30 minutes, until lightly browned and set through. Transfer them to a rack and let them cool for 20 minutes, just until you can handle them without breaking your fingers on hot bread.

  7. 7

    Split the bread

    Use a serrated knife to split each ring horizontally into two halves. Work slowly. The first bake gives you bread; this cut opens the crumb so the second bake can dry it properly.

  8. 8

    Dry the rusks

    Lower the oven to 120 C. Arrange the halves cut-side up and bake for 1 1/2 to 2 hours, turning the trays once, until the rusks are hard, dry, and pale through the middle. This is the whole point. A paximadi that keeps must be dry to its heart.

    Break one test rusk. If the center bends or feels cool and damp, keep drying. Color is less important than dryness.
  9. 9

    Cool and store

    Turn off the oven, crack the door, and leave the rusks inside for 30 minutes. Cool completely on a rack before storing in a tin or cloth bag. Serve by dipping briefly in water, then dressing for dakos with tomato, mizithra, oregano, olives, and olive oil.

Chef Tips

  • Use real barley flour, not only whole wheat. The barley is what gives Cretan paximadi its earthy flavor and dry, thirsting crumb.
  • Don't rush the second bake. A slightly under-dried rusk is not kinder or more tender; it simply won't keep.
  • For dakos, wet the paximadi quickly, then wait a minute before topping. It should soften at the surface and stay sturdy underneath.

Advance Preparation

  • Feed the sourdough starter 6 to 8 hours before mixing so it is active and bubbly.
  • The rusks keep for 4 to 6 weeks in a dry tin once fully cooled.
  • For meal prep, bake and dry the rusks on one day, then dress them for dakos only when serving.

Frequently Asked Questions

Nutrition Information

1 serving (about 90g)

Calories
325 calories
Total Fat
4 g
Saturated Fat
1 g
Trans Fat
0 g
Unsaturated Fat
3 g
Cholesterol
0 mg
Sodium
550 mg
Total Carbohydrates
64 g
Dietary Fiber
6 g
Sugars
0 g
Protein
10 g

Note: Chef personas and recipes are created with AI assistance. Cook with care: follow safe food-handling practices, check doneness with a thermometer when needed, and adapt for allergies and your kitchen.

Where cooking meets culture.

Culinary guides, cultural storytelling, and the editorial depth that makes cooking meaningful.

Discover Culinary Explorer

More from Greek Breads & Festive Loaves

Browse the full collection