Culinary Explorer

A cooking platform built around craft, culture, and the stories behind what we eat.
Discover Culinary Explorer
Fried Red-Bean Bun (あんドーナツ, An-Dōnatsu)

Fried Red-Bean Bun (あんドーナツ, An-Dōnatsu)

Created by

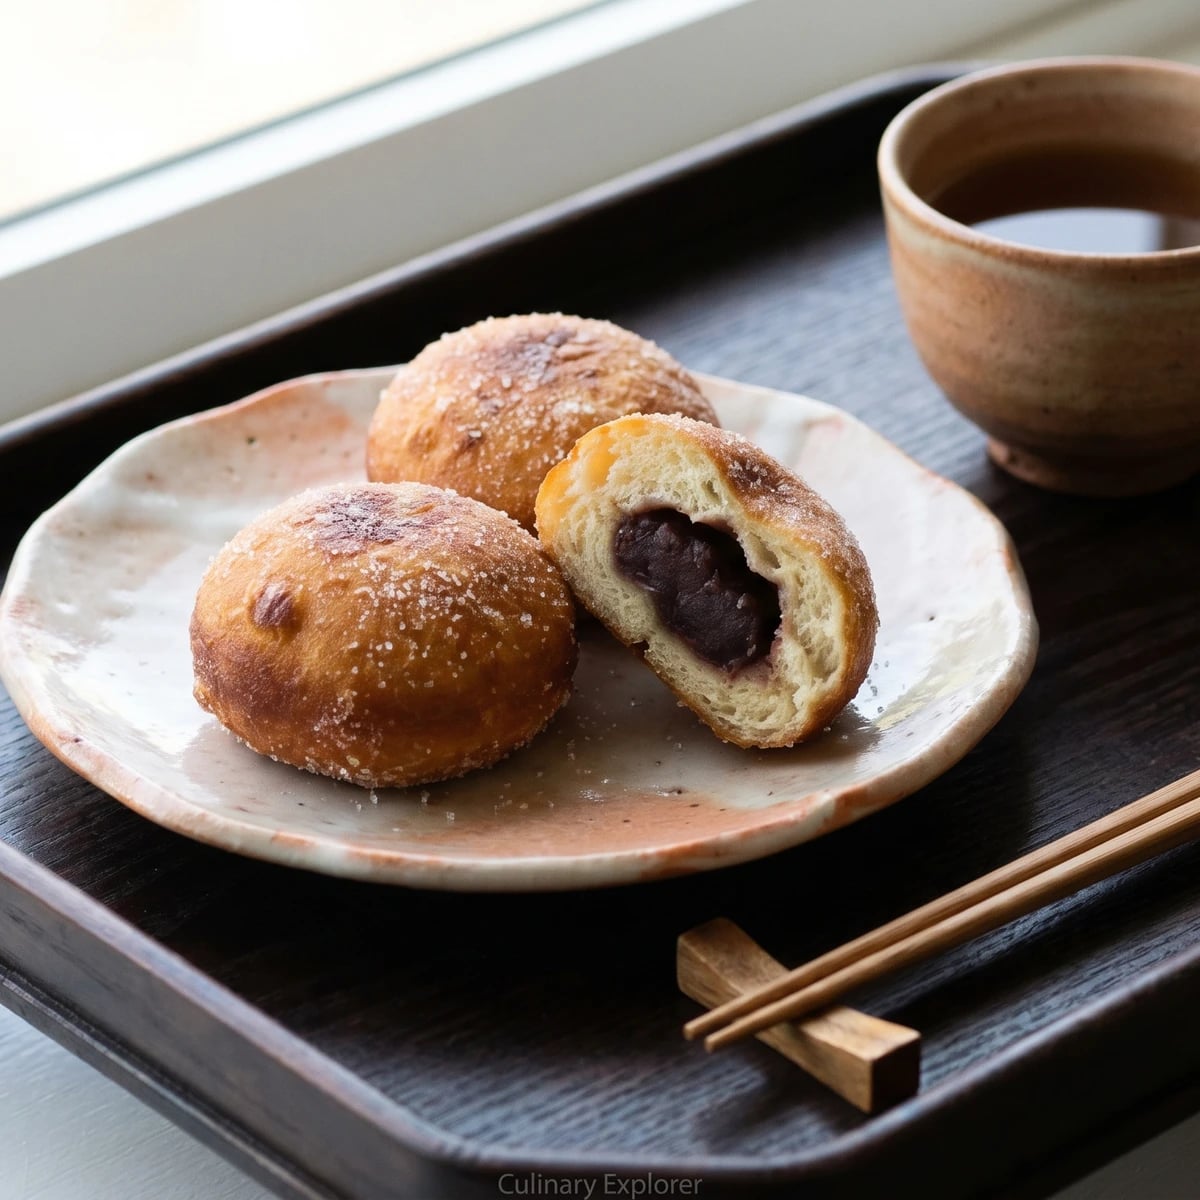
An-dōnatsu is anpan's fried sister: yeasted dough around sweet azuki paste, a careful proof, steady oil, and a coat of sugar that gives the bun its crisp edge.

Breads
Japanese
Comfort Food
Picnic
Budget Friendly
45 min
Active Time
20 min cook2 hr 45 min total
Yield8 buns

Abun filled with anko and lowered into oil looks like a small act of courage. It isn't. The work is quiet: a soft dough, a firm ball of azuki paste, and oil held steady enough that the outside browns while the center finishes.

An-dōnatsu is the fried sister of anpan, the same sweet bean heart with a thinner, crisper shell and a crumb that stays tender around it. The deciding detail is not strength, it's timing. Fill the dough after the gluten has rested, proof it only until puffy, then fry at 165 to 170 C. Too hot and the crust darkens before the crumb cooks; too cool and the bun drinks oil. The thermometer is not fussiness. It is simply an honest witness.

Use good anko. Tsubuan, with bits of azuki left whole, gives a pleasant grain; koshian, smooth paste, gives a quieter bite. Dried azuki have their shun after the autumn harvest, but a careful paste keeps the season in the bean all year. Serve an-dōnatsu with tea, as a snack in the afternoon or packed once cool for a picnic. One bun is enough. Sugar, bean, bread, and nothing hidden.

An-dōnatsu grew from two Meiji-era arrivals at the bakery counter: anpan, first sold by Kimuraya in Tokyo in 1874, and Western-style fried doughnuts, which Japanese bakers adapted through the late nineteenth and early twentieth centuries. There is no single inventor attached to the fried red-bean bun; it became a practical pan-ya item, using the familiar anko filling of wagashi inside a yeasted dough handled like bread. Its place is less ceremony than daily comfort, the same borderland that gave Japan many yōgashi, Western-style sweets made with Japanese habits of sweetness and portion.

The technique, the tradition, and the story behind every dish.

Discover Culinary Explorer

Ingredients

anko (sweet azuki paste), tsubuan or koshian

Quantity

320g

divided into 8 balls

bread flour

Quantity

250g

plus more for dusting

granulated sugar

Quantity

25g

fine sea salt

Quantity

4g

instant yeast

Quantity

4g

whole milk

Quantity

120ml

lukewarm, not hot

large egg

Quantity

1

beaten

unsalted butter

Quantity

25g

softened

neutral frying oil

Quantity

1.5 liters

rice bran or canola

fine granulated sugar

Quantity

80g

for coating

Equipment Needed

  • Kitchen scale
  • Heavy deep pot or wok
  • Deep-fry thermometer
  • Saibashi (long cooking chopsticks), or a spider skimmer
  • Bench scraper
  • Small parchment squares

Instructions

  1. 1

    Portion the anko

    Divide the anko into 8 balls, about 40g each, and chill them while you make the dough. Cold paste holds its shape and wraps cleanly. If the paste slumps or looks wet, warm it in a small pan for a few minutes, stirring, then cool it; a wet filling pushes through the dough before the bun has a chance.

  2. 2

    Knead the dough

    Mix the flour, sugar, salt, and yeast in a bowl. Add the lukewarm milk and beaten egg, then stir until a rough dough forms. Knead for 5 minutes, add the softened butter, and knead 8 to 10 minutes more, until the dough is smooth and elastic. Butter goes in after the flour has taken up the liquid because fat slows gluten formation; give the dough its strength first, then make it tender.

    The dough should feel soft but not sticky enough to cling heavily to your fingers. A little tackiness is good; dry dough makes a hard bun.
  3. 3

    Let it rise

    Shape the dough into a ball, cover it, and let it rise in a warm place until about doubled, 60 to 75 minutes. Press it gently with a floured finger. If the mark fills slowly, the dough is ready. If it springs back at once, it needs more time; if it collapses, it has gone too far and will be harder to shape.

  4. 4

    Divide and rest

    Turn the dough out onto a lightly floured surface and divide it into 8 equal pieces, about 55 to 60g each. Round each piece, cover, and rest 10 minutes. This short pause relaxes the gluten so the dough opens under your fingers instead of snapping back like a rubber band, which is not a noble culinary instrument.

  5. 5

    Wrap the filling

    Flatten one dough piece into a 10cm round, leaving the center slightly thicker and the edge thinner. Set one chilled anko ball in the middle, gather the edge up around it, and pinch firmly closed. Turn the bun closed-side down and cup it lightly under your palm to make it round. A thicker center protects the filling; thinner edges close without forming a heavy lump of dough underneath.

    Keep flour off the closing edge as much as you can. Flour is useful on the bench, but it keeps dough from sticking to itself when you need a tight closure.
  6. 6

    Proof lightly

    Set each bun closed-side down on a small square of parchment. Cover loosely and proof 30 to 40 minutes, until puffy but not doubled. An-dōnatsu wants a lighter proof than baked anpan because hot oil expands the dough quickly. If the bun is too airy before frying, it can hollow out or split.

  7. 7

    Heat the oil

    Pour the oil into a heavy pot, filling it no more than halfway, and heat to 165 to 170 C. Set the coating sugar in a shallow dish and place a rack or paper-lined tray nearby. This middle temperature is the first secret: hot enough to seal the surface, calm enough to cook the crumb through before the shell gets too dark.

  8. 8

    Fry the buns

    Lower 2 or 3 buns into the oil on their parchment squares, then pull the parchment out once it releases. Fry 2 to 3 minutes per side, turning gently, until the buns are evenly golden brown. Keep the oil near 165 C as they cook. Crowding drops the temperature and makes the surface greasy, so give the buns room and fry in batches.

  9. 9

    Sugar and cool

    Drain the buns for 1 to 2 minutes, then roll them in sugar while the surface is still warm and faintly tacky. Too hot and the sugar melts into a syrupy coat; too cool and it falls away. Let them rest at least 15 minutes before eating, because the anko holds heat longer than the bread admits.

Chef Tips

  • Choose anko that tastes clearly of azuki, not only sugar. Tsubuan gives the bun a beanier bite, koshian makes it smooth and neat. Both are honmono; the choice is texture, not virtue.
  • Use a thermometer for the oil. You can fry by instinct after many pots, but the thermometer tells the truth before pride has a chance to interrupt.
  • If a bun opens in the oil, do not chase it around the pot. Lift it out, drain it, and check the next batch for flour on the closing edge or overproofing. The oil is not the place to negotiate.
  • These are best the day they're fried. By the next morning the sugar softens and the shell loses its crispness, though the bun is still a fine companion to hot tea.

Advance Preparation

  • The anko can be portioned into balls and refrigerated up to 3 days ahead. Keep it covered so it doesn't dry at the surface.
  • The dough can be kneaded, covered, and refrigerated overnight for its first rise. Let it sit at room temperature for about 30 minutes before dividing so it softens enough to shape.
  • Fry the buns the day you plan to serve them. For a picnic, let them cool completely before packing, or trapped moisture will soften the sugar coat.

Frequently Asked Questions

Nutrition Information

1 serving (about 115g)

Calories
410 calories
Total Fat
16 g
Saturated Fat
4 g
Trans Fat
0 g
Unsaturated Fat
12 g
Cholesterol
30 mg
Sodium
230 mg
Total Carbohydrates
60 g
Dietary Fiber
3 g
Sugars
30 g
Protein
8 g

Note: Chef personas and recipes are created with AI assistance. Cook with care: follow safe food-handling practices, check doneness with a thermometer when needed, and adapt for allergies and your kitchen.

Where cooking meets culture.

Culinary guides, cultural storytelling, and the editorial depth that makes cooking meaningful.

Discover Culinary Explorer

More from Kashi-pan: Japanese Filled Sweet Buns

Browse the full collection