Culinary Explorer

A cooking platform built around craft, culture, and the stories behind what we eat.
Discover Culinary Explorer
Wachauer Laberl

Wachauer Laberl

Created by

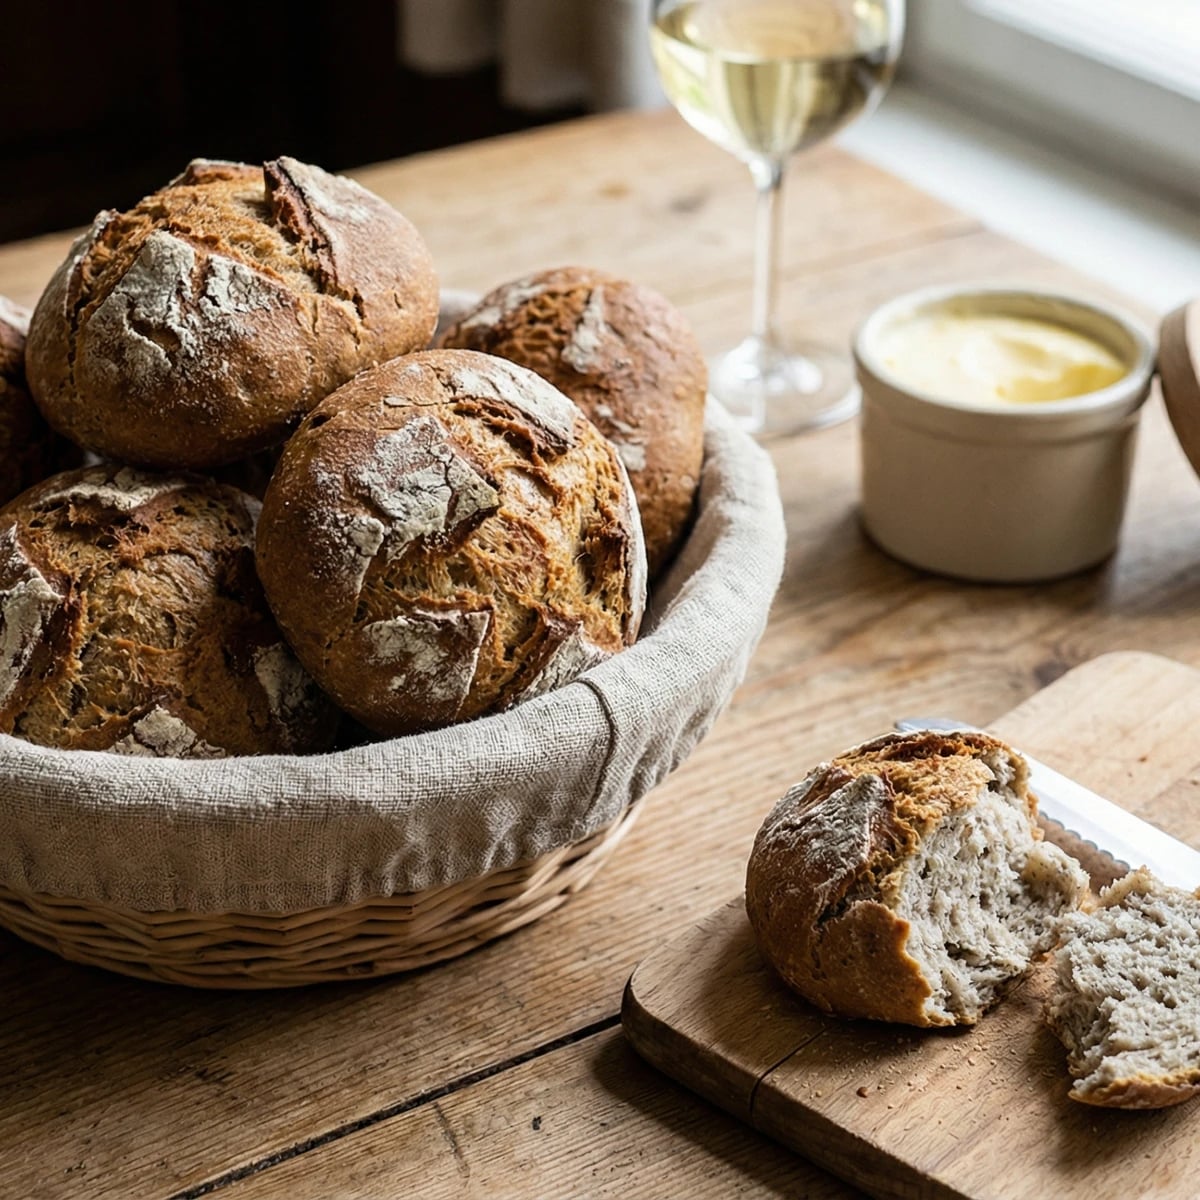
Hand-shaped rye-wheat rolls from the Wachau valley, proofed on rough linen so the crust cracks open in the oven like a dry riverbed, crusty and honest and perfect with cold butter and a glass of Grüner Veltliner.

Breads
Austrian
Weeknight
Outdoor Dining
30 min
Active Time
25 min cook14 hr total
Yield10 rolls

The first time I saw Wachauer Laberl done properly was at a bakery in Dürnstein during one of those childhood trips with Gretel and my grandmother Eva. We'd driven through the Wachau in late autumn, the vineyards going gold along the Danube, and stopped at a Heuriger for lunch. The rolls arrived in a linen-lined basket, split open along their tops like the earth cracks in a dry summer. I remember pulling one apart and the crust shattering under my fingers while the inside stayed soft and sour and warm. Gretel picked up her half, examined the crumb the way she examined everything edible, and said: "This is what bread should be. Two flours, water, salt, and time."

She was right, as usual. Wachauer Laberl are a rye-wheat roll, meaning they carry the tang and depth of Roggenmehl balanced against the structure of wheat. The crust is their signature, and it comes not from scoring or slashing but from the linen itself. You shape the rolls, set them seam-side down on a rough cloth dusted with flour, and let them proof. The linen pulls moisture from the surface unevenly. When the rolls hit a hot oven, that dry, flour-dusted skin tears open in jagged cracks. No two rolls look alike. That's the point.

These are the rolls you'll find at every Heuriger in the Wachau, torn open and spread with Liptauer or eaten alongside cold cuts and pickled vegetables. They belong to that landscape the way Grüner Veltliner does. Making them at home is simpler than you'd think, but they ask you to respect the timing. The overnight preferment gives the rye its character. Skip it and you'll have a decent roll. Give it the night and you'll have bread worth driving through a river valley for.

Wachauer Laberl are closely associated with Dürnstein and the broader Wachau valley along the Danube in Lower Austria, where rye and wheat have been grown side by side for centuries. The rolls gained formal recognition in the early 1900s as Heuriger culture flourished in the wine-growing regions, and bakers needed a bread sturdy enough to hold up to the cold buffet spreads served alongside new wine. The technique of proofing on rough linen (Leinentuch) is a regional practice shared with some French baking traditions, but the rye-wheat blend and the caraway seasoning are distinctly Austrian. In 2003, Wachauer Laberl received protected regional status as part of Austria's effort to preserve traditional food craftsmanship.

The technique, the tradition, and the story behind every dish.

Discover Culinary Explorer

Ingredients

rye flour (Roggenmehl)

Quantity

150g

plus extra for dusting

bread flour or strong wheat flour (Weizenmehl Type 700)

Quantity

350g

fine sea salt

Quantity

10g

dried yeast (or 20g fresh yeast)

Quantity

7g

caraway seeds (Kümmel)

Quantity

1 teaspoon

lightly crushed

lukewarm water

Quantity

300ml

rye sourdough starter

Quantity

100g

honey

Quantity

1 teaspoon

Equipment Needed

  • Large mixing bowl
  • Bench scraper
  • Kitchen scale
  • Rough linen cloth or coarse-weave tea towel
  • Baking stone or heavy inverted baking sheet
  • Small metal tray (for water bath)
  • Wire cooling rack

Instructions

  1. 1

    Make the overnight preferment

    The evening before you bake, mix 100g of the rye flour with 100ml of lukewarm water and the sourdough starter in a bowl. Stir until smooth, cover with a plate, and leave on the kitchen counter overnight. By morning it should look bubbly and smell pleasantly sour, like yogurt left out in the sun. This preferment is what gives Wachauer Laberl their depth. Without it, rye flour tastes flat and heavy. With twelve hours of slow fermentation, it becomes tangy and alive.

    If you don't keep a sourdough starter, you can make a simple overnight preferment instead: mix 100g rye flour, 100ml water, and a tiny pinch of dried yeast (less than a gram). It won't have the same sourness as a true starter, but it will give the rye time to develop flavor. Cover and leave overnight just the same.
  2. 2

    Mix the dough

    In a large bowl, combine the remaining 50g rye flour, all the wheat flour, salt, yeast, crushed caraway seeds, and honey. Add the overnight preferment and the remaining 200ml of lukewarm water. Mix with your hands or a wooden spoon until a shaggy dough forms. It will feel sticky and rough. That's the rye. Rye flour absorbs water differently than wheat and never develops the same smooth, elastic feel. Don't fight it.

  3. 3

    Knead the dough

    Turn the dough onto a lightly floured surface and knead for eight to ten minutes. The dough will never become as silky as a pure wheat bread. You're looking for it to hold together in a cohesive ball that springs back when you press it with your finger. If it sticks to your hands, wet them slightly instead of adding more flour. Extra flour at this stage dries out the crumb and you'll taste the difference tomorrow.

    Rye dough is tackier than wheat dough and always will be. A bench scraper is your best friend here. Use it to lift and fold the dough rather than wrestling it with your palms.
  4. 4

    First rise

    Shape the dough into a rough ball, place it back in the bowl, and cover with a damp tea towel. Let it rise in a warm spot for one and a half to two hours, until it has grown by about half its size. Rye doughs don't double the way wheat doughs do. If you wait for it to double, you've overproofed and the rolls will spread flat in the oven instead of cracking upward.

  5. 5

    Shape the rolls

    Turn the dough onto a lightly floured surface. Divide it into ten equal pieces, roughly 75g each. A kitchen scale helps here. To shape each roll, cup your hand over a piece of dough and roll it in a tight circle on the work surface, tucking the edges underneath to create tension on the top. The surface should feel taut, like a drum skin. That tension is what makes the crust crack open cleanly in the oven instead of just sagging. If the top isn't tight, the roll won't split.

  6. 6

    Proof on rough linen

    Dust a rough linen cloth (a clean tea towel with a coarse weave works well) generously with rye flour. Place the shaped rolls seam-side down on the cloth, leaving a few centimeters between each one. Pull up folds of the cloth between the rolls to keep them from touching as they expand. Cover loosely with another cloth. Let them proof for forty-five minutes to one hour. The rolls are ready when they've puffed noticeably and a gentle poke with your fingertip leaves an impression that fills back slowly.

    The rough linen is not a suggestion. It's the technique. The coarse fabric wicks moisture unevenly from the surface and imprints flour into the skin of the dough. When the rolls bake, those dry, flour-dusted patches tear open while the rest of the crust holds firm. That's where the signature cracked appearance comes from. A smooth cloth or a baking tray won't do the same thing.
  7. 7

    Preheat with a water bath

    While the rolls proof, place a baking stone or an inverted heavy baking sheet on the middle rack of your oven. Set a small metal tray on the bottom rack. Preheat to 230°C (450°F) for at least thirty minutes. You want the stone screaming hot. The initial blast of heat is what drives the oven spring and shatters the crust open along those linen-made fault lines.

  8. 8

    Bake the rolls

    Gently flip the proofed rolls off the linen onto the hot baking stone, seam-side up now, so the cracked, flour-dusted surface faces the ceiling of the oven. Work quickly. Pour a cup of hot water into the metal tray on the bottom rack and close the oven door immediately. The burst of moisture in the first few minutes keeps the crust flexible long enough for the rolls to expand before it sets hard. Bake for twenty to twenty-five minutes, until the rolls are deeply golden brown with pale cracks running across their tops. They should sound hollow when you tap their bottoms.

    After ten minutes, crack the oven door open for two seconds to release the remaining moisture. This dries the crust and gives you the shattering crunch that makes Wachauer Laberl worth the effort.
  9. 9

    Cool on a wire rack

    Transfer the rolls to a wire rack immediately. Don't leave them on the hot stone or the bottoms will go soggy from trapped moisture. Let them cool for at least fifteen minutes before you tear one open. I know that's hard. The kitchen smells like a Wachau bakery and every instinct says eat one now. But the crumb needs those fifteen minutes to finish setting. After that, tear one open, spread it with good butter, and listen to the crust crackle. Mahlzeit!

Chef Tips

  • Crush the caraway seeds lightly with the flat of a knife or in a mortar before adding them. Whole seeds are too aggressive and you'll bite into one unexpectedly. Crushed seeds release their flavor through the dough evenly. Austrians call Kümmel the soul of their bread baking, and I think they're right.
  • If you can find Austrian Type 700 flour (or German Type 550), use it. It has a protein content between all-purpose and bread flour that gives you a tender crumb with enough structure to hold the crust. If you can't find it, use bread flour and accept that the crumb will be slightly chewier. It will still be good.
  • These rolls are best the day they're baked. By the second day, the crust softens. You can revive them by running them under the tap for a second (really, just a second) and putting them in a 200°C oven for five minutes. They'll crackle again like they just came out of the bakery.
  • At a Heuriger, Wachauer Laberl are served with Liptauer (a spiced cheese spread with paprika), Verhackertes (a coarse pork spread), cold cuts, pickled vegetables, and a glass of Grüner Veltliner. That's their natural habitat. If you make these for a dinner party, set out a spread and let people tear and eat with their hands. That's the Gemütlichkeit of it.

Advance Preparation

  • The overnight preferment must be started twelve hours before you plan to bake. Mix it the night before for a morning bake.
  • Shaped rolls can be proofed slowly in the fridge overnight instead of at room temperature. Cover the linen-lined tray tightly with cling film and refrigerate. In the morning, let them sit at room temperature for thirty minutes while the oven preheats, then bake directly. The cold retard deepens the sour flavor and makes the crust even crunchier.
  • Baked rolls freeze well for up to one month. Reheat from frozen in a 200°C oven for eight minutes. They won't be quite as good as fresh, but they'll still be better than anything you can buy outside Austria.

Frequently Asked Questions

Nutrition Information

1 serving (about 82g)

Calories
200 calories
Total Fat
1 g
Saturated Fat
0 g
Trans Fat
0 g
Unsaturated Fat
1 g
Cholesterol
0 mg
Sodium
390 mg
Total Carbohydrates
43 g
Dietary Fiber
4 g
Sugars
1 g
Protein
7 g

Note: Chef personas and recipes are created with AI assistance. Cook with care: follow safe food-handling practices, check doneness with a thermometer when needed, and adapt for allergies and your kitchen.

Where cooking meets culture.

Culinary guides, cultural storytelling, and the editorial depth that makes cooking meaningful.

Discover Culinary Explorer

More from Austrian Breads & Gebaeck

Browse the full collection