Culinary Explorer

A cooking platform built around craft, culture, and the stories behind what we eat.
Discover Culinary Explorer
Varme Hveder

Varme Hveder

Created by Chef Freja

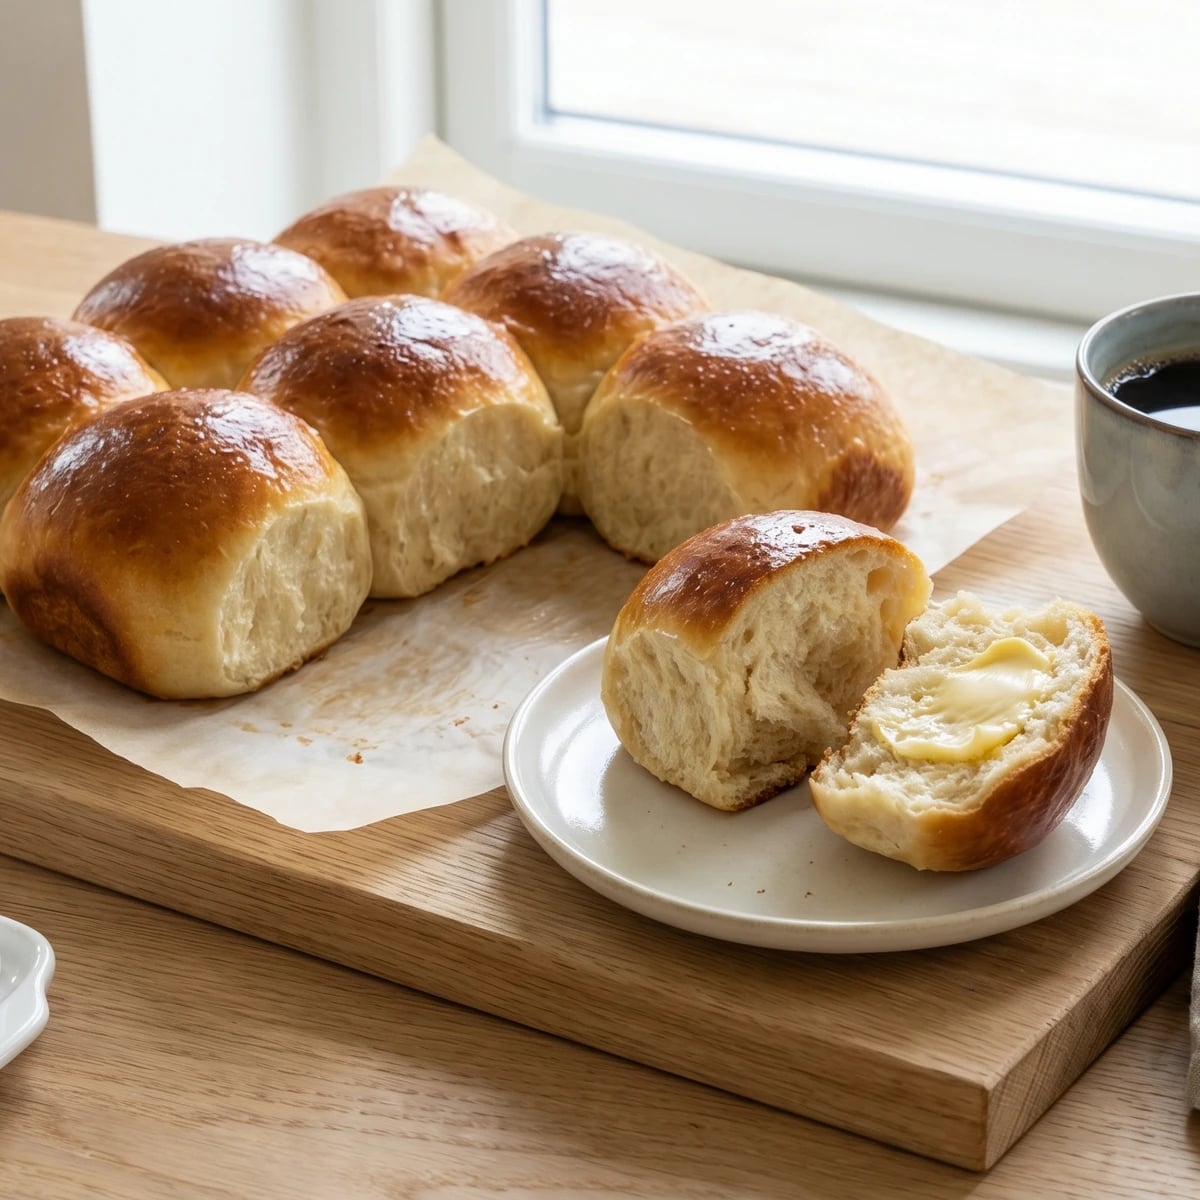
Cardamom wheat buns baked close together until their sides fuse soft and pale. Pulled apart warm, spread thick with cold butter the evening before Store Bededag, the way Copenhagen has done it since the 1600s.

Breads
Danish
Holiday
Special Occasion
Make Ahead
25 min
Active Time
18 min cook2 hr 45 min total
Yield12 buns

There's an evening in late April or early May, it moves with Easter, when something shifts in Danish kitchens. The holiday is Store Bededag, Great Prayer Day, and the night before it belongs to hveder. Warm wheat buns, fragrant with cardamom, baked so close together that they press into one another and fuse at the sides. You pull them apart with your hands, split them open, and spread them thick with cold butter while the bread is still warm enough to just begin melting it at the edges. Strong coffee alongside. That's the whole ritual.

The dough itself is simple. Flour, milk, butter, egg, a generous measure of cardamom. No lamination, no layers, no shaping tricks. What makes hveder special isn't technique. It's understanding the few things that matter: the cardamom must be present and warm, not faint. The buns must be placed close enough to join as they rise. And they must be served warm, because a cold hvede is just a roll, and a warm one is the reason you're in the kitchen tonight.

I'll walk you through every step so you understand not just what to do but why. Pay attention to the shaping and the spacing. The soft, pale sides where the buns pressed together during baking are what distinguish hveder from any other wheat bun. When you tear one from the batch and feel that gentle give, you'll know when it's right.

Store Bededag was established in 1686 by King Christian V, who consolidated numerous minor prayer and penance days scattered across the calendar into a single national holiday on the fourth Friday after Easter. Because no work, including baking, was permitted on the holy day itself, Copenhagen bakers prepared hveder the evening before and sold them warm through the streets, their cry of "varmehveder!" becoming one of the city's most recognizable seasonal sounds. The tradition persisted for over three centuries, surviving even the 2023 parliamentary decision to abolish Store Bededag as a public holiday, a move that prompted Danes across the country to bake hveder at home in quiet, determined protest, turning a baker's custom into something closer to a civic act.

The technique, the tradition, and the story behind every dish.

Discover Culinary Explorer

Ingredients

strong white bread flour

Quantity

500g, plus extra for dusting

caster sugar

Quantity

75g

fine sea salt

Quantity

1 teaspoon

ground cardamom

Quantity

1.5 teaspoons

freshly ground if possible

instant dry yeast

Quantity

7g

whole milk

Quantity

250ml

warmed to body temperature

unsalted butter (for the dough)

Quantity

75g

softened

egg

Quantity

1 large

egg

Quantity

1

beaten with 1 tablespoon milk, for glazing

cold unsalted butter

Quantity

to serve

Equipment Needed

  • Large mixing bowl
  • Stand mixer with dough hook (optional)
  • Baking sheet or round baking tin, approximately 30cm
  • Pastry brush for egg wash

Instructions

  1. 1

    Mix the dough

    Combine the flour, sugar, salt, cardamom, and yeast in a large bowl. Make a well in the centre and pour in the warm milk and the egg. Stir with a wooden spoon until the mixture comes together into a rough, shaggy mass. Add the softened butter in pieces and work it in, kneading for about ten minutes by hand or six in a stand mixer with the dough hook. The dough should become smooth, soft, and slightly springy. It will feel a little tacky to the touch, not sticky. That tackiness is the butter and the egg doing their work, giving the crumb its tenderness.

    The milk should be warm like a bath you could rest your hand in. Too hot and it kills the yeast. Too cold and the butter won't incorporate properly. Body temperature is what you want.
  2. 2

    First rise

    Shape the dough into a ball and place it back in the bowl. Cover with a damp cloth and leave it somewhere warm for about an hour and a half, until it has doubled in size. Don't rush this. A slow, patient rise gives the dough its flavor. The yeast is converting the sugars, and the longer it works, the more complex that sweetness becomes. The cardamom deepens during this time too, moving from sharp and bright to something warmer and rounder.

    If your kitchen is cool, the rise may take longer. That's fine. Better a slow rise in a cool room than a fast rise next to a radiator. You'll know it's ready when you press a floured finger into the dough and the indent springs back slowly, not immediately.
  3. 3

    Shape the buns

    Turn the risen dough onto a lightly floured surface and press it down gently to release the largest air pockets. Divide the dough into twelve equal pieces. The easiest way is to halve it, then halve each half, then divide each quarter into thirds. Roll each piece into a smooth, tight ball: cup your hand over the dough on the counter and move it in a small circle, letting the friction of the surface pull the outside taut. The tension on the surface is what gives the bun its shape in the oven. Loose, slack balls spread sideways. Tight balls rise upward.

  4. 4

    Arrange them close

    Place the twelve balls on a baking sheet lined with parchment, arranging them in rows so they are almost touching, about one centimetre apart. This is the detail that makes hveder what they are. As they rise and bake, the buns push into one another and fuse at the sides. The tops and bottoms become golden and slightly firm, but the sides where they've pressed together stay pale and impossibly soft. When you pull one away from its neighbour, you get that soft, tender tear. That's the whole point.

    A round baking tin or a deep-sided sheet pan works even better than a flat tray. The edges keep the outer buns from spreading sideways, so every bun, not just the ones in the middle, gets those soft joined sides.
  5. 5

    Second rise

    Cover the tray loosely with a damp cloth and let the buns rise again for about forty-five minutes. They should puff up and close the gaps between them, pressing gently into one another. The surface will look smooth and taut. Don't let them overproof. If the surface starts to wrinkle or the buns lose their shape, they've gone too long, and the crumb will be coarse instead of fine.

  6. 6

    Glaze and bake

    Heat the oven to 190C. Brush the tops of the buns with the egg wash, using a light hand so the glaze doesn't pool in the crevices between them. The egg wash gives the crust its colour and its faint sheen, the look that tells you someone made these at home, not a factory. Bake for sixteen to eighteen minutes until the tops are a deep, even gold. The buns will sound hollow if you tap the top of the batch gently. Don't overbake. The moment they go past golden into brown, the crumb dries out, and hveder should be soft all the way through.

    Every oven is different. Start checking at fourteen minutes. The colour you want is the gold of strong tea, not the brown of toast.
  7. 7

    Serve warm with cold butter

    Let the buns cool for just five minutes on the tray, then pull them apart while they're still warm. Split each one open with your hands, not a knife, and spread thickly with cold butter straight from the fridge. The cold butter against the warm bread is the whole experience. It starts to melt at the edges but stays firm in the centre, so every bite gives you both: the soft, cardamom-scented crumb and the clean, cold richness of good butter. Serve with strong coffee. This is how Danes have greeted Store Bededag for centuries. Tak for mad.

Chef Tips

  • Cardamom is everything here. If you can buy whole green cardamom pods and grind them yourself, do it. Crack the pods, discard the husks, and grind the black seeds in a mortar. The difference between freshly ground and pre-ground cardamom is the difference between a bun that smells like a Danish kitchen and one that smells like nothing in particular.
  • The butter you serve alongside must be cold. Take it straight from the fridge. The contrast of cold butter against warm bread is the entire point. If the butter is soft and room temperature, you lose the experience that defines the dish.
  • Don't slice the buns with a knife. Tear them apart from the batch, then split each one open by pulling it gently with your hands. A knife compresses the crumb. Your hands honour it.
  • If you're reheating leftover hveder the next morning, wrap them loosely in foil and warm in a 150C oven for eight minutes. They won't be the same as fresh, but they'll be close. Never the microwave.

Advance Preparation

  • The dough can be mixed and given its first rise in the fridge overnight. Take it out two hours before you plan to shape and bake, and let it come to room temperature before continuing. The cold rise deepens the flavor.
  • Shaped buns can be frozen after the second rise. Place the whole tray in the freezer until firm, then cover tightly. Bake from frozen, adding three to four minutes to the baking time. Brush with egg wash before they go in.
  • Hveder are best within an hour of baking. This is a dish that rewards planning your timing. Work backwards from when you want to eat, and start the dough about two and a half hours before that moment.

Frequently Asked Questions

Nutrition Information

1 serving (about 75g)

Calories
245 calories
Total Fat
7 g
Saturated Fat
4 g
Trans Fat
0 g
Unsaturated Fat
3 g
Cholesterol
40 mg
Sodium
210 mg
Total Carbohydrates
39 g
Dietary Fiber
1 g
Sugars
8 g
Protein
7 g

Note: Chef personas and recipes are created with AI assistance. Cook with care: follow safe food-handling practices, check doneness with a thermometer when needed, and adapt for allergies and your kitchen.

Where cooking meets culture.

Culinary guides, cultural storytelling, and the editorial depth that makes cooking meaningful.

Discover Culinary Explorer

More from Danish Breads & Rugbrod

Browse the full collection