Culinary Explorer

A cooking platform built around craft, culture, and the stories behind what we eat.
Discover Culinary Explorer
Slow-Roast Pork Belly with Crackling

Slow-Roast Pork Belly with Crackling

Created by Chef Thomas

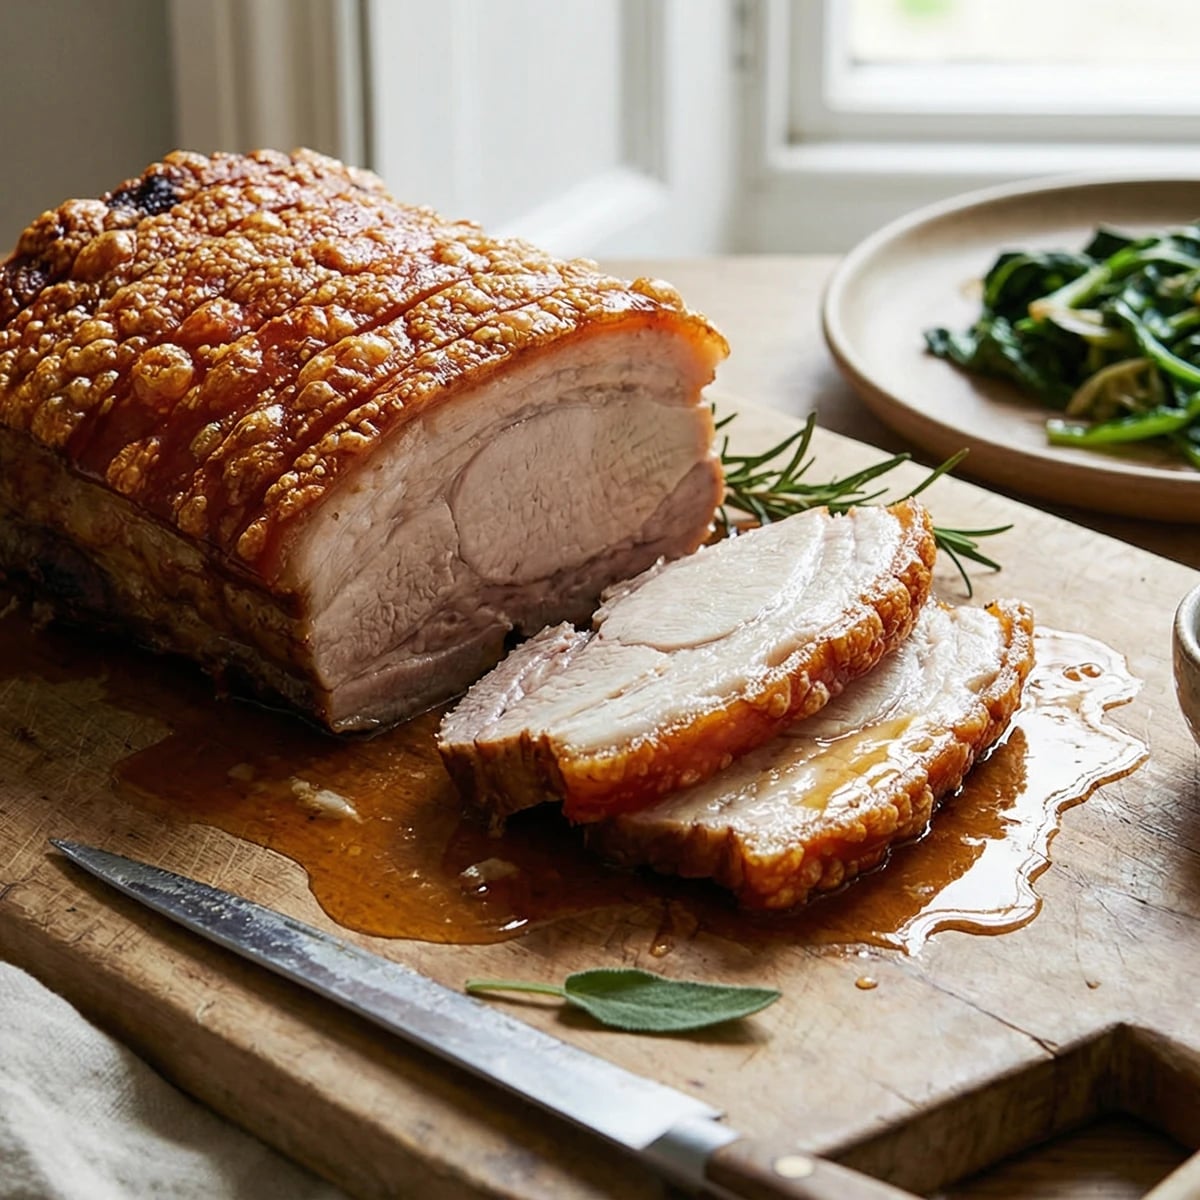
A slab of pork belly given hours in a low oven until the fat has rendered to almost nothing, the meat pulls apart, and the skin cracks like thin ice underfoot. An evening's patience, well repaid.

Main Dishes
British
Comfort Food
Dinner Party
Special Occasion
20 min
Active Time
4 hr 30 min cook4 hr 50 min total
Yield6 servings

The cold has properly arrived. The kind where the windows are dark by four and the kitchen is the only room in the house you want to be in. That's the evening for this. Not a quick supper, not a midweek improvisation, but a slow afternoon project where the oven does most of the work and you do almost none.

Pork belly is a patient cut. It doesn't reward haste. What it wants is low heat and time, four hours or so, during which the fat renders quietly down through the meat, basting it from within, until the flesh is soft and yielding and the thin layer of skin on top has turned into something entirely different: crackling so brittle it shatters at the touchof a knife. The kitchen fills with a smell that is, I think, the closest cooking gets to a form of central heating. Pork fat and rosemary and something sweet from the onions underneath.

I make this through the winter months, from the first real frost until the clocks go forward. It's not a dish that makes sense in warm weather. You need the cold outside to justify the warmth of it. I wrote in the notebook once: "Pork belly. Sunday. Rain all day. Fed four. Nothing left." That's the highest compliment a roast can receive.

Get the best pork you can. A proper piece from a butcher who can tell you where it came from, with a good ratio of meat to fat and skin that's been scored properly. This is not the place for a supermarket shrink-wrap. The animal matters. The rearing matters. A recipe is a conversation, not a contract, but the conversation starts with the ingredient.

The technique, the tradition, and the story behind every dish.

Discover Culinary Explorer

Ingredients

pork belly

Quantity

1.5kg piece

skin on, bone in or out

fine sea salt

Quantity

generously

flaky sea salt

Quantity

for the skin

fennel seeds

Quantity

1 tablespoon

garlic

Quantity

4 cloves

unpeeled, lightly crushed

fresh rosemary

Quantity

a few sprigs

fresh sage

Quantity

a few sprigs

olive oil

Quantity

1 tablespoon

onions

Quantity

2

halved

carrots

Quantity

2

halved lengthways

dry cider or white wine

Quantity

200ml

chicken stock

Quantity

200ml

Equipment Needed

  • Heavy roasting tin, not too large
  • Sharp knife or Stanley knife for scoring
  • Fine-mesh sieve
  • Pestle and mortar

Instructions

  1. 1

    Score and salt the skin

    Take the pork belly out of the fridge a good hour before you plan to cook it. Cold meat in a hot oven doesn't behave. With the sharpest knife you've got, score the skin in parallel lines about a centimetre apart, cutting through the skin and into the fat beneath, but not so deep that you reach the meat. The butcher may have done this already. If they haven't, take your time. A Stanley knife does it better than most kitchen knives, if you can stomach the idea. Rub the skin all over with olive oil, then massage flaky sea salt into every score line. Be generous. More than you think. The salt draws out moisture, and dry skin is the whole secret to crackling.

    If the skin is damp, pat it completely dry with kitchen paper before salting. Moisture is the enemy of crackling. Some people leave the belly uncovered in the fridge overnight on a rack, and they are right to do so.
  2. 2

    Season the meat

    Turn the belly over and season the flesh side with fine sea salt. Crush the fennel seeds roughly in a pestle and mortar, or under the flat of a knife, and press them into the meat along with a few torn sage leaves. The fennel and pork is an old friendship. It works because the anise cuts through the richness, gives the fat somewhere to go on the palate. Flip it back skin-side up.

  3. 3

    Build the roasting bed

    Set the oven to 220C/200C fan. Lay the halved onions and carrots in the bottom of a roasting tin, cut-side down. Scatter the garlic cloves and rosemary sprigs among them. This bed of vegetables does two things: it lifts the pork so the heat circulates underneath, and it gives you the beginnings of a sauce. Place the pork belly on top, skin facing upward. Make sure the skin is exposed and isn't touching the sides of the tin.

    The roasting tin matters. Choose one where the belly fits without too much spare room. Too large a tin and the juices spread thin and burn. Too small and the air can't get to the skin.
  4. 4

    Blast at high heat

    Put the tin into the hot oven for thirty minutes. This initial blast starts the crackling. The skin should begin to blister and puff. It won't be finished yet, but you'll hear it: a low, irregular popping, like something waking up. If parts of the skin haven't begun to bubble after thirty minutes, don't worry. They will.

  5. 5

    Slow roast

    Turn the oven down to 160C/140C fan. Pour the cider and stock into the tin around the pork, not over it. The liquid should sit below the meat, keeping the vegetables company, not touching the skin. Now leave it alone. Three and a half to four hours. The kitchen will start to smell like the kind of afternoon where nobody wants to leave the house. The fat will render slowly, the meat will turn soft enough to pull apart with a fork, and the liquid in the bottom of the tin will reduce into something deeply savoury.

    Resist opening the oven every twenty minutes. Every time you open the door, you lose heat and humidity changes. Check once at the halfway mark. If the liquid has reduced to almost nothing, add a splash of water.
  6. 6

    Finish the crackling

    After the slow roast, check the skin. If it hasn't crackled fully, and there are always stubborn patches, turn the oven back up to 220C/200C fan for a final ten to fifteen minutes. Watch it carefully. The line between crackling and burnt is a matter of minutes at this temperature. You want it golden, blistered, and brittle. When you tap it with the back of a spoon, it should sound hollow. That's when it's done.

    If the crackling refuses to cooperate, slide it under a hot grill for the last few minutes instead. Keep the door open and watch it the entire time. Grills are fast and unforgiving.
  7. 7

    Rest the pork

    Lift the pork belly out of the tin and onto a warm board. Let it rest for fifteen to twenty minutes. Resting isn't optional. The meat needs time to relax, to reabsorb its juices, to become the thing it's been promising to be for the last four hours. Cover it loosely with foil if you like, though some people leave the crackling uncovered to keep it crisp. Both work.

  8. 8

    Make the pan sauce

    While the pork rests, set the roasting tin over a medium heat on the hob. The vegetables will have collapsed and caramelised, the garlic gone soft and sweet. Press everything through a sieve into a small saucepan, pushing the softened vegetables through with the back of a spoon to thicken the liquid. Discard whatever won't pass through. Taste the sauce. It should be savoury, slightly sweet from the onions, with a background hum of cider. If it's thin, let it bubble for a few minutes. If it needs sharpness, a squeeze of lemon or a splash of cider vinegar will bring it into focus. Season and taste. Then taste again.

  9. 9

    Carve and serve

    Cut the belly into thick slices, letting the knife crack through the crackling. A serrated knife sometimes does this more cleanly than a chef's knife. Serve on warm plates with the pan sauce spooned alongside. This wants something green beside it, wilted greens or a sharp apple salad, and something starchy to catch the juices: roast potatoes, mashed, or good bread. Put the plate in front of someone you care about. That's the whole point.

Chef Tips

  • Ask your butcher to score the skin for you. They have sharper knives and steadier hands, and they'll do it without being asked twice. If you're doing it yourself, the sharper the blade, the better. Blunt knives tear the skin instead of cutting it, and torn skin won't crackle evenly.
  • The overnight salt and fridge method is worth planning for. Rub the skin with salt the night before, set the belly on a rack over a plate, and leave it uncovered in the fridge. By morning the skin will be visibly drier and papery to the touch. Dry skin crackles. Damp skin doesn't. It's the single most useful thing you can do for this dish.
  • Leftover pork belly, if there is any, makes extraordinary sandwiches the next day. Cold, sliced thinly, on good bread with a smear of mustard and some sharp pickled cabbage. I'd almost argue it's better than the original meal. Almost.
  • The pan sauce is not gravy. It's thinner, more concentrated, and it should taste of the roasting tin: caramelised onion, garlic, pork drippings, and a quiet sharpness from the cider. If it tastes flat, a teaspoon of cider vinegar or a squeeze of lemon will wake it up.

Advance Preparation

  • The belly can be scored, salted, and left uncovered on a rack in the fridge overnight. This dries the skin and dramatically improves the crackling. Bring it to room temperature for an hour before roasting.
  • The pan sauce can be strained and refrigerated a day ahead. Any fat that solidifies on top can be lifted off and the sauce reheated gently.
  • Leftover cooked pork belly keeps well in the fridge for up to three days. Reheat slices in a hot pan, skin-side down, to re-crisp the crackling.

Frequently Asked Questions

Nutrition Information

1 serving (about 200g)

Calories
660 calories
Total Fat
55 g
Saturated Fat
19 g
Trans Fat
0 g
Unsaturated Fat
33 g
Cholesterol
120 mg
Sodium
1800 mg
Total Carbohydrates
9 g
Dietary Fiber
1 g
Sugars
3 g
Protein
31 g

Note: Chef personas and recipes are created with AI assistance. Cook with care: follow safe food-handling practices, check doneness with a thermometer when needed, and adapt for allergies and your kitchen.

Where cooking meets culture.

Culinary guides, cultural storytelling, and the editorial depth that makes cooking meaningful.

Discover Culinary Explorer

More from Sunday Roasts & Slow Suppers

Browse the full collection