
Chef Takumi
Autumn Mushroom Rice (きのこの炊き込みご飯, Kinoko Takikomi Gohan)
Autumn mushrooms do most of the work here. Rinse the rice well, season the liquid before cooking, and let the pot rest so every grain comes out separate and fragrant.
A cooking platform built around craft, culture, and the stories behind what we eat.
Created by
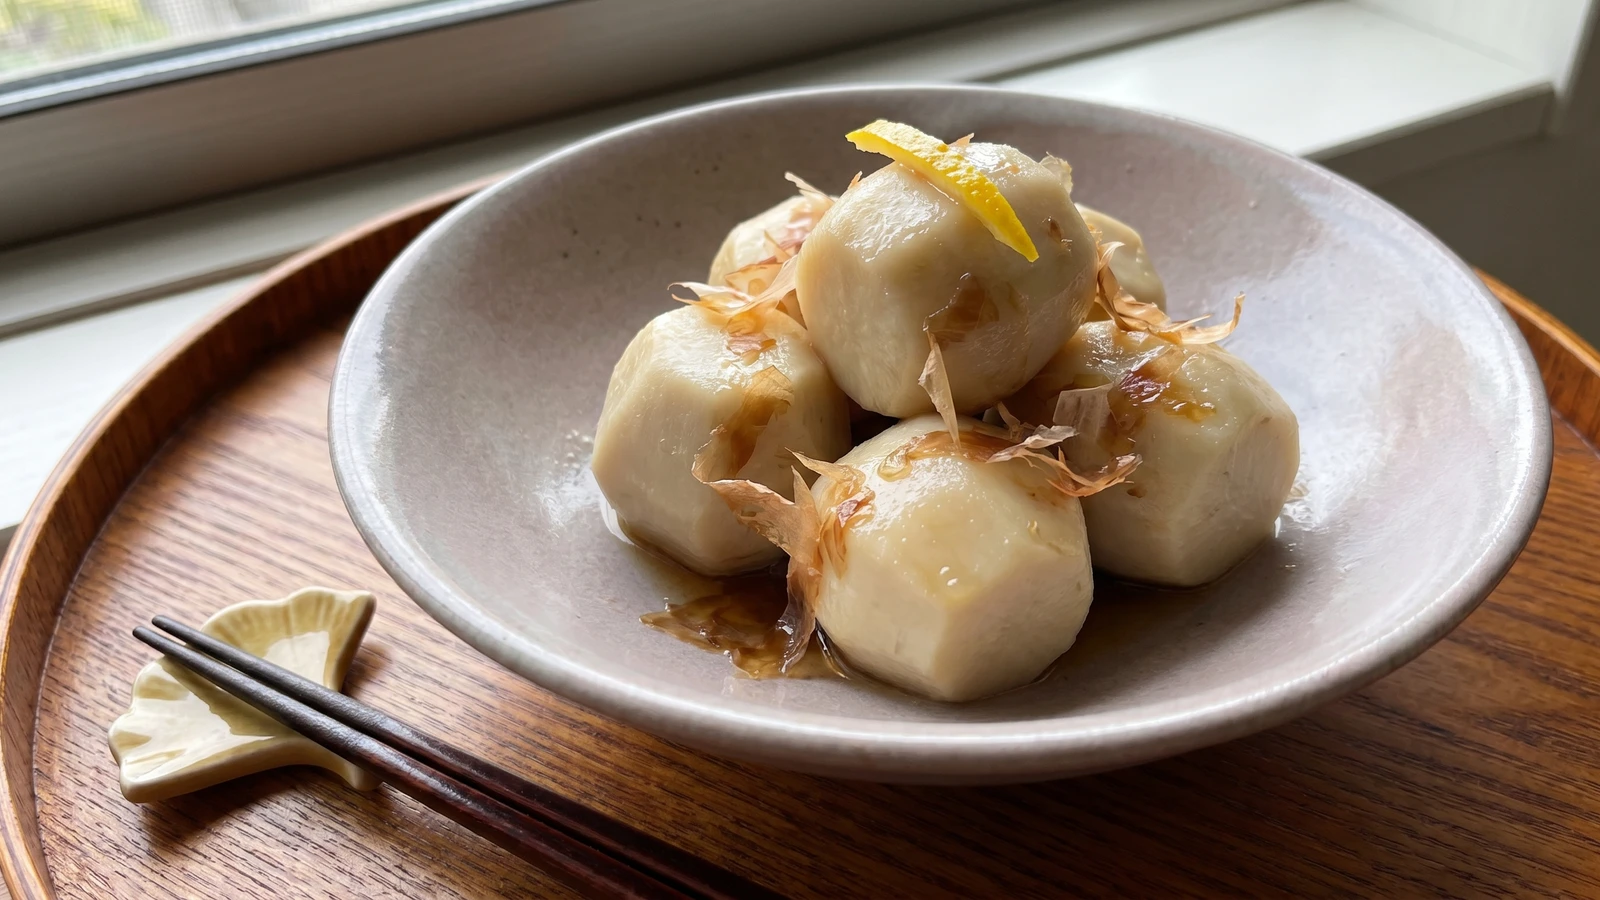
Satoimo looks awkward at the sink, then becomes one of winter's quiet comforts: ivory corms simmered gently until creamy, lightly sweet, and glossy with dashi and bonito.
Satoimo is a winter root with a small mischief: it slips in your hands, and then it slips under the chopsticks. People see that slick skin and think the dish is troublesome. It isn't. The slipperiness is part of its character, and our job is to tame the surface without cooking away the creamy center.
The first secret is the salt rub and brief blanch. Peel the corms after they are washed and dried, rub them with salt, then give them a short boil and a gentle rinse. That carries off the harsh surface starch, so the simmering broth stays clear and the finished pieces feel silky, not gluey. This is not fussing. It is simply putting the ingredient in order before the dashi receives it.
After that, the dish is plain nimono: dashi, a little sugar and mirin, then shōyu after the taro has begun to soften. Sugar enters early and seasons the center; soy goes later so the pieces stay pale and gentle rather than turning hard and dark at the edge. A drop-lid, otoshibuta, keeps the broth moving over the tops without stirring, because stirring is how satoimo becomes paste, and paste is useful only when you meant to make paste.
Serve it warm or at room temperature, tucked beside rice and soup as one of the small dishes that steadies a weeknight meal. Finish with katsuobushi for Tosa style, the flakes clinging to the glossy surface. Leave the bowl half quiet. Satoimo rewards restraint.
Satoimo, taro, is one of Japan's older cultivated root crops, grown long before the sweet potato and the common potato arrived from the Americas in the early modern period. The fifteenth night of the eighth lunar month, jūgoya, is also called Imo Meigetsu, the taro-harvest moon, because satoimo were offered with the moon-viewing display. Tosa-style nimono takes its name from old Tosa Province, present-day Kōchi, a major bonito region, and finishes the simmered vegetable with katsuobushi.
Quantity
2 1/2 cups
Quantity
1 piece (about 5g)
Quantity
15g
for dashi
Quantity
5g
lightly crushed, for finishing
Quantity
700g
washed, dried, and peeled
Quantity
1 tablespoon
for rubbing
Quantity
2 tablespoons
Quantity
1 1/2 tablespoons
Quantity
2 tablespoons
Quantity
1 1/2 tablespoons
or regular shōyu
Quantity
1 thin strip
| Ingredient | Quantity |
|---|---|
| cold water | 2 1/2 cups |
| konbu (dried kelp) | 1 piece (about 5g) |
| katsuobushi (bonito flakes)for dashi | 15g |
| katsuobushi (bonito flakes)lightly crushed, for finishing | 5g |
| small satoimo (Japanese taro corms)washed, dried, and peeled | 700g |
| sea saltfor rubbing | 1 tablespoon |
| sake | 2 tablespoons |
| sugar | 1 1/2 tablespoons |
| mirin | 2 tablespoons |
| usukuchi shōyu (light soy sauce)or regular shōyu | 1 1/2 tablespoons |
| yuzu peel (optional) | 1 thin strip |
Wipe the konbu with a damp cloth, but don't wash it. Put it in the cold water and bring it up slowly over low heat, about ten minutes. Pull the konbu when the water trembles and small bubbles climb the sides. Bring the water to a gentle boil, add 15g katsuobushi all at once, turn off the heat, and leave it alone for two minutes. Strain through a cloth and let it drip on its own. Don't squeeze. Measure out 2 cups dashi, adding a little water only if you are short.
Scrub the satoimo, dry them well, then trim the top and bottom of each corm. Peel down the sides with a small knife or peeler, following the curve and keeping small ones whole. Halve any large pieces so they cook at the same pace. Dry skin is easier to hold, and it keeps the raw sap from making the job feel more dramatic than it is. If your hands are sensitive, wear food-safe gloves.
Put the peeled satoimo in a bowl, sprinkle with the salt, and rub them gently until the surface feels slick. Transfer them to a pot, cover with cold water, and boil for four to five minutes, just until gray foam rises and the outside turns slightly translucent. Drain and rinse gently under running water. This removes the excess surface starch and keeps the broth clean, but don't scrub them bare. A little silk belongs to satoimo.
Arrange the satoimo in a wide pot in one layer if you can. Add the 2 cups dashi, sake, sugar, and mirin. The liquid should come about halfway to two-thirds up the pieces; the drop-lid will do the rest. Bring to a quiet simmer, set an otoshibuta, a wooden drop-lid, directly on the surface, and cook for ten minutes. Sugar and mirin go in before the soy because sweetness moves into the center more easily before salt tightens the surface.
Pour the shōyu around the edge of the pot, replace the drop-lid, and simmer gently for twelve to fifteen minutes more. A chopstick should slide through the center without resistance. Keep the bubbles small. A hard boil knocks the pieces together, clouds the broth, and roughens the edges. Don't stir; tilt the pot now and then if you need to move the seasoning.
Turn off the heat and let the satoimo rest in the broth for at least twenty minutes. Nimono seasons as it cools: heat pushes, cooling draws in. This pause is why the same pot tastes better after sitting quietly than it does straight from the flame.
Remove the drop-lid. If there is more than about 1/2 cup broth left, simmer uncovered for a few minutes until the liquid looks glossy and lightly coats the pieces. Scatter the remaining 5g katsuobushi over the satoimo and shake the pot gently so the flakes cling. They drink the last seasoned broth and bring the Tosa finish without hiding the vegetable. Serve in a shallow bowl, with a thin strip of yuzu peel if you have it.
1 serving (about 180g)
Culinary guides, cultural storytelling, and the editorial depth that makes cooking meaningful.
Discover Culinary ExplorerChef Takumi
Autumn mushrooms do most of the work here. Rinse the rice well, season the liquid before cooking, and let the pot rest so every grain comes out separate and fragrant.

Chef Takumi
A whole salmon fillet laid on seasoned rice does nearly all the work. Cook it gently, flake it back through, and autumn has found its bowl.

Chef Takumi
Daigakuimo is simple student comfort: sweet potato cut stout, fried until the corners take color, then turned in a soy-sugar syrup that sets shiny instead of sticky.

Chef Takumi
Chawanmushi looks delicate, but the secret is plain: good dashi, strained egg, and quiet heat. Keep the steam soft and the custard sets smooth, tender, and calm.