Culinary Explorer

A cooking platform built around craft, culture, and the stories behind what we eat.
Discover Culinary Explorer
Panerede Kyllingebryst

Panerede Kyllingebryst

Created by Chef Freja

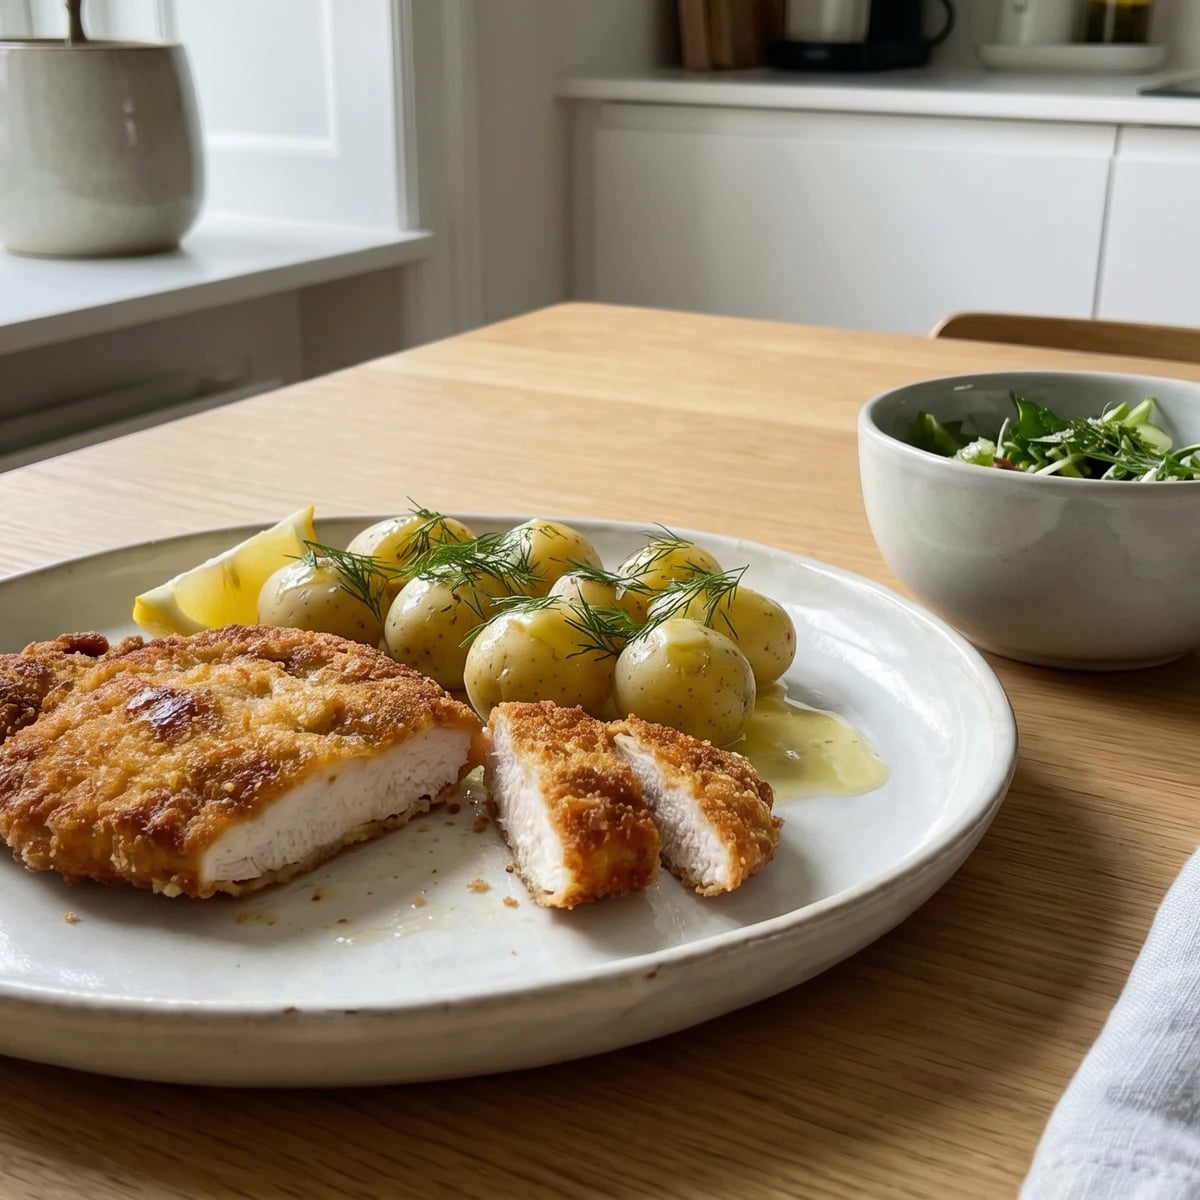
Chicken breasts pounded thin, breaded in three careful steps, and fried in butter until the crust turns deep gold and cracks under the knife. New potatoes, dill, lemon. The Danish weeknight dinner that never disappoints.

Main Dishes
Danish
Weeknight
Quick Meal
Comfort Food
20 min
Active Time
12 min cook32 min total
Yield4 servings

June evenings in Denmark stay light until nearly eleven. The kitchen window is open, the potatoes are the first of the season, still small enough to cook whole, and nobody wants to spend an hour at the stove. This is when panerede kyllingebryst earns its place.

Breaded cutlets are one of those dishes that every Danish family cooks but nobody talks about. They aren't written about in food magazines or served at restaurants. They belong to the Tuesday kitchen, the one where you get home, open the fridge, and need something on the table in half an hour that everyone will eat without argument. Chicken pounded thin, coated in breadcrumbs, fried in butter until the outside is golden and the inside stays tender. New potatoes with a little butter and dill alongside. A squeeze of lemon. Done.

The technique is simple, but the order matters. I'll explain each step so you understand why the flour comes before the egg, why the butter needs to foam and settle before the chicken goes in, and why pounding the breasts to an even thickness is the single thing that determines whether your cutlet is juicy or dry. Once you understand the why, you won't need the recipe anymore. You'll just know. And that's the point.

The paneret kotelet, the breaded cutlet fried in butter, arrived in Danish kitchens in the mid-1800s as a domestic version of the Wiener Schnitzel that had spread across Northern Europe from Vienna. For most of its Danish life, the dish was made with pork, the defining meat of the Danish table. Chicken became the more common choice only in the latter decades of the twentieth century, as poultry grew affordable and lighter weeknight meals replaced the heavier traditions. The technique itself, the flour-egg-breadcrumb sequence, has remained unchanged since it first appeared in Danish household cookbooks of the 1860s.

The technique, the tradition, and the story behind every dish.

Discover Culinary Explorer

Ingredients

boneless, skinless chicken breasts

Quantity

4, about 150g each

plain flour

Quantity

80g

eggs

Quantity

2 large

beaten

fine dry breadcrumbs

Quantity

120g

fine sea salt

Quantity

to taste

black pepper

Quantity

freshly ground, to taste

unsalted butter (for frying)

Quantity

40g

neutral oil

Quantity

2 tablespoons

lemon

Quantity

1

cut into wedges

small new potatoes

Quantity

600g

scrubbed

unsalted butter (for the potatoes)

Quantity

15g

fresh dill

Quantity

small bunch

fronds picked

flaky sea salt

Quantity

to finish

Equipment Needed

  • Large heavy frying pan
  • Rolling pin or heavy-bottomed pan for pounding
  • Three shallow dishes for the breading stations
  • Cling film or baking parchment

Instructions

  1. 1

    Start the potatoes

    Put the new potatoes in a pot of cold, well-salted water and bring to a gentle boil. Cook for fifteen to twenty minutes until a knife slides through the center without resistance. Starting them in cold water means the heat reaches the center at the same pace as the outside, and you get potatoes that are tender all the way through, not chalky in the middle. Drain, return to the pot, and add the butter and a scatter of dill. Put the lid on and let them sit while you cook the chicken.

  2. 2

    Pound the chicken thin

    Place each chicken breast between two sheets of cling film or baking parchment. Using a rolling pin or the flat bottom of a heavy pan, pound the breasts to an even thickness of about one centimeter. Work from the center outward so the meat thins evenly. This matters more than anything else in the recipe. Uneven cutlets cook unevenly: thin edges burn and dry out while the thick center stays raw in the middle. One centimeter means the whole piece cooks through in the same time and stays juicy.

    If the breast has a small fillet attached on the underside, pull it off and cook it separately. It's too thick in one spot and too thin where it tapers. Save it for tomorrow's salad.
  3. 3

    Set up the breading

    Arrange three shallow dishes in a line. Flour in the first, seasoned with salt and pepper. Beaten eggs in the second. Breadcrumbs in the third. Season the pounded chicken on both sides with salt and pepper. Then take each piece through the stations: flour first, shaking off the excess. Egg next, letting the extra drip away. Breadcrumbs last, pressing them gently onto the surface so they stick. The flour gives the egg something to grip. The egg glues the breadcrumbs on. Skip the flour and the coating slides off in the pan. That's the logic of the three steps, and it hasn't changed since cooks first started breading meat.

    Use one hand for the dry stations and the other for the egg. Otherwise you end up with breadcrumbed fingers thicker than the cutlet.
  4. 4

    Fry in butter and oil

    Heat the butter and oil together in a large, heavy frying pan over medium heat. Wait until the butter foams, then settles. That settling is the signal: the water in the butter has cooked off, and now the milk solids are beginning to toast. This is when the chicken goes in. Lay the cutlets in the pan without crowding. Work in batches if your pan isn't big enough for all four. Cook for three to four minutes on the first side without moving them. The crust needs uninterrupted contact with the heat to set and turn golden. Flip once. The underside should be a deep, even gold. Cook for another three minutes. The second side never gets quite as dark, and that's fine.

    If the butter starts to darken before the chicken is done, your heat is too high. Turn it down. A burnt crust tastes bitter and all your careful breading is wasted.
  5. 5

    Rest and serve

    Transfer the cutlets to a board and let them rest for two minutes. Resting matters even here. The juices are pushed to the center by the heat of the pan, and two minutes lets them redistribute so the first bite is juicy instead of dry. Serve on warm plates with the buttered new potatoes, a few more dill fronds scattered over everything, a wedge of lemon, and a simple green salad alongside. Squeeze the lemon over the cutlet at the table. The acid cuts through the richness of the butter and the crust, and suddenly the whole plate makes sense. Tak for mad.

Chef Tips

  • Use fine, dry breadcrumbs, not the coarse panko style. Fine crumbs give you a thin, even crust that crisps tightly against the meat. Panko works for other things, but a Danish breaded cutlet should have a close, golden coat, not a shaggy one.
  • If your chicken breasts are very large, cut them in half horizontally before you pound them. A 250g breast pounded to one centimeter becomes enormous and unwieldy. Two thinner pieces fry more evenly and fit the plate better.
  • The lemon is not optional. A breaded cutlet without lemon is like a sentence without a full stop. The acid finishes the dish and balances the richness of the butter crust. Squeeze it at the table, not in the kitchen, so the juice stays bright.
  • Serve with a simple salad dressed lightly with a good vinaigrette. Butter lettuce if you can get it. The softness of the leaves against the crunch of the cutlet is a quiet pleasure.

Advance Preparation

  • You can bread the cutlets up to two hours ahead. Lay them on a tray lined with parchment and refrigerate uncovered. The coating actually sets better when it has time to dry slightly, and the cold chicken holds its shape in the hot pan.
  • Leftover cutlets make excellent cold smorrebrod the next day. Slice thickly, lay on buttered rugbrod with remoulade and a few slices of pickled cucumber.

Frequently Asked Questions

Nutrition Information

1 serving (about 380g)

Calories
695 calories
Total Fat
26 g
Saturated Fat
10 g
Trans Fat
0 g
Unsaturated Fat
16 g
Cholesterol
230 mg
Sodium
900 mg
Total Carbohydrates
65 g
Dietary Fiber
4 g
Sugars
3 g
Protein
45 g

Note: Chef personas and recipes are created with AI assistance. Cook with care: follow safe food-handling practices, check doneness with a thermometer when needed, and adapt for allergies and your kitchen.

Where cooking meets culture.

Culinary guides, cultural storytelling, and the editorial depth that makes cooking meaningful.

Discover Culinary Explorer

More from Danish Family Mains & Frikadeller

Browse the full collection