Culinary Explorer

A cooking platform built around craft, culture, and the stories behind what we eat.
Discover Culinary Explorer
Mochi Rice Crackers (おかき, Okaki)

Mochi Rice Crackers (おかき, Okaki)

Created by

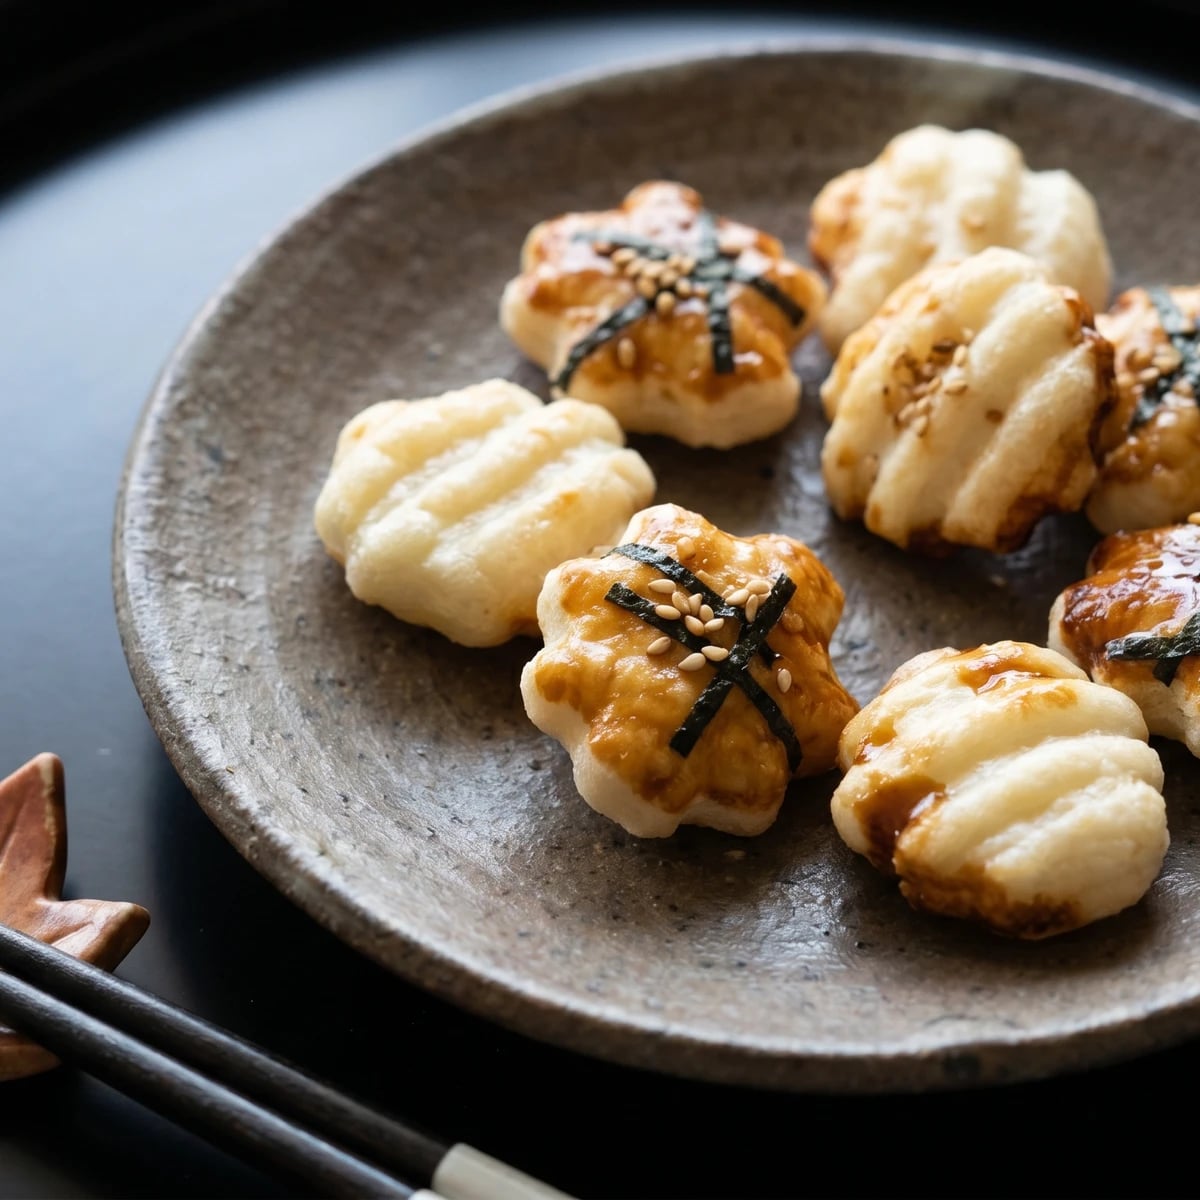
Okaki begins with leftover mochi and patience. Dry it well, fry it steadily, and each piece blooms into a tender rice cracker with a soy-dark shine.

Pastries & Cookies
Japanese
Make Ahead
Comfort Food
Budget Friendly
15 min
Active Time
20 min cook48 hr 35 min total
Yield4 servings

Okaki looks like a snack, but it teaches one very Japanese lesson: patience changes texture. Fresh mochi is soft and elastic. Leave it to dry until the surface is firm and pale, then cook it, and the same rice opens into a crisp, tender cracker. Not difficult. Only slow.

The one detail that decides it is dryness. If the mochi still holds too much water, it splutters in the oil, browns before it opens, and keeps a hard center. Dry it first until the pieces feel light and the corners no longer bend. Then the heat can reach the inside evenly, and the cracker blooms instead of merely scorching. A small thing, but the bench is full of small things that become the whole dish.

We often make okaki after New Year, when kagami mochi, the stacked ceremonial rice cakes, are broken and eaten rather than cut with a knife. At home, use plain kiri mochi, the rectangular shelf-stable blocks, and slice them cleanly. Brush with shōyu and mirin while the crackers are still hot so the surface drinks the seasoning and dries glossy. Nothing hidden, just rice, heat, and a little salt-sweet shine.

Okaki developed from mochi made with glutinous rice, distinct from senbei made mainly with ordinary uruchimai rice. The custom of eating broken kagami mochi after New Year is tied to kagami biraki, traditionally observed on January 11 in many regions, when the ceremonial rice cakes are opened by hand or mallet rather than sliced with a blade. Larger broken pieces became okaki, while smaller fragments are often called arare, though regional usage varies.

The technique, the tradition, and the story behind every dish.

Discover Culinary Explorer

Ingredients

plain kiri mochi

Quantity

4 blocks (about 200g)

cut into 1/2-inch pieces

neutral oil

Quantity

about 3 cups

for frying

shōyu (Japanese soy sauce)

Quantity

1 tablespoon

mirin

Quantity

1 tablespoon

sugar

Quantity

1/2 teaspoon

nori (optional)

Quantity

1 small sheet

cut into thin strips

toasted sesame seeds (optional)

Quantity

1 teaspoon

Equipment Needed

  • Bamboo zaru or wire rack for drying
  • Heavy pot for frying
  • Cooking thermometer, or long cooking chopsticks for testing the oil
  • Spider strainer or mesh skimmer
  • Pastry brush

Instructions

  1. 1

    Cut the mochi

    Cut the kiri mochi into pieces about 1/2 inch across. Keep them uneven if you like, but keep the size close so they cook at the same pace. A smaller piece dries more reliably and opens more gently in the oil.

  2. 2

    Dry the pieces

    Spread the mochi pieces on a rack or bamboo zaru with space between them. Leave them uncovered in a dry, airy place for 2 days, turning once or twice. They should feel hard at the surface, lighter in the hand, and no longer bend at the corners.

    Dryness is not decoration here. Water trapped in mochi turns to forceful steam in hot oil, which makes the pieces spit and keeps the center tough.
  3. 3

    Make the glaze

    Warm the shōyu, mirin, and sugar in a small pan just until the sugar dissolves. Take it off the heat. The mirin softens the salt edge of the soy, and the little bit of sugar helps the glaze cling without turning the okaki into candy.

  4. 4

    Heat the oil

    Pour the oil into a heavy pot and heat it to 325°F. If you don't have a thermometer, drop in one dried mochi piece: it should sink briefly, then rise with small steady bubbles. Too hot, and the outside browns before the center has time to bloom.

  5. 5

    Fry in batches

    Fry a small handful at a time, stirring gently with long chopsticks or a spider. The pieces will puff, split at the edges, and turn pale gold, usually in 4 to 6 minutes. Give them room in the pot, because crowded mochi sticks together and cooks unevenly.

  6. 6

    Drain and glaze

    Lift the okaki to a rack and let the oil drain for a minute. While the pieces are still hot, brush lightly with the soy glaze or toss them in a bowl with just enough glaze to coat. Hot rice drinks seasoning quickly, so use a light hand and stop before the crackers turn wet.

  7. 7

    Finish and cool

    Scatter with nori strips or sesame if using, then leave the okaki on the rack until completely cool and dry to the touch. The rest matters: trapped warmth softens crisp rice, while open air lets the surface settle back into its clean bite.

Chef Tips

  • Use plain mochi made from mochigome, glutinous rice. Sweetened mochi or filled mochi won't behave here, and the filling will leak before the rice has a chance to open.
  • If the weather is damp, dry the cut mochi in the refrigerator on a rack for 2 to 3 days. The air is dry enough to help. It sounds inelegant, but the cracker will forgive you.
  • Fry slowly rather than fiercely. Okaki wants time for the center to expand, so steady moderate oil gives you tenderness inside and crispness outside.
  • For a grilled version, dry the mochi pieces a little larger, brush them with soy glaze, and toast over low heat or under a broiler, turning often. It is less puffed than fried okaki, but still honmono.

Advance Preparation

  • Cut and dry the mochi 2 to 3 days ahead. Once fully dried, keep the pieces loosely covered in a dry place for another day before frying.
  • Finished okaki keeps 3 days in an airtight container after it is completely cool. If it softens, warm it briefly in a low oven and let it cool uncovered.

Frequently Asked Questions

Nutrition Information

1 serving (about 55g)

Calories
220 calories
Total Fat
10 g
Saturated Fat
1 g
Trans Fat
0 g
Unsaturated Fat
9 g
Cholesterol
0 mg
Sodium
230 mg
Total Carbohydrates
28 g
Dietary Fiber
1 g
Sugars
2 g
Protein
3 g

Note: Chef personas and recipes are created with AI assistance. Cook with care: follow safe food-handling practices, check doneness with a thermometer when needed, and adapt for allergies and your kitchen.

Where cooking meets culture.

Culinary guides, cultural storytelling, and the editorial depth that makes cooking meaningful.

Discover Culinary Explorer

More from Senbei & Arare: Japanese Rice Crackers

Browse the full collection