
Chef Freja
Boller
Soft, round, barely sweet Danish buns made with milk, butter, and patient yeast. The first thing most Danish children learn to bake, and the smell that means someone is home.
A cooking platform built around craft, culture, and the stories behind what we eat.
Created by Chef Freja
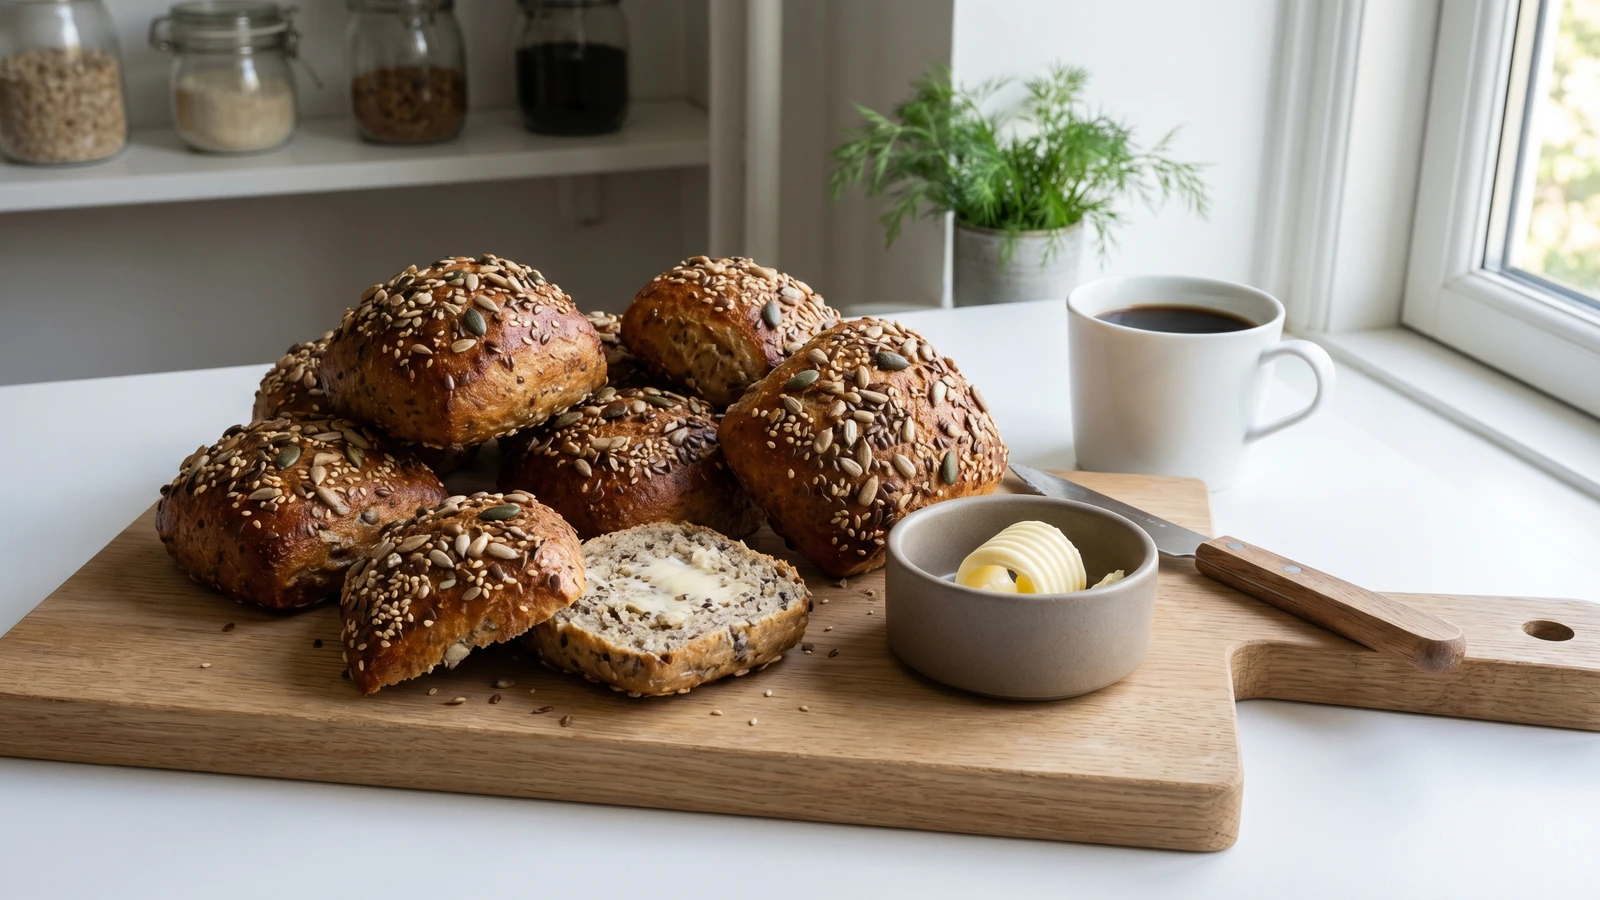
Danish seeded rolls with sunflower, flax, pumpkin, and sesame worked through a wheat and rye dough. The roll you split open every morning in Denmark and fill with whatever the fridge offers.
Every Danish kitchen has a bread routine, and for most of us, kerneboller are at the center of it. They're the rolls you bake on a Sunday evening, stack in a cloth-lined basket, and eat through the week: split in half at breakfast with butter and cheese, packed into the madpakke (the lunch box that follows every Dane from childhood to the office), or grabbed on the way out the door with nothing more than a scrape of soft butter and a cup of coffee.
The dough is simple. Strong white flour with a measure of coarse rye for weight and flavor, a handful of honey for a whisper of sweetness, and then the seeds: sunflower, pumpkin, flax, sesame. You toast them first. That step takes four minutes and changes everything, turning raw, oily seeds into something warm and nutty that perfumes the whole dough. The rye flour slows the rise slightly and gives the crumb its close, satisfying texture. This is not a fluffy white roll. It's a roll with substance, one that holds up under toppings and holds your attention through the last bite.
Pay attention to two things. First, the shaping: roll each piece against the bare counter so the surface pulls taut. That tension is what keeps the rolls round and tall in the oven. Second, the hollow tap when they come out. Knock the bottom of a roll with your knuckle. If it sounds hollow, the bread is done. If it sounds dense, give it more time. You'll know when it's right.
Denmark's obsession with seeded bread traces back to the broader Scandinavian tradition of kornbrod, grain breads that combined whatever seeds and cereals were available from local harvests. Kerneboller as a distinct form gained popularity in the second half of the 20th century, when Danish home bakers began moving away from plain white rolls toward heartier alternatives rich with seeds and whole grains, partly influenced by the growing interest in fuldkorn (whole grain) eating that Danish health campaigns promoted from the 1970s onward. The Fuldkornspartnerskabet, a public-private initiative launched in 2008, further cemented Denmark's identity as a nation that takes its seeds and grains seriously, and today kerneboller are among the most commonly baked rolls in Danish households.
Quantity
400g
Quantity
100g
Quantity
7g
Quantity
1 1/2 teaspoons
Quantity
1 tablespoon
Quantity
300ml
Quantity
2 tablespoons
Quantity
60g
Quantity
40g
Quantity
30g
Quantity
20g
Quantity
1
beaten, for glazing
Quantity
for topping
| Ingredient | Quantity |
|---|---|
| strong white bread flour | 400g |
| coarse rye flour | 100g |
| instant dry yeast | 7g |
| fine sea salt | 1 1/2 teaspoons |
| honey | 1 tablespoon |
| lukewarm water | 300ml |
| neutral oil | 2 tablespoons |
| raw sunflower seeds | 60g |
| raw pumpkin seeds | 40g |
| whole flaxseeds | 30g |
| sesame seeds | 20g |
| eggbeaten, for glazing | 1 |
| mixed seeds (optional) | for topping |
Scatter the sunflower seeds, pumpkin seeds, flaxseeds, and sesame seeds into a dry frying pan over medium heat. Stir them constantly for three to four minutes until the sunflower and pumpkin seeds start to turn golden and you can smell them. Toasting does two things: it deepens the flavor from flat and oily to warm and nutty, and it dries the surface of the seeds so they grip the dough instead of sliding through it. Tip them onto a plate and let them cool completely before adding to the flour. Hot seeds will kill the yeast.
Combine the bread flour, rye flour, yeast, and salt in a large bowl. Stir the honey into the lukewarm water until it dissolves, then add the oil. Pour the liquid into the dry ingredients and bring everything together with a wooden spoon until you have a rough, shaggy mass. The rye flour will make the dough feel slightly heavier and stickier than pure wheat dough. That's correct. Rye absorbs water more slowly and gives the finished rolls their close, chewy crumb.
Turn the dough out onto a lightly floured surface and knead for eight to ten minutes until it is smooth and springs back when you press it with a finger. If you're using a stand mixer, six minutes on medium with the dough hook will get you there. Once the dough is smooth, flatten it slightly, scatter the cooled toasted seeds across the surface, and fold and knead them in until they're evenly distributed. This takes another minute or two. Some seeds will try to escape. Press them back in. The dough should feel dense and heavy with seeds.
Shape the dough into a ball and place it back in the bowl. Cover with a damp cloth and leave it somewhere warm for one hour to one hour and a half, until it has roughly doubled in size. The seeds slow the rise slightly because they interrupt the gluten network, so be patient. Don't rush it. A full, unhurried rise is what gives the rolls their flavor. The yeast needs time to do its work, and that time is a gift to the bread.
Turn the risen dough onto a lightly floured surface and press it flat to knock out the large air bubbles. Divide it into twelve equal pieces. A kitchen scale helps here: each piece should weigh about 80 to 85 grams. Cup your hand over each piece and roll it in a tight circle on the counter, using the friction of the unfloured surface to pull the dough taut underneath. This tension is what gives the rolls their round shape in the oven. If the surface is too floury, the dough slides instead of gripping, and you get flat, spreading rolls instead of tall, proud ones.
Place the shaped rolls on two baking sheets lined with parchment, leaving a few centimeters between each one. They will spread slightly as they rise. Cover loosely with a cloth and leave for forty to forty-five minutes. They should look visibly puffed and feel soft and pillowy when you press one gently with a fingertip. The indent should fill back slowly, not spring back instantly and not stay dented. That slow return is the sign that the rolls are ready for the oven.
Heat the oven to 200C. Brush each roll with the beaten egg, working gently so you don't deflate them. The egg gives the crust its deep amber color and a slight sheen that catches the light. Scatter additional mixed seeds over the tops while the glaze is still wet. Press them lightly so they stick. These are the seeds the eye sees first and the teeth crunch through on the first bite.
Bake for twenty to twenty-five minutes until the rolls are deep golden brown on top and sound hollow when you tap the bottom. That hollow sound is the simplest and most reliable test for bread: it means the interior has set and the moisture has cooked out of the crumb. If the sound is dull and heavy, give them five more minutes. Let the rolls cool on a wire rack for at least fifteen minutes before you split one open. Cutting too soon lets all the steam escape, and the crumb goes gummy instead of holding its shape.
1 serving (about 80g)
Culinary guides, cultural storytelling, and the editorial depth that makes cooking meaningful.
Discover Culinary ExplorerChef Freja
Soft, round, barely sweet Danish buns made with milk, butter, and patient yeast. The first thing most Danish children learn to bake, and the smell that means someone is home.

Chef Freja
Dark rye crackers from the island of Bornholm, laminated in twenty-seven butter-layered folds and scattered with caraway and sea salt. The kind of thing you keep in a tin for cheese, good butter, and cold dark beer.

Chef Freja
The soft Danish white loaf with a milk-brushed crust and blue poppy seeds that belongs on every weekday breakfast table. Simple dough, gentle rise, toast and butter and jam.

Chef Freja
Danish whole wheat rolls made with grahamsmel, ready in just over an hour. The weekday bun that fills lunch boxes, sits beside soup, and smells like a kitchen where someone cares.