
Chef Remy
Bourbon Pecan Brittle
Shattery sheets of amber candy studded with toasted Louisiana pecans and kissed with good bourbon, the kind of homemade sweet that disappears from holiday tables before the wrapping paper hits the floor.
A cooking platform built around craft, culture, and the stories behind what we eat.
Created by
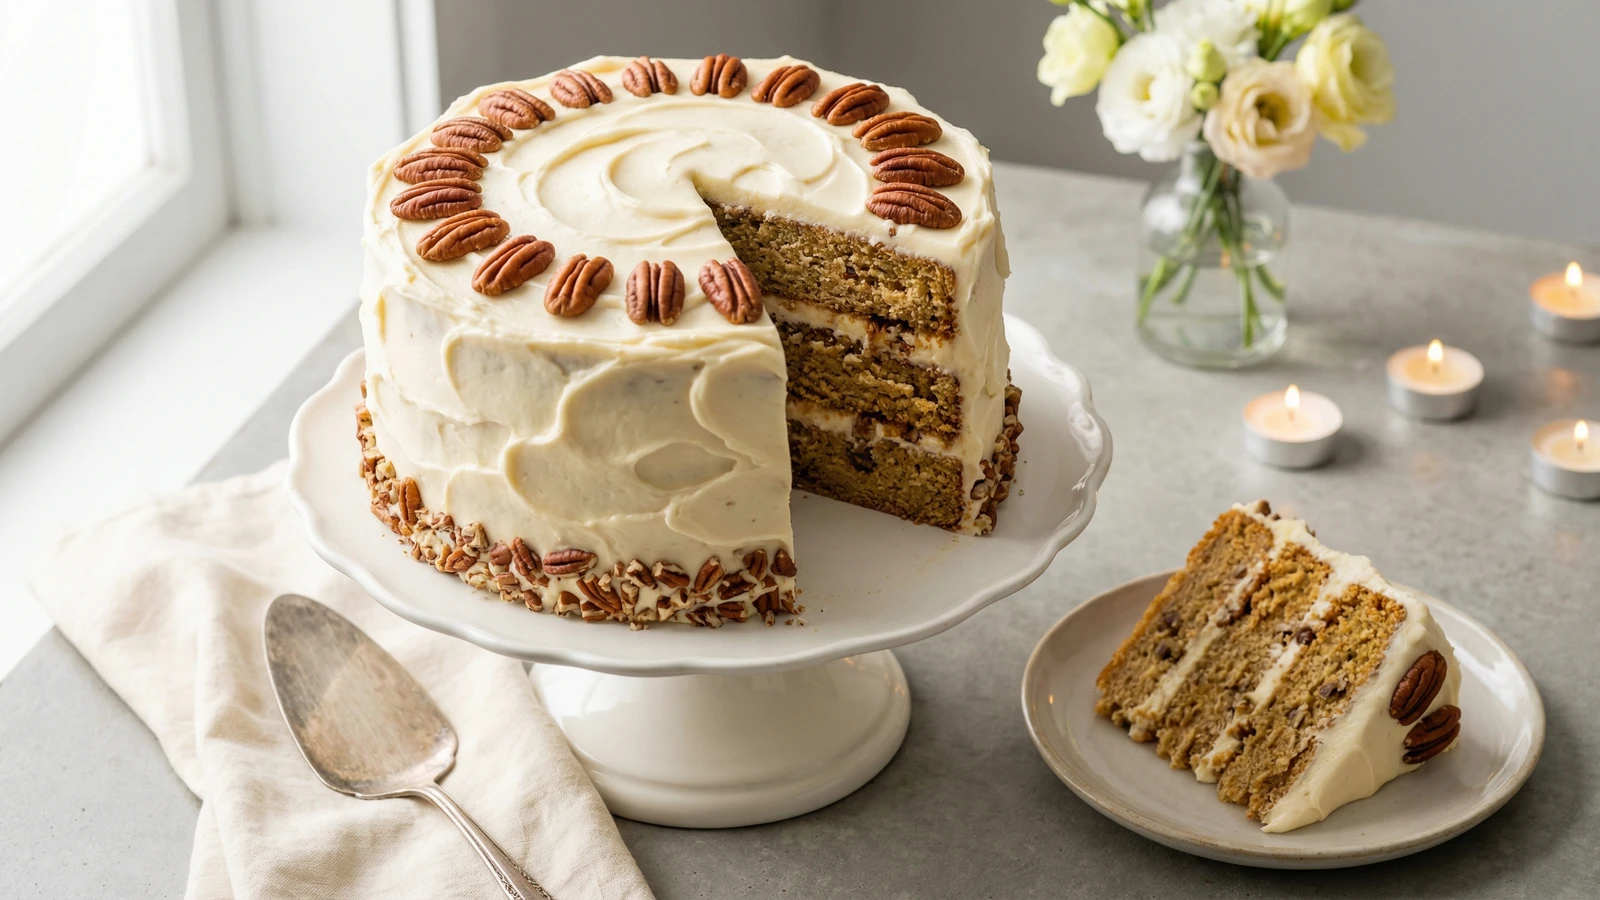
A towering three-layer Southern legend loaded with ripe bananas, crushed pineapple, toasted pecans, and warm spices, swathed in tangy cream cheese frosting. The cake people request for birthdays and remember for decades.
The Hummingbird Cake appeared in Southern Living magazine in 1978, submitted by a reader from North Carolina, and promptly became the most requested recipe in the publication's history. The name's origin remains delightfully murky. Some say the cake is sweet enough to attract hummingbirds. Others claim it makes people hum with pleasure. Either explanation works for me.
This is a cake built for celebration. Three generous layers, each one tender and fragrant with banana, pineapple, cinnamon, and pecans, stacked with cream cheese frosting between and all around. The tropical fruits keep the crumb impossibly moist for days, the pecans provide crunch, and the cream cheese frosting adds that tangy richness that makes the sweetness sing instead of cloy.
Unlike butter cakes that require precise creaming and careful temperature management, the Hummingbird asks for simpler technique. You'll stir the batter by hand. The oil keeps things foolproof and forgiving. If you can mash a banana and fold ingredients together, you can make this cake. It's the kind of honest American baking I've spent my career championing: unpretentious, generous, and absolutely worth the effort.
Quantity
3 cups (360g)
Quantity
2 cups (400g)
Quantity
1 teaspoon
Quantity
1 teaspoon
Quantity
1/2 teaspoon
freshly grated
Quantity
1 teaspoon
Quantity
3
at room temperature
Quantity
1 1/2 cups (360ml)
Quantity
2 teaspoons
Quantity
1 can (8 ounces)
undrained
Quantity
2 cups mashed (about 4 large)
Quantity
1 1/2 cups (170g)
toasted and chopped, divided
Quantity
16 ounces (2 packages)
softened
Quantity
1 cup (2 sticks/226g)
softened
Quantity
2 pounds (about 8 cups)
sifted
Quantity
2 teaspoons
Quantity
1/8 teaspoon
Quantity
for decorating
| Ingredient | Quantity |
|---|---|
| all-purpose flour | 3 cups (360g) |
| granulated sugar | 2 cups (400g) |
| baking soda | 1 teaspoon |
| ground cinnamon | 1 teaspoon |
| nutmegfreshly grated | 1/2 teaspoon |
| fine sea salt | 1 teaspoon |
| large eggsat room temperature | 3 |
| neutral vegetable oil | 1 1/2 cups (360ml) |
| pure vanilla extract (for cake) | 2 teaspoons |
| crushed pineappleundrained | 1 can (8 ounces) |
| ripe bananas | 2 cups mashed (about 4 large) |
| pecanstoasted and chopped, divided | 1 1/2 cups (170g) |
| cream cheesesoftened | 16 ounces (2 packages) |
| unsalted buttersoftened | 1 cup (2 sticks/226g) |
| powdered sugarsifted | 2 pounds (about 8 cups) |
| pure vanilla extract (for frosting) | 2 teaspoons |
| fine sea salt (for frosting) | 1/8 teaspoon |
| pecan halves (optional) | for decorating |
Spread pecans in a single layer on a rimmed baking sheet. Toast in a 350°F oven for 8 to 10 minutes, stirring once halfway through, until fragrant and a shade darker. You'll smell them before you see the color change. Watch carefully because they turn from toasted to burnt in about sixty seconds. Let cool completely before chopping.
Position a rack in the center of your oven and preheat to 350°F. Generously butter three 9-inch round cake pans, dust with flour, and tap out the excess. Line the bottoms with parchment rounds for insurance. Nothing ruins a triumphant baking day like a cake stuck to the pan.
In a large bowl, whisk together the flour, sugar, baking soda, cinnamon, nutmeg, and salt until thoroughly combined. This dry mixture is your foundation. The spices should distribute evenly so every bite carries warmth.
Choose bananas with plenty of brown spots on the skin. The starch has converted to sugar and the flavor has intensified. Mash them with a fork in a bowl until mostly smooth with some small chunks remaining. A few lumps add pleasant pockets of banana throughout the finished cake.
Add the eggs, oil, and vanilla to the dry ingredients. Stir with a wooden spoon or rubber spatula until just combined. Do not reach for your mixer. This batter should not be beaten or whipped. Overmixing develops gluten and produces a tough, chewy cake instead of the tender crumb you want.
Add the crushed pineapple with all its juice, the mashed bananas, and one cup of the toasted chopped pecans. Reserve the remaining half cup of pecans for decoration. Fold gently until the fruit and nuts are evenly distributed. The batter will be thick and fragrant.
Divide the batter evenly among the three prepared pans. A kitchen scale helps here: weigh each filled pan and adjust. Even layers make assembly easier and the finished cake more beautiful. Bake for 25 to 30 minutes, rotating pans halfway through, until the tops spring back when gently pressed and a toothpick inserted in the center comes out with just a few moist crumbs clinging.
Let the cakes cool in their pans for 15 minutes. The structure sets as they cool, preventing crumbling. Run a thin knife around the edges, then invert onto wire racks. Peel away the parchment. Cool completely, at least one hour, before frosting. Warm cake melts frosting into an unappealing slick.
Beat the softened cream cheese and butter together in a large bowl using a stand mixer or hand mixer on medium speed. Beat for a full 3 minutes until completely smooth, scraping down the sides twice. Lumps of cream cheese will haunt your finished frosting. When the mixture is silky and uniform, reduce speed to low and add the sifted powdered sugar one cup at a time. Add the vanilla and salt with the final cup. Once incorporated, increase speed to medium-high and beat for 2 minutes until fluffy and spreadable.
If your cake layers domed, use a long serrated knife to trim them level. Place each layer cut-side down on your work surface and slice horizontally with a sawing motion, keeping the blade parallel to the counter. Save the scraps for snacking. The cook's privilege.
Place the first layer on a cake stand or serving plate. Dollop about one cup of frosting on top and spread evenly to the edges using an offset spatula. Add the second layer, pressing gently, and repeat with another cup of frosting. Top with the final layer, placing it bottom-side up for the smoothest surface. Apply a thin crumb coat of frosting to the top and sides, just enough to seal in loose crumbs. Refrigerate for 20 minutes to set this base coat.
Apply the remaining frosting generously to the top and sides of the chilled cake. Use sweeping strokes with your spatula, or create rustic swirls for a homey appearance. Press the reserved chopped pecans around the bottom edge of the cake, and arrange pecan halves on top in whatever pattern pleases you. This is your cake. Make it beautiful in your own way.
1 serving (about 155g)
Culinary guides, cultural storytelling, and the editorial depth that makes cooking meaningful.
Discover Culinary ExplorerChef Remy
Shattery sheets of amber candy studded with toasted Louisiana pecans and kissed with good bourbon, the kind of homemade sweet that disappears from holiday tables before the wrapping paper hits the floor.

Chef Dean
Silky cream custard perfumed with scraped vanilla bean and aged Kentucky bourbon, unmolded onto summer berries soaked in their own ruby juices. This is porch-sitting dessert, make-ahead elegance without a lick of fuss.

Chef Dean
Stale bread reborn as a custardy, cinnamon-laced wonder, its golden top yielding to soft, custard-soaked depths while warm bourbon sauce pools into every crevice like liquid velvet.

Chef Dean
Summer's finest stone fruits and wild berries bubble beneath shaggy buttermilk biscuits in a screaming-hot cast iron skillet, the edges caramelized where fruit meets iron, demanding nothing more than cold cream poured from a pitcher.