Culinary Explorer

A cooking platform built around craft, culture, and the stories behind what we eat.
Discover Culinary Explorer
Classic Red Velvet Cake

Classic Red Velvet Cake

Created by

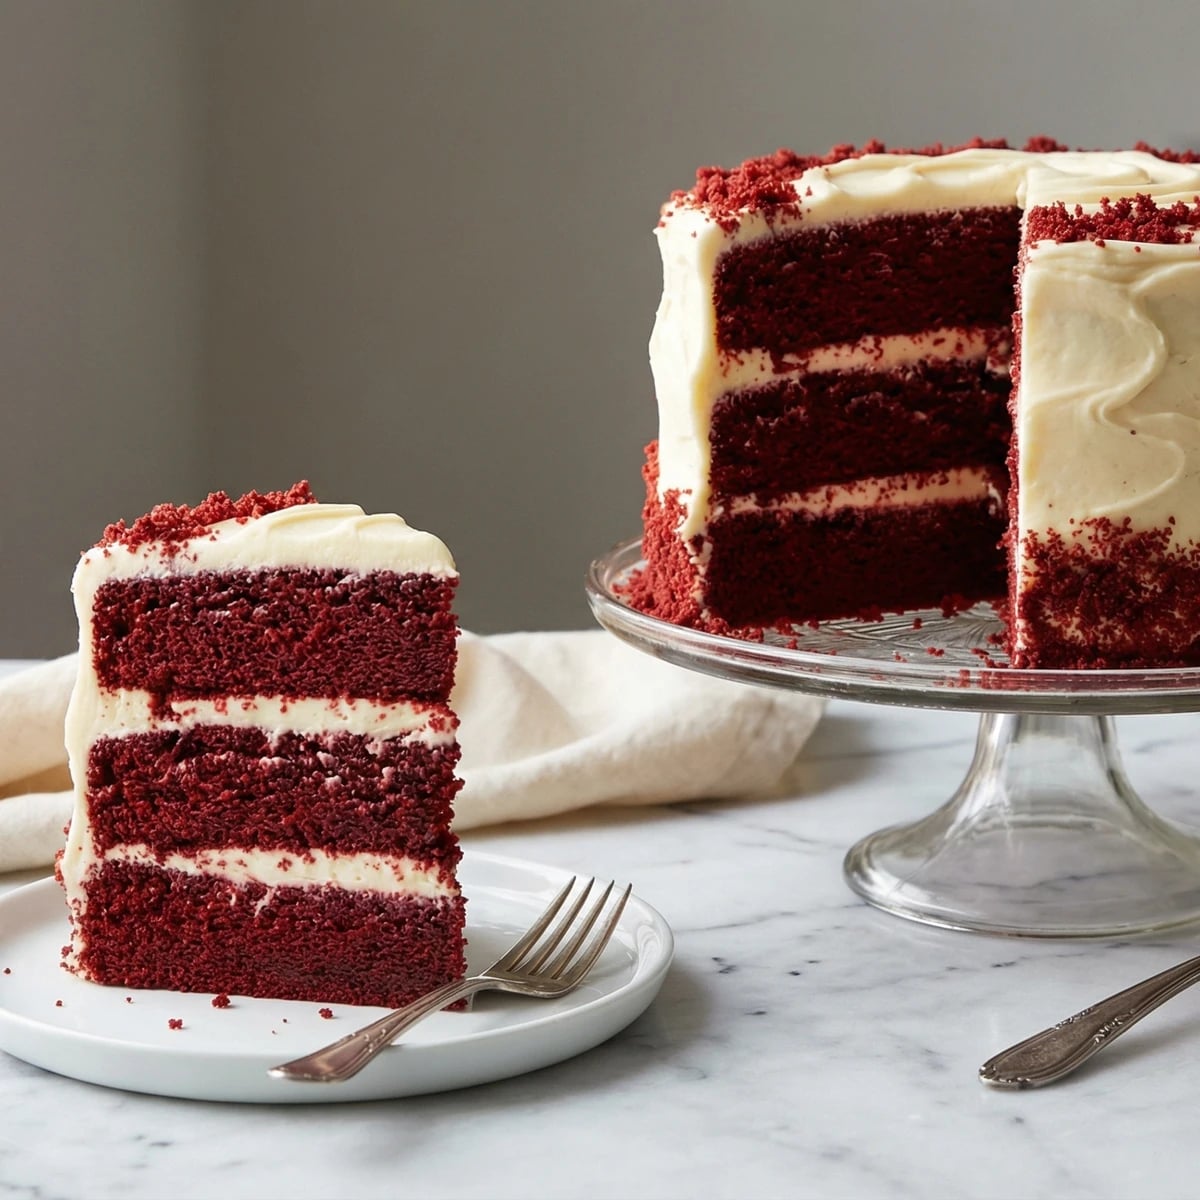
Three towering layers of tender, crimson-hued cake with just a whisper of cocoa, wrapped in clouds of tangy cream cheese frosting that melts on your tongue. This is the cake that made the South famous for dessert.

Desserts
Southern
Birthday
Valentines Day
Special Occasion
45 min
Active Time
30 min cook2 hr 30 min total
Yield12 servings (one 9-inch three-layer cake)

Red velvet cake is one of the great Southern contributions to American baking. Its origins are disputed, claimed by everyone from the Waldorf-Astoria to small-town Texas bakeries, but its place in our hearts is not. This is celebration cake. Birthday cake. The cake you make when someone you love deserves something beautiful.

The name comes from the texture, not the color. A proper red velvet crumb is so fine, so tender, it feels like velvet against your tongue. The cocoa is there for depth, not chocolate flavor. You'll taste it only as a faint earthiness beneath the buttermilk tang and vanilla sweetness. The color, that dramatic crimson, comes from food coloring. There's no pretending otherwise. Early versions achieved a subtle reddish hue from the reaction between acidic buttermilk and cocoa, but the vivid red we expect today requires modern assistance.

Don't let three layers intimidate you. This cake forgives small imperfections because the frosting covers everything. What matters is the crumb structure: tender but sturdy enough to stack, moist enough to stay fresh for days. Follow the method, trust your instincts, and you'll produce a cake worthy of any celebration.

The technique, the tradition, and the story behind every dish.

Discover Culinary Explorer

Ingredients

all-purpose flour

Quantity

2 1/2 cups (315g)

granulated sugar

Quantity

1 1/2 cups (300g)

baking soda

Quantity

1 teaspoon

fine sea salt

Quantity

1 teaspoon

unsweetened cocoa powder

Quantity

2 tablespoons (10g)

vegetable oil

Quantity

1 1/2 cups (360ml)

buttermilk

Quantity

1 cup (240ml)

at room temperature

large eggs

Quantity

2

at room temperature

red food coloring

Quantity

2 tablespoons (30ml)

pure vanilla extract

Quantity

1 teaspoon

distilled white vinegar

Quantity

1 teaspoon

cream cheese

Quantity

24 ounces (680g)

softened

unsalted butter (for frosting)

Quantity

12 tablespoons (1 1/2 sticks/170g)

softened

powdered sugar

Quantity

6 cups (720g)

sifted

pure vanilla extract (for frosting)

Quantity

2 teaspoons

fine sea salt (for frosting)

Quantity

1/4 teaspoon

Equipment Needed

  • Three 9-inch round cake pans
  • Parchment paper rounds
  • Stand mixer or hand mixer
  • Offset spatula
  • Wire cooling racks
  • Cake turntable (optional but helpful)
  • Kitchen scale (recommended)

Instructions

  1. 1

    Prepare your pans

    Position a rack in the center of your oven and heat to 350°F. Butter three 9-inch round cake pans, line the bottoms with parchment paper, butter the parchment, then dust with flour, tapping out any excess. This belt-and-suspenders approach ensures clean release every time.

    If you only own two cake pans, bake two layers first, let the pans cool completely, then bake the third. The batter holds at room temperature for thirty minutes without issue.
  2. 2

    Whisk dry ingredients

    Sift the flour, sugar, baking soda, salt, and cocoa powder into a large mixing bowl. Whisk thoroughly for thirty seconds to distribute the leavening and cocoa evenly. This step prevents pockets of baking soda that would leave bitter spots in your cake.

  3. 3

    Combine wet ingredients

    In a separate bowl or large measuring cup, whisk together the oil, buttermilk, eggs, food coloring, and vanilla until completely uniform. The mixture will turn a vivid, almost alarming red. This is correct.

  4. 4

    Create the batter

    Pour the wet ingredients into the dry and whisk gently until just combined. The batter should be smooth and pourable, the color of ripe strawberries with a slight sheen from the oil. A few small lumps are acceptable. Overmixing develops gluten and toughens the crumb.

    Oil-based cakes stay moist longer than butter cakes. The trade-off is less flavor complexity, which the cocoa and buttermilk correct.
  5. 5

    Add the vinegar

    Sprinkle the vinegar directly onto the batter and fold in with three or four strokes. The vinegar reacts with the baking soda to create extra lift and contributes to that signature tender crumb. Don't overmix after this addition.

  6. 6

    Divide and bake

    Divide batter evenly among prepared pans, about 1 2/3 cups per pan. A kitchen scale makes this foolproof: each pan should hold roughly 400 grams of batter. Smooth the tops gently with an offset spatula. Bake 25 to 30 minutes, rotating pans halfway through, until a toothpick inserted in the center emerges with just a few moist crumbs attached.

  7. 7

    Cool completely

    Let cakes rest in pans on wire racks for fifteen minutes. Run a thin knife around the edges, then invert onto racks, peel away parchment, and flip right-side up. Cool completely before frosting, at least one hour. Warm layers will melt the frosting into an unappetizing slick.

    For the flattest layers, wrap cooled cakes in plastic and refrigerate overnight. Cold cake is easier to trim and frost without crumbling.
  8. 8

    Make the frosting

    Beat the softened cream cheese in a stand mixer fitted with the paddle attachment on medium speed until completely smooth, about two minutes, scraping the bowl frequently. Add the softened butter and beat another two minutes until fluffy and uniform. No lumps should remain.

  9. 9

    Add sugar gradually

    Reduce mixer speed to low and add powdered sugar one cup at a time, beating after each addition until incorporated. Once all sugar is added, increase to medium-high and beat for two minutes until light and spreadable. Add vanilla and salt, beat thirty seconds more.

  10. 10

    Apply the crumb coat

    Place one cake layer on your serving plate or cake stand. Spread about 3/4 cup frosting evenly to the edges. Add the second layer, press gently to level, and frost the same way. Add the third layer, bottom-side up for the flattest top. Apply a thin layer of frosting over the entire cake, just enough to seal in crumbs. Refrigerate fifteen minutes until set.

  11. 11

    Finish and decorate

    Apply the remaining frosting in generous swoops, covering sides and top completely. Use an offset spatula to create rustic swirls or smooth to a clean finish, whichever suits your celebration. The contrast of white frosting against red cake when sliced is the visual reward for your efforts.

    Save a small portion of cake scraps. Crumble them finely and press around the bottom edge of the frosted cake or sprinkle over the top for the classic bakery presentation.

Chef Tips

  • Room temperature ingredients matter more in this cake than almost any other. Cold eggs and buttermilk won't emulsify properly with the oil, resulting in a dense, greasy crumb. Set everything out at least one hour before mixing.
  • Gel food coloring produces more vivid color with less liquid than traditional liquid dye. If substituting, start with half the amount and adjust. The batter should look intensely red before baking, as it fades slightly in the oven.
  • For those avoiding artificial color, beet powder creates a more muted burgundy. Use two tablespoons mixed into the wet ingredients. The flavor is undetectable once baked.
  • Cream cheese frosting softens quickly at room temperature. If your kitchen runs warm, refrigerate the frosted cake for thirty minutes between crumb coat and final frosting to maintain clean lines.
  • This cake actually improves after a day. The moisture redistributes and the crumb becomes even more tender. Store covered at room temperature up to two days, or refrigerated up to five days. Bring to room temperature before serving.

Advance Preparation

  • Cake layers can be baked up to two days ahead, wrapped tightly in plastic, and stored at room temperature. They freeze beautifully for up to three months; thaw overnight in the refrigerator before frosting.
  • Cream cheese frosting can be made one day ahead and refrigerated. Let it come to room temperature and rewhip briefly before using, as it stiffens when cold.
  • The fully assembled and frosted cake keeps refrigerated for up to five days. Remove from refrigerator one hour before serving for the best texture.

Frequently Asked Questions

Nutrition Information

1 serving (about 135g)

Calories
1020 calories
Total Fat
50 g
Saturated Fat
30 g
Trans Fat
0 g
Unsaturated Fat
18 g
Cholesterol
35 mg
Sodium
154 mg
Total Carbohydrates
79 g
Dietary Fiber
1 g
Sugars
62 g
Protein
8 g

Note: Chef personas and recipes are created with AI assistance. Cook with care: follow safe food-handling practices, check doneness with a thermometer when needed, and adapt for allergies and your kitchen.

Where cooking meets culture.

Culinary guides, cultural storytelling, and the editorial depth that makes cooking meaningful.

Discover Culinary Explorer

More from Delicious Desserts

Browse the full collection