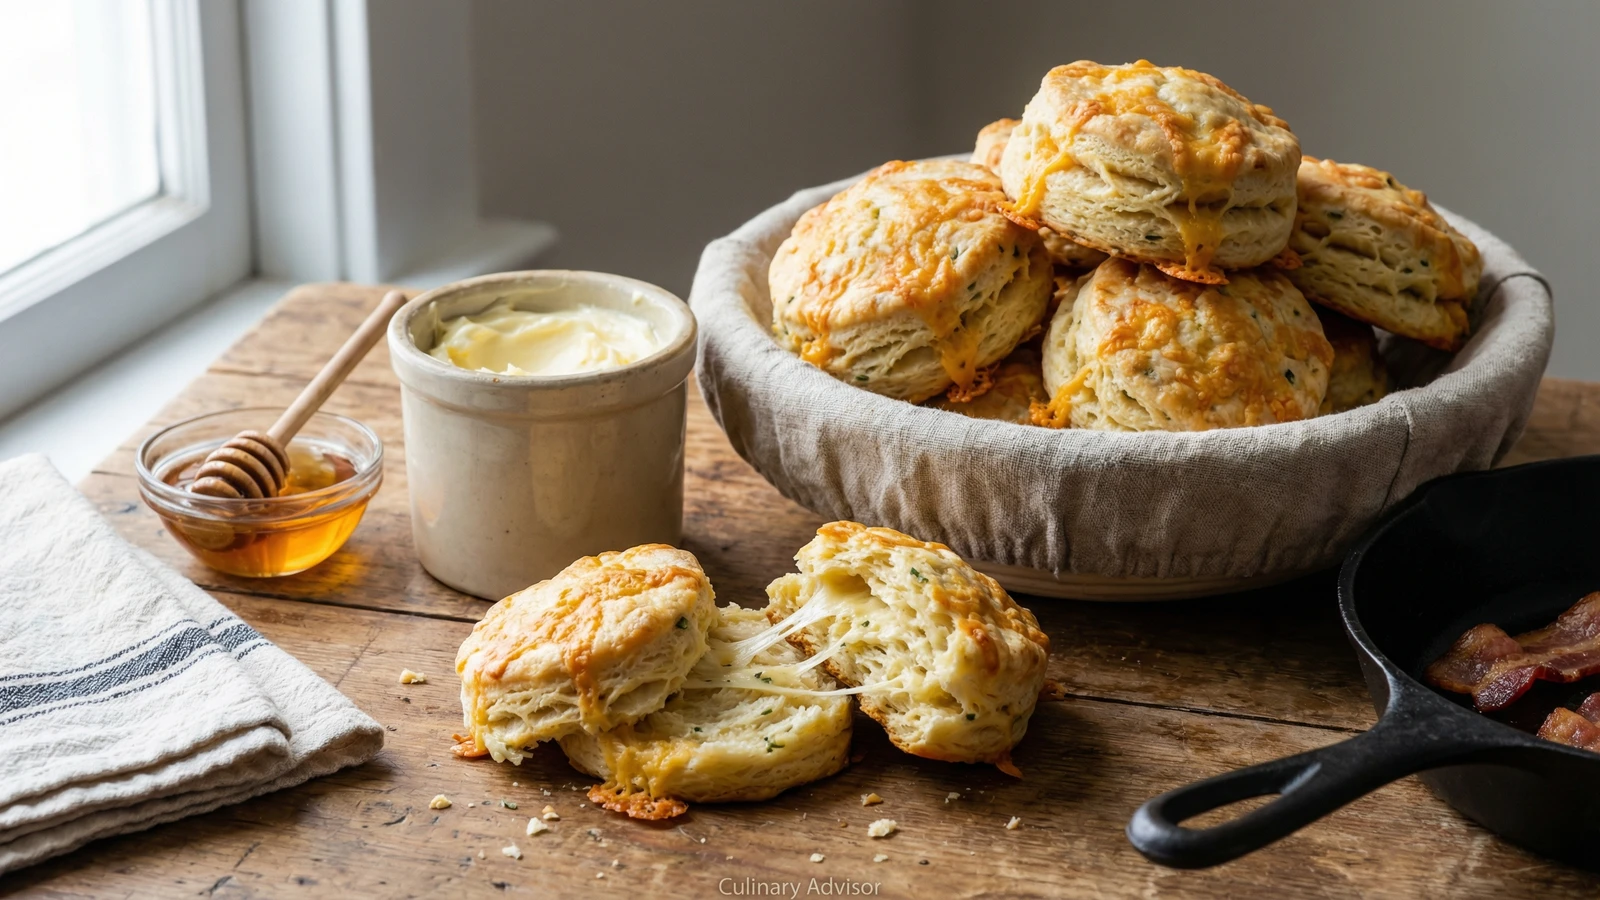
Tall and impossibly flaky biscuits studded with sharp aged cheddar and bright fresh chives, with a golden buttermilk crust and soft pull-apart sides that beg to be split and stuffed with eggs or country ham.
Pastries & Cookies
American
Weeknight
Quick Meal
20 min
Active Time
15 min cook•35 min total
Yield12 biscuits
The American biscuit is one of our great culinary gifts to the world. Southern grandmothers have been making them for generations, passing down techniques that predate written recipes. The method is simple: cold fat cut into flour, bound with buttermilk, handled as little as possible. The results are transformative.
These biscuits take the classic template and make it even better. Sharp aged cheddar melts into the layers, creating pockets of savory richness. Fresh chives add a gentle onion note that belongs at the breakfast table. A whisper of cayenne works quietly in the background, making the cheese taste more like itself.
The key to tall, flaky biscuits lives in temperature control. Everything must stay cold: the butter, the cheese, the buttermilk. Frozen butter grated into the flour creates distinct fat pieces that melt in the oven, leaving behind the air pockets we call layers. Work quickly, handle the dough gently, and don't fuss over perfection. Biscuits reward confidence, not overthinking.
I've taught this recipe to hundreds of nervous cooks convinced biscuits were beyond their abilities. They weren't. Within an hour, every one of them pulled golden, sky-high biscuits from the oven. You will too.
The technique, the tradition, and the story behind every dish.
Position a rack in the upper third of your oven and preheat to 425°F. Line a heavy rimmed baking sheet with parchment paper. The high heat is essential. Biscuits need aggressive bottom heat to set their structure before the butter melts away entirely.
2
Whisk dry ingredients
In a large bowl, whisk together the flour, baking powder, salt, black pepper, and cayenne until thoroughly combined. The cayenne won't make these biscuits spicy. It works behind the scenes, brightening the cheese flavor the way a squeeze of lemon lifts a pan sauce.
Check the date on your baking powder. Old leavening produces flat, dense biscuits no matter how perfectly you handle the dough.
3
Grate frozen butter
Using the large holes of a box grater, grate the frozen butter directly into the flour mixture. Work quickly. The butter should fall into the bowl like coarse snow. Toss the shreds with the flour using your fingertips until each piece is coated and separated. This creates the layers that make biscuits flaky.
Freezing the butter for at least two hours ensures clean grating. Soft butter smears instead of shredding and produces heavy, breadlike biscuits.
4
Add cheese and chives
Add the grated cheddar and snipped chives to the flour mixture. Toss gently until evenly distributed. The cheese should be cold from the refrigerator. Warm cheese clumps together and melts too quickly in the oven, leaving sad pockets instead of stretchy ribbons.
5
Form the dough
Make a well in the center. Pour in one cup of cold buttermilk all at once. Using a fork, stir from the outside edges toward the center, pulling dry ingredients into the liquid. Stop when the dough looks shaggy and holds together in rough clumps. It should appear dry in spots. This is correct.
The cardinal sin of biscuit making is overworking the dough. The moment it holds together, stop mixing. Gluten develops with each turn, and developed gluten means tough biscuits.
6
Fold and laminate
Turn the shaggy dough onto a lightly floured surface. Pat into a rough rectangle about one inch thick. Fold the dough in thirds like a business letter. Rotate ninety degrees and pat flat again. Repeat this folding three more times. You're building layers, creating the structure that will puff and separate in the oven. Handle the dough firmly but quickly.
7
Cut the biscuits
Pat the dough to exactly one inch thick. Using a sharp 2 1/2-inch round cutter dipped in flour, cut straight down without twisting. Twisting seals the edges and prevents proper rise. Gather scraps, pat together gently, and cut remaining biscuits. You should get twelve. The re-rolled biscuits won't rise quite as tall, but they'll taste just as good.
A sharp cutter matters. Dull edges compress the dough and hinder rise. If you don't own a proper cutter, use a drinking glass with a thin rim.
8
Arrange and brush
Place biscuits on the prepared baking sheet with edges just touching. They support each other as they rise, creating taller biscuits with soft, pull-apart sides. Brush tops generously with the remaining two tablespoons of buttermilk. The milk sugars will caramelize into a gorgeous golden crust.
9
Bake until golden
Bake for 14 to 16 minutes until the tops are deeply golden and the bottoms have browned. The biscuits will have risen to nearly double their height. The cheese edges will appear lacey and crisp. Remove from oven and immediately brush with melted butter. The butter soaks into the hot surface, creating a rich, glossy finish that tastes as good as it looks.
10
Rest briefly and serve
Let the biscuits rest on the pan for five minutes. They need this time to set their structure. Try to split one too soon and it will tear rather than separate into those beautiful flaky layers. Serve warm in a cloth-lined basket to hold the heat. These wait for no one.
Chef Tips
•The cheese makes all the difference. Seek out a properly aged cheddar, at least twelve months old. Young cheddar lacks the sharpness to stand up to the butter and buttermilk. The best cheddars will have visible crystals and a slightly crumbly texture.
•Use a box grater on the large holes for the cheese. Pre-shredded cheese is coated in cellulose to prevent clumping and won't melt into those beautiful stretchy ribbons.
•These biscuits are forgiving about buttermilk substitutes. Mix one tablespoon of white vinegar or lemon juice into one cup of whole milk and let it sit for five minutes. It won't be exactly the same, but it will work.
•For breakfast sandwiches, split the biscuits horizontally, add a fried egg and crisp bacon or country ham, and close them up. The yolk breaks into the flaky layers. This is proper American breakfast.
Advance Preparation
•Cut biscuits can be frozen unbaked for up to one month. Arrange on a parchment-lined sheet, freeze solid, then transfer to a freezer bag. Bake directly from frozen at 425°F for 18 to 20 minutes.
•The dry mixture with grated butter, cheese, and chives can be prepared up to two days ahead and refrigerated. Add buttermilk when ready to bake.
•Baked biscuits keep in an airtight container at room temperature for one day. Reheat in a 350°F oven for five minutes to restore the crust. They are best eaten within hours of baking.
Frequently Asked Questions
Nutrition Information
1 biscuit (about 85g)
Calories
250 calories
Total Fat
15 g
Saturated Fat
9 g
Trans Fat
0 g
Unsaturated Fat
6 g
Cholesterol
35 mg
Sodium
195 mg
Total Carbohydrates
21 g
Dietary Fiber
1 g
Sugars
1 g
Protein
7 g
Where cooking meets culture.
Culinary guides, cultural storytelling, and the editorial depth that makes cooking meaningful.