Culinary Explorer

A cooking platform built around craft, culture, and the stories behind what we eat.
Discover Culinary Explorer
San Francisco Sourdough

San Francisco Sourdough

Created by

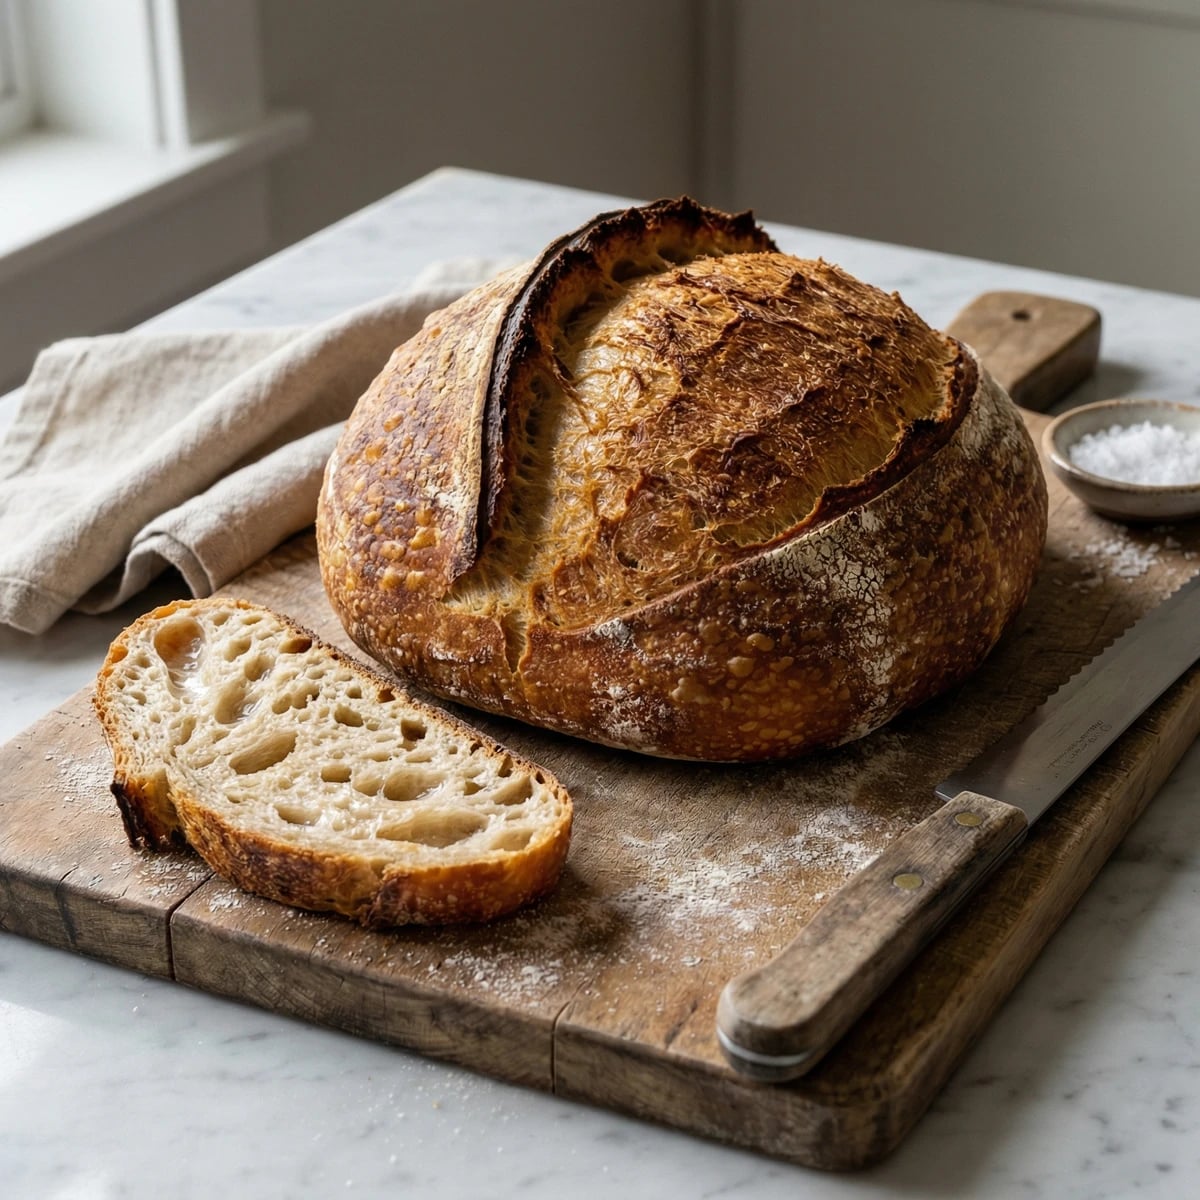
A crusty, deeply tangy boule with an open, glossy crumb that captures the wild fermentation magic of San Francisco's fog-kissed air. Three days of patient work yields bread worth every hour.

Breads
California
Weeknight
Make Ahead
45 min
Active Time
50 min cook72 hr total
Yield1 large boule (about 900g)

San Francisco sourdough is not simply bread. It is a living connection to the Gold Rush, when prospectors carried bubbling starters across the Sierra Nevada like family heirlooms. The city's cool, damp climate created something remarkable: a unique bacterial culture now named Lactobacillus sanfranciscensis that produces a tang found nowhere else on earth. This is bread with a birth certificate.

I've watched too many home bakers approach sourdough with fear. They treat their starters like temperamental infants, fussing over precise temperatures and timing down to the minute. Relax. Wild yeast has survived for millennia without your anxiety. What sourdough requires is attention, not perfection. Learn to read your dough. Trust your hands. The bread will teach you.

The process spans three days, but the actual work totals perhaps forty-five minutes. The rest is waiting while invisible organisms do their ancient labor. Day one, you build the levain. Day two, you mix, fold, shape, and refrigerate. Day three, you bake. The cold overnight proof develops that characteristic sourness. Rush it and you'll have decent bread. Honor the time and you'll have something that makes people stop mid-chew and ask what bakery this came from.

This recipe assumes you already maintain an active starter. If you don't, begin one now. Equal parts flour and water, fed daily for two weeks until it doubles reliably within four to six hours of feeding. That's your foundation. Everything else builds from there.

The technique, the tradition, and the story behind every dish.

Discover Culinary Explorer

Ingredients

bread flour

Quantity

500g (4 cups)

plus more for dusting

water

Quantity

350g (1½ cups)

at 80°F

active sourdough starter

Quantity

100g (½ cup)

fine sea salt

Quantity

10g (2 teaspoons)

rice flour

Quantity

for banneton

Equipment Needed

  • Kitchen scale (essential for consistent results)
  • Large mixing bowl
  • Bench scraper
  • 9-inch round banneton (proofing basket)
  • Bread lame or razor blade
  • 5-quart Dutch oven with lid
  • Wire cooling rack
  • Instant-read thermometer (for water temperature)

Instructions

  1. 1

    Build the levain

    The night before mixing day, feed your starter to build a levain. Combine 25g of active starter with 50g bread flour and 50g water at 80°F in a clean jar. Stir vigorously to incorporate air. Cover loosely and leave at room temperature (68-72°F) for 8 to 12 hours. The levain is ready when it has doubled in volume, shows a domed surface with bubbles throughout, and passes the float test: drop a small spoonful into room temperature water. If it floats, you're ready. If it sinks, wait another hour.

    A slightly cooler room will slow fermentation, giving you flexibility on timing. At 65°F, your levain may need 14 hours.
  2. 2

    Autolyse the flour

    In a large mixing bowl, combine 500g bread flour with 325g of your water (reserve 25g for later). Mix with your hand or a wooden spoon until no dry flour remains. The dough will be shaggy and rough. That's correct. Cover with a damp towel and rest for 45 minutes to 1 hour. This autolyse allows the flour to fully hydrate and begins gluten development without any effort from you. When you return, the dough will feel smoother, more pliable. The transformation happens in silence.

  3. 3

    Add levain and salt

    Dissolve the salt in your reserved 25g of water. Spread 100g of your ripe levain over the autolysed dough. Pour the salted water on top. Now use your hand like a claw, squeezing the dough repeatedly to incorporate the levain and salt. This takes 3 to 4 minutes. The dough will feel like it's falling apart, then suddenly come together. Keep working until no slippery patches of unmixed levain remain. The dough should feel tacky but not sticky, pulling cleanly from your fingers after a moment of contact.

  4. 4

    Bulk fermentation with folds

    Cover the bowl and begin bulk fermentation at room temperature. Over the next 4 hours, perform four sets of stretch-and-folds spaced 30 minutes apart during the first 2 hours. For each set: wet your hand, slide it under one side of the dough, stretch it upward until you feel resistance (not tearing), and fold it over the center. Rotate the bowl 90 degrees and repeat. Four folds per set, north-south-east-west. After the final fold, leave the dough undisturbed for the remaining 2 hours. Watch for a 50% rise in volume, a domed surface, and visible bubbles on the sides when you tilt the bowl toward the light.

    Temperature controls everything. At 78°F, bulk may finish in 3.5 hours. At 68°F, expect 5 to 6 hours. Learn to read the dough, not just the clock.
  5. 5

    Pre-shape the dough

    Flour your work surface lightly. Turn the dough out, letting it release naturally from the bowl. Using a bench scraper and one floured hand, gently shape it into a rough round by tucking the edges underneath. Don't be aggressive. You're building surface tension, not degassing your fermentation. Let this rest uncovered for 25 minutes. The dough will relax and spread slightly. This bench rest makes final shaping easier.

  6. 6

    Final shape

    Dust your banneton generously with rice flour (rice flour prevents sticking better than wheat). Flip the rested dough so the floured top is now face-down on your work surface. Working with the sticky side up, fold the bottom third toward the center, then fold the sides in like an envelope, then roll the whole package toward you to create a taut boule with a seam on the bottom. Use your bench scraper to drag the boule toward you on the unfloured surface, building tension as the friction tightens the skin. Place seam-side up in the banneton.

    The seam goes up in the basket because you'll flip it onto the Dutch oven lid, making the seam the bottom of your baked loaf.
  7. 7

    Cold proof overnight

    Cover the banneton with a plastic bag or shower cap. Refrigerate immediately at 38-40°F for 12 to 16 hours. This cold retard slows yeast activity while bacteria continue producing lactic and acetic acid, developing that signature San Francisco tang. The dough will rise slightly but not dramatically. Don't panic. The magic happens in the oven. You can hold the dough refrigerated for up to 48 hours if your schedule demands flexibility. The sourness intensifies with time.

  8. 8

    Preheat with Dutch oven

    Place your Dutch oven with its lid inside a cold oven. Set the temperature to 500°F. Allow a full hour for preheating, not just until the oven beeps. The thermal mass of cast iron needs time to saturate with heat. The walls of that pot will create steam from the dough's moisture, mimicking professional steam-injected ovens. This is how home bakers achieve that shattering crust.

  9. 9

    Score and load

    Remove the banneton from the refrigerator. Cut a piece of parchment paper slightly larger than your loaf. Invert the dough onto the parchment (it will release cleanly if you used enough rice flour). Using a lame or razor blade held at a 30-degree angle, score the surface decisively with one swift motion, cutting about ½ inch deep. Hesitation creates ragged edges. Confidence creates the ear that will bloom in the oven. Carefully remove the screaming-hot Dutch oven, lift the parchment sling with the dough inside, and lower it into the pot. Replace the lid immediately.

    Bake straight from the refrigerator. Cold dough holds its shape better during scoring and the first minutes of baking.
  10. 10

    Bake covered

    Bake with the lid on at 500°F for 20 minutes. Resist every urge to peek. The lid traps steam released from the dough, keeping the crust pliable while the loaf springs upward. This oven spring transforms your scored slash into a dramatic ear of caramelized crust. You'll hear the bread singing, crackling as it expands. That sound means everything is working.

  11. 11

    Bake uncovered until deep golden

    Remove the lid carefully (steam will escape, so protect your hands and face). Reduce the oven temperature to 450°F. Continue baking uncovered for 25 to 30 minutes until the crust is a deep mahogany brown. This is darker than you think you want. Trust me. That color means flavor, caramelization, a crust that shatters. Pale bread tastes like disappointment. When you tap the bottom of the loaf, it should sound hollow, like knocking on a wooden door.

  12. 12

    Cool completely

    Transfer the loaf to a wire rack immediately. This part requires discipline: wait at least 2 hours before slicing. The interior is still cooking as residual heat redistributes. Cut too soon and you'll find gummy crumb and compressed texture. The loaf will crackle and sing as it cools, a sound that rewards your patience. When you finally slice, use a serrated knife in long, gentle strokes. The crumb should be glossy, open, and slightly translucent. The aroma will fill your kitchen.

Chef Tips

  • Your starter's character determines your bread's flavor. A starter fed with whole rye develops more acidity than one fed with white flour. Experiment. Some bakers maintain multiple starters for different breads.
  • Weigh your ingredients. Volume measurements for flour vary by 30% depending on how you scoop. A kitchen scale costing fifteen dollars will improve your bread more than any expensive flour.
  • The poke test reveals proofing progress: press a floured finger into the dough about half an inch. If it springs back immediately, the dough needs more time. If it springs back slowly, leaving a slight indent, you're ready. If it doesn't spring back at all, you've overproofed.
  • San Francisco's fog and cool temperatures create an ideal environment for sourdough. If you live somewhere hot, your fermentation will move faster. Adjust your timeline accordingly, or use cooler water to slow things down.
  • Leftover bread becomes exceptional toast for three days, then transitions gracefully into breadcrumbs, croutons, or panzanella. Nothing goes to waste.

Advance Preparation

  • Maintain your starter with daily feedings at room temperature, or weekly feedings if stored refrigerated. A neglected starter can be revived with three consecutive daily feedings.
  • The levain should be built 8 to 12 hours before you plan to mix. Evening builds work well for morning mixing.
  • Shaped dough can be cold-proofed for up to 48 hours. Longer cold fermentation produces more sour flavor.
  • Baked loaves freeze beautifully for up to 3 months. Cool completely, wrap tightly in plastic, then foil. Refresh in a 350°F oven for 10 minutes directly from frozen.

Frequently Asked Questions

Nutrition Information

1 serving (about 113g)

Calories
250 calories
Total Fat
1 g
Saturated Fat
0 g
Trans Fat
0 g
Unsaturated Fat
1 g
Cholesterol
0 mg
Sodium
156 mg
Total Carbohydrates
52 g
Dietary Fiber
1 g
Sugars
1 g
Protein
9 g

Note: Chef personas and recipes are created with AI assistance. Cook with care: follow safe food-handling practices, check doneness with a thermometer when needed, and adapt for allergies and your kitchen.

Where cooking meets culture.

Culinary guides, cultural storytelling, and the editorial depth that makes cooking meaningful.

Discover Culinary Explorer

More from The Bread Baker's Handbook

Browse the full collection