Culinary Explorer

A cooking platform built around craft, culture, and the stories behind what we eat.
Discover Culinary Explorer
Joelho de Presunto e Queijo

Joelho de Presunto e Queijo

Created by

You think bakery dough is not for you. Anota aí: flour, milk, yeast, patience, and a filling you already understand. Make a tray and Sunday snack is handled.

Appetizers & Snacks
Brazilian
Make Ahead
Freezer Friendly
Comfort Food
35 min
Active Time
25 min cook2 hr 30 min total
Yield12 rolls

You know that quiet little voice, isso não é pra mim, the one that appears the second a recipe says dough? I know it well. I had it too, standing in my kitchen as a grown woman, writing every tiny step in my caderno because I didn't trust myself to remember what the dough should feel like. Cozinhar não é dom, é um aprendizado. Bread dough too.

This is padaria food, which means it lives in that good Brazilian space between snack and meal. A joelho can sit beside coffee in the afternoon, go into a lunchbox, or rescue dinner when the rice and feijão are already made and a gente needs one more thing on the plate. It isn't the whole pê-efe, no. But it belongs to the same logic: real food, made ahead, shared, nothing pretending to be dinner from a packet.

The method is simple because the dough tells you everything. Knead until it turns smooth and springy, because that stretch is what holds the roll together. Rest it until puffy, because yeast needs time to make the bread soft. Roll it snug, not strangled, because the filling needs to stay inside without squeezing out like drama in a school hallway.

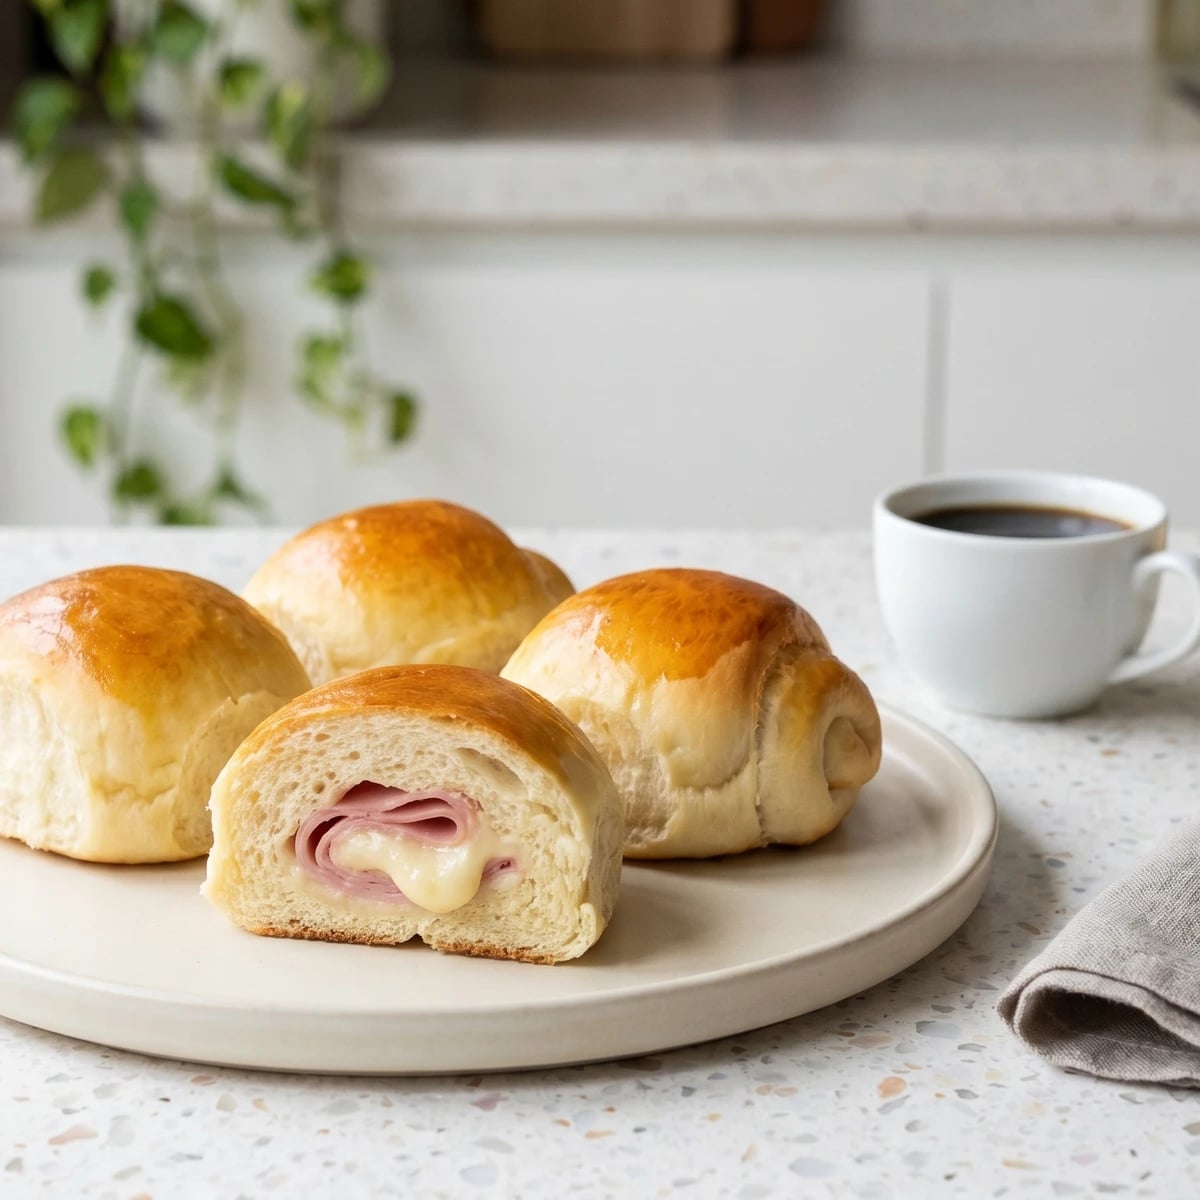
By the end you'll have soft, golden rolls with melted cheese tucked into ham, the kind you thought only the bakery made. The bakery is lovely. Your oven works too.

Joelho de presunto e queijo is a common Brazilian padaria savory, especially in Rio de Janeiro, where the name joelho, knee, sits beside other regional names like enroladinho or italiano depending on the bakery. It belongs to the twentieth-century bakery counter tradition shaped by Portuguese-style bread shops, urban workdays, school snacks, and the habit of eating something savory with coffee. The filling is not ancient and doesn't need a legend: sliced ham, cheese, and soft bread became popular because they were affordable, filling, portable, and easy to sell warm by the tray.

The technique, the tradition, and the story behind every dish.

Discover Culinary Explorer

Ingredients

whole milk

Quantity

1 cup

warm to the touch, not hot

active dry yeast

Quantity

2 1/4 teaspoons

sugar

Quantity

2 tablespoons

all-purpose flour

Quantity

4 cups

plus more only if the dough is truly sticky

fine salt

Quantity

1 1/2 teaspoons

egg

Quantity

1 large

oil

Quantity

3 tablespoons

butter

Quantity

1 tablespoon

softened

ham

Quantity

12 slices

mozzarella cheese

Quantity

12 slices

egg yolk

Quantity

1 large

beaten with 1 tablespoon milk, for brushing

sesame seeds (optional)

Quantity

1 tablespoon

Equipment Needed

  • Large mixing bowl
  • Measuring cups and spoons
  • Rolling pin
  • Baking tray
  • Parchment paper
  • Pastry brush

Instructions

  1. 1

    Wake the yeast

    Put the warm milk, yeast, and sugar in a large bowl and stir. Let it sit for 5 to 10 minutes, until the surface looks foamy and smells gently bready. If nothing happens, your yeast is dead or the milk was too hot, and no amount of optimism will make the dough rise.

    Warm means comfortable on your finger, not hot. Hot milk kills yeast, cold milk slows it down, and then you sit there blaming yourself for biology.
  2. 2

    Mix the dough

    Add the flour, salt, egg, oil, and softened butter. Stir until the bowl turns shaggy and there are no dry pockets of flour. It will look messy at first. Good. Dough begins as a pile of confusion before it becomes something you can trust.

  3. 3

    Knead until smooth

    Turn the dough onto a lightly floured counter and knead for 8 to 10 minutes, pushing it away with the heel of your hand and folding it back. Stop when it feels smooth, soft, and elastic, and springs back when you poke it. Add flour only by the tablespoon if it sticks badly, because too much flour makes a tough roll instead of a soft one.

    Sticky at the beginning is normal. Wet cement sticky is not. Give the dough two minutes of kneading before deciding it needs more flour.
  4. 4

    Let it rise

    Put the dough in a lightly oiled bowl, turn it once so the top is coated, cover, and let it rise in a warm spot until puffy and nearly doubled, about 1 hour. The clock is a guide, not the boss. Puffy dough means the yeast has filled it with air, and that air is what gives you a tender roll.

  5. 5

    Divide and rest

    Tip the dough onto the counter and press it gently to release the largest bubbles. Divide it into 12 equal pieces. Cover them with a towel and rest for 10 minutes, until they relax. This little pause makes the dough easier to roll without snapping back like it's arguing with you.

  6. 6

    Fill the rolls

    Roll one piece into a small rectangle, about 12 by 15 cm. Lay on one slice of ham and one slice of cheese, folding them if needed so they stay inside the dough. Leave a small border bare around the edges, because cheese on the edge becomes cheese on the tray.

  7. 7

    Roll and seal

    Roll the dough up from the short side, snug but not tight, then pinch the seam and ends closed. Place seam-side down on a lined baking tray. Sealing matters because melted cheese looks for escape routes, and it will find every lazy pinch.

  8. 8

    Proof again

    Cover the shaped rolls and let them rise for 25 to 35 minutes, until visibly puffier and soft to the touch. Don't skip this second rest. It gives the dough time to loosen around the filling, so the baked joelhos come out soft instead of dense.

  9. 9

    Brush and bake

    Heat the oven to 180°C (350°F). Brush the rolls with the beaten yolk and milk, then sprinkle sesame seeds if using. Bake for 22 to 25 minutes, until deep golden on top and lightly browned underneath. That color is flavor and a soft crust, not decoration.

  10. 10

    Cool before eating

    Let the rolls sit on the tray for 10 minutes before biting in. The cheese will settle, the crumb will finish firming, and you won't burn your mouth proving a point nobody asked you to prove.

Chef Tips

  • Use real sliced ham and real cheese. The shortcut is buying them already sliced at the market, which is fine. The shortcut I won't hand you is powdered cheese flavor or some packet pretending to be filling. That's not comida de verdade, that's marketing with salt.
  • Mozzarella gives the classic stretchy padaria bite. Prato cheese works too and tastes very Brazilian, but it can leak more, so seal the ends properly and don't overfill.
  • Make the whole tray. Eat what you want today, freeze the rest, and future you will be smug in the correct direction.
  • If your kitchen is cold, let the covered bowl sit inside the turned-off oven with the oven light on. Warm, not hot. Yeast likes comfort, not punishment.
  • For smaller party snacks, divide the dough into 18 pieces and use smaller strips of ham and cheese. Bake a few minutes less and watch the color, because small rolls dry out faster.

Advance Preparation

  • Shape the rolls, freeze them on a tray until firm, then store in a freezer bag for up to 2 months. Bake from frozen at 180°C (350°F), adding 5 to 8 minutes.
  • The dough can rise overnight in the fridge after the first mix. Cover it well, then bring it to room temperature for 30 minutes before dividing and shaping.
  • Baked joelhos keep 3 days in the fridge. Reheat in a 180°C (350°F) oven until the bread feels soft again and the cheese is melted, about 10 minutes.

Frequently Asked Questions

Nutrition Information

1 serving (about 115g)

Calories
345 calories
Total Fat
14 g
Saturated Fat
6 g
Trans Fat
0 g
Unsaturated Fat
8 g
Cholesterol
75 mg
Sodium
825 mg
Total Carbohydrates
35 g
Dietary Fiber
1 g
Sugars
4 g
Protein
18 g

Note: Chef personas and recipes are created with AI assistance. Cook with care: follow safe food-handling practices, check doneness with a thermometer when needed, and adapt for allergies and your kitchen.

Where cooking meets culture.

Culinary guides, cultural storytelling, and the editorial depth that makes cooking meaningful.

Discover Culinary Explorer

More from Salgados de Padaria & Boteco

Browse the full collection