Culinary Explorer

A cooking platform built around craft, culture, and the stories behind what we eat.
Discover Culinary Explorer
Fluffy Buttermilk Biscuits

Fluffy Buttermilk Biscuits

Created by

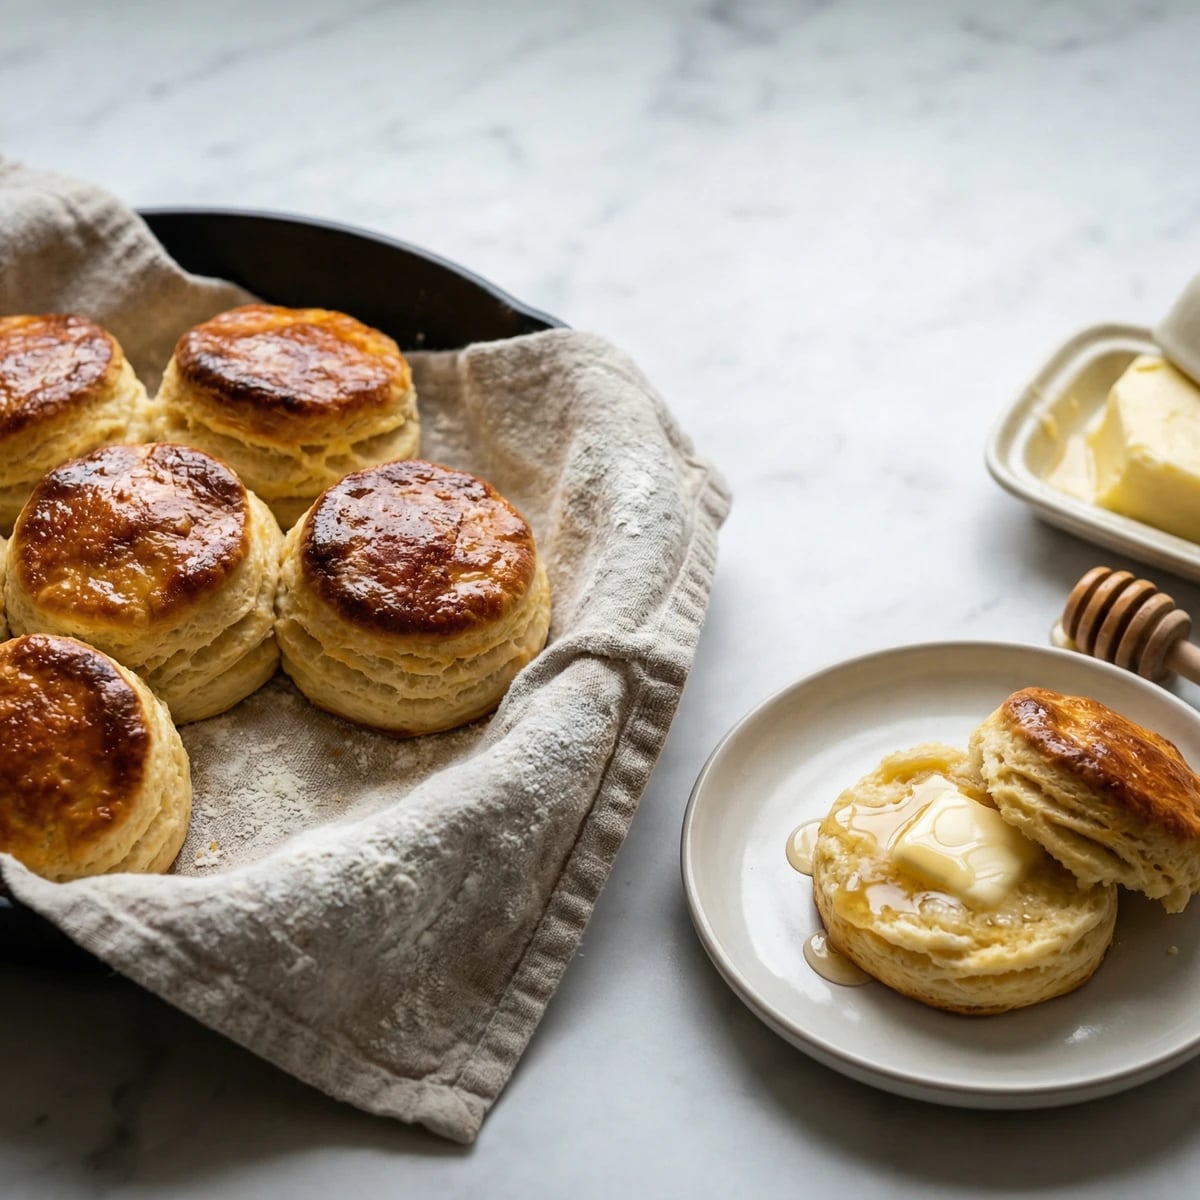
Towering golden biscuits with layers that shatter and pull apart in buttery sheets. The kind your grandmother made if she knew her way around a flour bin and a cold stick of butter.

Breads
Southern
Comfort Food
15 min
Active Time
15 min cook30 min total
Yield12 biscuits

The Southern biscuit is an act of faith. You combine flour, fat, and buttermilk with as little handling as possible, then trust the oven to do its work. There's no yeast. No rising time. No second chances. What emerges in fifteen minutes is either tall and flaky or dense as a hockey puck. The difference comes down to temperature and touch.

Cold butter is non-negotiable. The moment those fat chunks hit the hot oven, they release steam that forces the layers apart. Warm butter simply melts into the flour and produces something more like a scone. A good scone, perhaps, but not a proper biscuit. Keep everything cold: the butter, the buttermilk, even the bowl if you can manage it.

I learned biscuit making from a woman in Charleston who could produce a perfect batch while holding a conversation about absolutely anything else. Her hands moved from memory. She never measured the buttermilk, just poured until the dough looked right. That intuition takes years to develop. Until then, follow these proportions exactly. They work.

The technique matters more than the recipe. Fold the dough, don't knead it. Cut straight down with your cutter, never twist. Nestle them close together in the pan so they push each other upward as they rise. These details separate restaurant-quality biscuits from the sad, squat specimens that disappoint so many home cooks.

The technique, the tradition, and the story behind every dish.

Discover Culinary Explorer

Ingredients

all-purpose flour

Quantity

2 1/2 cups, plus more for dusting

baking powder

Quantity

1 tablespoon

baking soda

Quantity

1/2 teaspoon

fine sea salt

Quantity

1 1/2 teaspoons

granulated sugar

Quantity

1 tablespoon

unsalted butter

Quantity

8 tablespoons (1 stick)

cold, cut into 1/2-inch cubes

buttermilk

Quantity

1 cup plus 2 tablespoons

cold

melted butter

Quantity

2 tablespoons

for brushing

Equipment Needed

  • Large mixing bowl
  • Pastry blender or two butter knives
  • 2 1/2-inch round biscuit cutter
  • Baking sheet or 10-inch cast iron skillet
  • Pastry brush

Instructions

  1. 1

    Prepare the oven and pan

    Position a rack in the upper third of your oven and preheat to 450°F. Line a baking sheet with parchment paper or use an ungreased cast iron skillet. The high heat is essential: it creates the initial burst of steam that lifts those layers.

  2. 2

    Combine dry ingredients

    Whisk together the flour, baking powder, baking soda, salt, and sugar in a large bowl. Make sure the leaveners are evenly distributed. Clumps of baking powder create bitter spots in your finished biscuits.

    Place your mixing bowl in the freezer for 10 minutes before starting. Cold equipment keeps the butter firm longer.
  3. 3

    Cut in the butter

    Add the cold butter cubes to the flour mixture. Using a pastry blender, two knives, or your fingertips, work the butter into the flour until the mixture resembles coarse meal with some pea-sized chunks remaining. You should see distinct butter pieces. They're responsible for the layers. Work quickly so your hands don't warm the butter.

    If your kitchen is warm, return the bowl to the refrigerator for 10 minutes at this stage. Cold butter is the whole game.
  4. 4

    Add the buttermilk

    Create a well in the center of the flour mixture. Pour in the cold buttermilk all at once. Stir with a fork just until the dough comes together in shaggy clumps. It will look rough and slightly dry. This is correct. Overworking develops gluten and produces tough biscuits. The moment the flour is hydrated, stop stirring.

  5. 5

    Fold the dough

    Turn the dough onto a lightly floured surface. Pat it into a rectangle about 1 inch thick. Fold the dough in thirds like a business letter. Rotate it 90 degrees and pat it out again. Repeat this folding process three more times. These folds create the layers. You'll feel the dough become smoother with each fold, but resist the urge to keep going. Four folds is enough.

    Handle the dough with confidence but speed. Tentative poking warms the butter. Quick, decisive movements preserve it.
  6. 6

    Cut the biscuits

    Pat the dough into a final rectangle about 3/4 inch thick. Using a sharp 2 1/2-inch round cutter dipped in flour, cut straight down without twisting. Twisting seals the edges and prevents proper rising. Gather the scraps gently, pat them together, and cut remaining biscuits. These second-cut biscuits won't rise quite as tall, but they'll still be delicious.

  7. 7

    Arrange for baking

    Place the biscuits on your prepared pan with sides touching. When biscuits bake in contact with each other, they support one another and rise upward rather than spreading outward. The edges will pull apart easily after baking.

    For extra-crispy bottoms, use a cast iron skillet preheated in the oven for 5 minutes.
  8. 8

    Bake until golden

    Bake for 12 to 15 minutes, rotating the pan halfway through. The biscuits are done when the tops are deep golden brown and the sides look set. Don't pull them early. Pale biscuits are underbaked biscuits, and underbaked biscuits are gummy inside. Trust the color.

  9. 9

    Brush and serve

    Remove from the oven and immediately brush the tops with melted butter. The butter soaks into the crust while it's still porous from the heat. Serve within 20 minutes if possible. A fresh biscuit is a fleeting pleasure. They're still good later, but neverquite as good as right now.

Chef Tips

  • If you don't have buttermilk, stir 1 tablespoon of white vinegar or lemon juice into 1 cup of whole milk. Let it sit for 10 minutes until slightly thickened. It's not quite the same, but it works.
  • The flour matters less than you'd think. All-purpose works beautifully. Southern brands like White Lily have lower protein content and produce slightly more tender biscuits, but don't let unavailability stop you from baking.
  • Invest in a proper biscuit cutter. The sharp edge cuts cleanly rather than pressing and sealing. In a pinch, use a thin-rimmed drinking glass dipped in flour.
  • These biscuits are the foundation for countless meals: sausage gravy, ham and honey, strawberry shortcake, chicken sandwiches. Master this recipe and you've unlocked a dozen others.

Advance Preparation

  • Unbaked biscuits can be frozen on a parchment-lined sheet, then transferred to a freezer bag for up to 2 months. Bake directly from frozen, adding 3 to 4 minutes to the baking time.
  • The dry ingredients can be combined and stored in an airtight container for up to 1 month. Cut in the butter and add buttermilk when ready to bake.
  • Leftover biscuits keep in an airtight container at room temperature for 1 day. Split them, brush cut sides with butter, and toast in a 375°F oven for 5 minutes to revive them. They won't match fresh, but they'll satisfy.

Frequently Asked Questions

Nutrition Information

1 biscuit (about 48g)

Calories
195 calories
Total Fat
10 g
Saturated Fat
6 g
Trans Fat
0 g
Unsaturated Fat
4 g
Cholesterol
25 mg
Sodium
890 mg
Total Carbohydrates
22 g
Dietary Fiber
1 g
Sugars
1 g
Protein
3 g

Note: Chef personas and recipes are created with AI assistance. Cook with care: follow safe food-handling practices, check doneness with a thermometer when needed, and adapt for allergies and your kitchen.

Where cooking meets culture.

Culinary guides, cultural storytelling, and the editorial depth that makes cooking meaningful.

Discover Culinary Explorer

More from Comfort Food Classics

Browse the full collection