Culinary Explorer

A cooking platform built around craft, culture, and the stories behind what we eat.
Discover Culinary Explorer
Rissóis de Camarão

Rissóis de Camarão

Created by

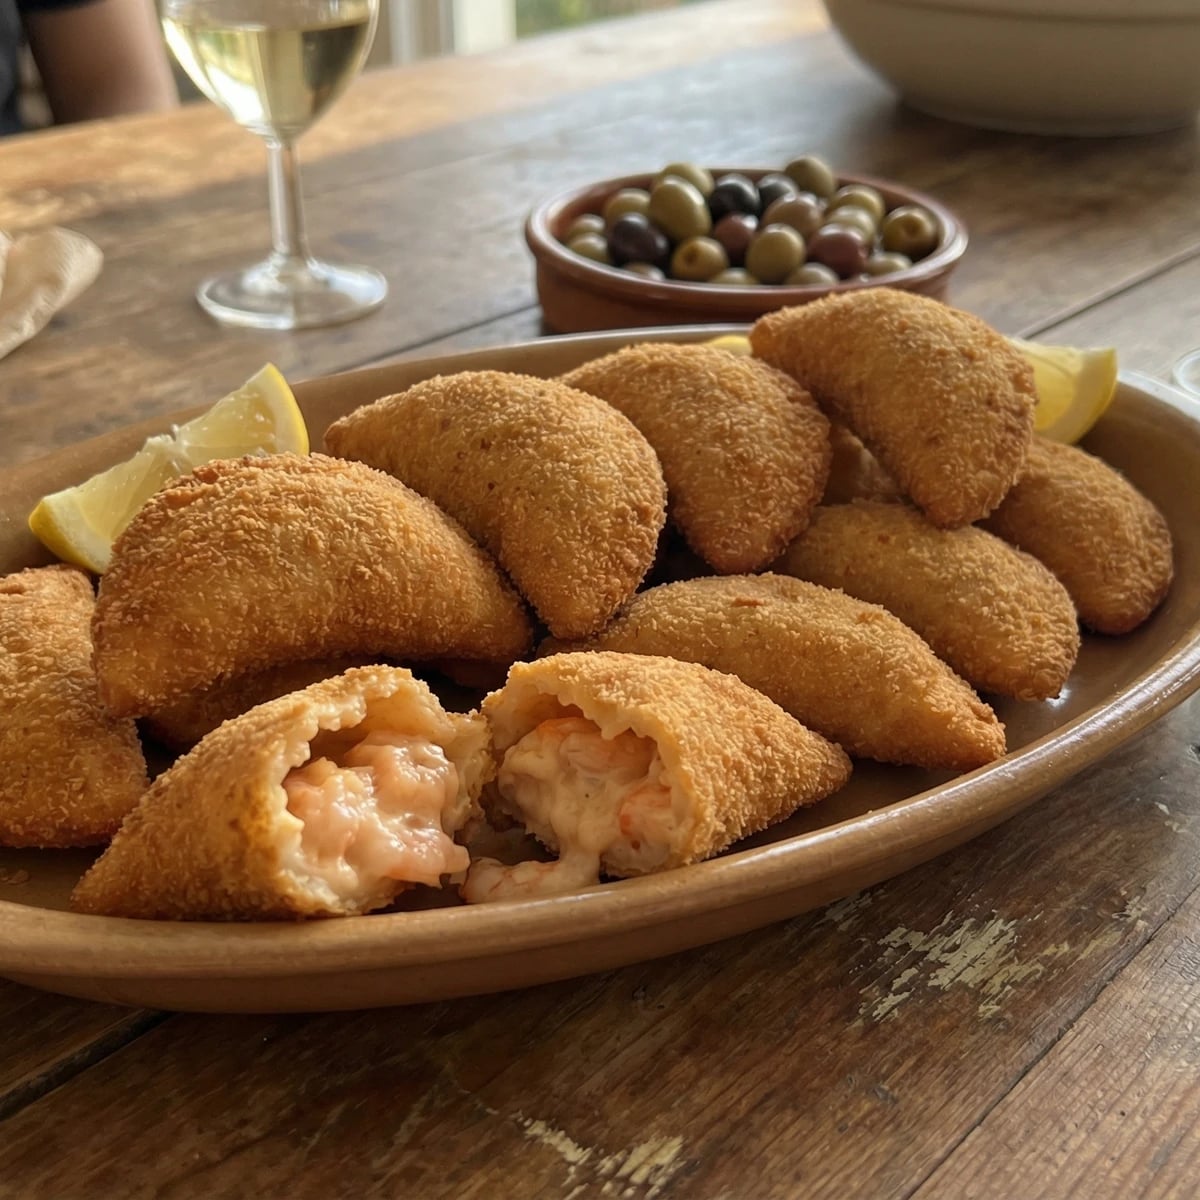
The shrimp turnover that appears at every Portuguese celebration, proof that when French béchamel met Portuguese hospitality, something perfect was born. Crispy shell, creamy filling, no occasion too small.

Appetizers & Snacks
Portuguese
Dinner Party
Make Ahead
Freezer Friendly
1 hr 30 min
Active Time
30 min cook2 hr total
YieldAbout 24 rissóis

If you've ever been to a Portuguese party, a baptism, a wedding, a birthday, you've seen the plate of rissóis. Golden half-moons piled high, still warm from frying, disappearing faster than you can refill the tray. This is the petisco that says someone cared enough to make something by hand.

Rissóis are a labor of love. I won't pretend otherwise. The dough, the filling, the shaping, the breading, the frying. It takes time. But here's what I've learned from the grandmothers I've documented across Portugal: they never apologize for dishes that take time. Time is how you show love. When Avó Leonor made rissóis, the whole family gathered in the kitchen. My cousins and I would shape them while she managed the frying. Three generations around the table, hands busy, stories flowing. That's the tradition inside the tradition.

The technique is French. Béchamel wrapped in dough, breaded and fried. But the soul is Portuguese. We took that idea and made it ours, filling it with camarão from our coasts, adding a whisper of lemon zest to the dough, perfecting the ratio of crispy shell to creamy center. Every tasca in Lisbon serves them. Every grandmother has her method. And now you'll have yours.

These freeze beautifully, which makes them perfect for entertaining. Shape and bread them, freeze on a tray, then bag them. Fry straight from frozen, adding a minute to the cooking time. A freezer full of rissóis means you're always ready for guests.

Rissóis arrived in Portugal through French culinary influence, likely during the 19th century when French cuisine dominated European aristocratic kitchens. The Portuguese transformed the concept into a street food and home celebration staple. The name derives from the French 'rissole,' but the shrimp filling and characteristic half-moon shape are distinctly Portuguese innovations.

The technique, the tradition, and the story behind every dish.

Discover Culinary Explorer

Ingredients

raw shrimp

Quantity

400g

peeled and deveined, shells reserved

water (for shrimp stock)

Quantity

2 cups

bay leaf

Quantity

1

butter (for filling)

Quantity

4 tablespoons

onion

Quantity

1 small

minced very fine

all-purpose flour (for filling)

Quantity

3 tablespoons

whole milk

Quantity

1/2 cup

reserved shrimp cooking liquid

Quantity

1/2 cup

fresh lemon juice

Quantity

1 tablespoon

fresh parsley

Quantity

1 tablespoon

finely chopped

salt and white pepper

Quantity

to taste

water (for dough)

Quantity

1 1/2 cups

butter (for dough)

Quantity

4 tablespoons

salt (for dough)

Quantity

1 teaspoon

lemon zest

Quantity

from 1/2 lemon

all-purpose flour (for dough)

Quantity

1 3/4 cups

all-purpose flour (for breading)

Quantity

1 cup

eggs

Quantity

3 large

beaten

fine dry breadcrumbs

Quantity

2 cups

vegetable oil

Quantity

for deep frying

Equipment Needed

  • 10cm (4-inch) round cutter or glass
  • Rolling pin
  • Deep pot or fryer
  • Kitchen thermometer
  • Slotted spoon
  • Fork for crimping

Instructions

  1. 1

    Make the shrimp stock

    In a small pot, combine the reserved shrimp shells with 2 cups of water and the bay leaf. Bring to a simmer and cook for 15 minutes. This is flavor you'd otherwise throw away. Strain and set aside. You'll need half a cup for the béchamel.

  2. 2

    Cook and chop the shrimp

    Poach the peeled shrimp in the strained stock for 2 to 3 minutes until just pink and curled. Remove with a slotted spoon and let cool. Chop into small pieces, about the size of a chickpea. Not too fine or you lose the texture. Not too large or they'll tear through the dough.

    The shrimp will cook again when you fry the rissóis. Undercook them slightly now so they stay tender at the end.
  3. 3

    Build the béchamel filling

    Melt the butter in a saucepan over medium heat. Add the minced onion and cook until soft and translucent, about 5 minutes. No color. Add the flour and stir constantly for 2 minutes to cook out the raw taste. Slowly whisk in the milk and then the shrimp stock. Keep whisking until the mixture thickens into a very thick béchamel, about 5 minutes. It should be thicker than a normal sauce, almost like a paste. Stir in the chopped shrimp, lemon juice, and parsley. Season with salt and white pepper. Spread on a plate, cover with plastic touching the surface, and refrigerate until completely cold, at least 1 hour.

    The filling must be cold and firm to shape. Warm filling will make the rissóis impossible to form. Patience here saves frustration later.
  4. 4

    Make the dough

    In a saucepan, combine the water, butter, salt, and lemon zest. Bring to a full boil over medium-high heat. The moment it boils, remove from heat and add all the flour at once. Stir vigorously with a wooden spoon until the dough comes together and pulls away from the sides of the pan. It will look rough at first, then smooth. Turn onto a lightly floured surface and knead briefly until uniform. Wrap in plastic and let rest for 15 minutes.

    This dough is similar to pâte à choux but drier. It should be pliable but not sticky. If it sticks to your hands, add a bit more flour when kneading.
  5. 5

    Roll and cut the dough

    Roll the dough on a floured surface to about 2mm thick. It should be thin enough to fold without cracking but thick enough to hold the filling. Cut rounds using a 10cm (4-inch) cutter or the rim of a glass. Gather and re-roll the scraps. You should get about 24 rounds.

  6. 6

    Shape the rissóis

    Place a heaping tablespoon of the cold filling in the center of each round. Fold the dough over to form a half-moon. Press the edges firmly with your fingers, then crimp with the tines of a fork to seal. The seal is critical. Any gaps and the filling will escape during frying. Work on a lightly floured surface and keep finished rissóis covered so they don't dry out.

    Avó Leonor had a trick: she'd dip her finger in water and run it along the edge before folding. The moisture helps the seal.
  7. 7

    Bread the rissóis

    Set up three shallow dishes: flour in the first, beaten eggs in the second, breadcrumbs in the third. Dredge each rissól in flour, shaking off excess. Dip in egg, letting the excess drip off. Roll in breadcrumbs, pressing gently so they adhere. Place on a tray lined with parchment. Repeat with all rissóis.

  8. 8

    Fry until golden

    Heat oil in a deep pot or fryer to 180°C (350°F). Fry the rissóis in batches of 4 or 5, turning once, until deep golden brown on all sides, about 3 minutes total. Don't crowd the pot or the temperature will drop and the coating will absorb oil. Drain on paper towels. Serve hot.

    Test your oil with a small piece of dough. It should sizzle immediately and rise to the surface. If it sinks and sits, the oil isn't hot enough.

Chef Tips

  • Use raw shrimp, not pre-cooked. Pre-cooked shrimp will turn to rubber by the time they're fried twice. The gentle poach, then the hot fry: that's how you keep them tender.
  • White pepper instead of black. Black pepper leaves visible specks in the filling that some consider unsightly. Traditional recipes call for white. Your guests won't know the difference, but you will.
  • The dough dries out quickly. Keep rounds covered with a damp towel while you work. If edges crack when you fold, the dough has dried. Knead it briefly with wet hands to restore pliability.
  • At Mesa da Avó, we serve these with lemon wedges and nothing else. The filling is already seasoned, already complete. They don't need sauce. They need to be eaten hot, standing around the kitchen, before they even reach the table.

Advance Preparation

  • The filling must be made at least 1 hour ahead and chilled until firm. It can be made up to 2 days in advance.
  • Shaped and breaded rissóis can be frozen for up to 2 months. Freeze on a tray until solid, then transfer to bags. Fry directly from frozen, adding 1 minute to cooking time.
  • Once fried, rissóis are best eaten immediately. They can be kept warm in a low oven (100°C) for up to 20 minutes, but the coating will lose some crispness.

Frequently Asked Questions

Nutrition Information

1 rissóis (about 50g)

Calories
205 calories
Total Fat
11 g
Saturated Fat
3 g
Trans Fat
0 g
Unsaturated Fat
7 g
Cholesterol
65 mg
Sodium
270 mg
Total Carbohydrates
18 g
Dietary Fiber
1 g
Sugars
1 g
Protein
8 g

Note: Chef personas and recipes are created with AI assistance. Cook with care: follow safe food-handling practices, check doneness with a thermometer when needed, and adapt for allergies and your kitchen.

Where cooking meets culture.

Culinary guides, cultural storytelling, and the editorial depth that makes cooking meaningful.

Discover Culinary Explorer

More from Chef Margarida's Appetizers and Snacks

Browse the full collection