Culinary Explorer

A cooking platform built around craft, culture, and the stories behind what we eat.
Discover Culinary Explorer
Panettone Classico Milanese

Panettone Classico Milanese

Created by

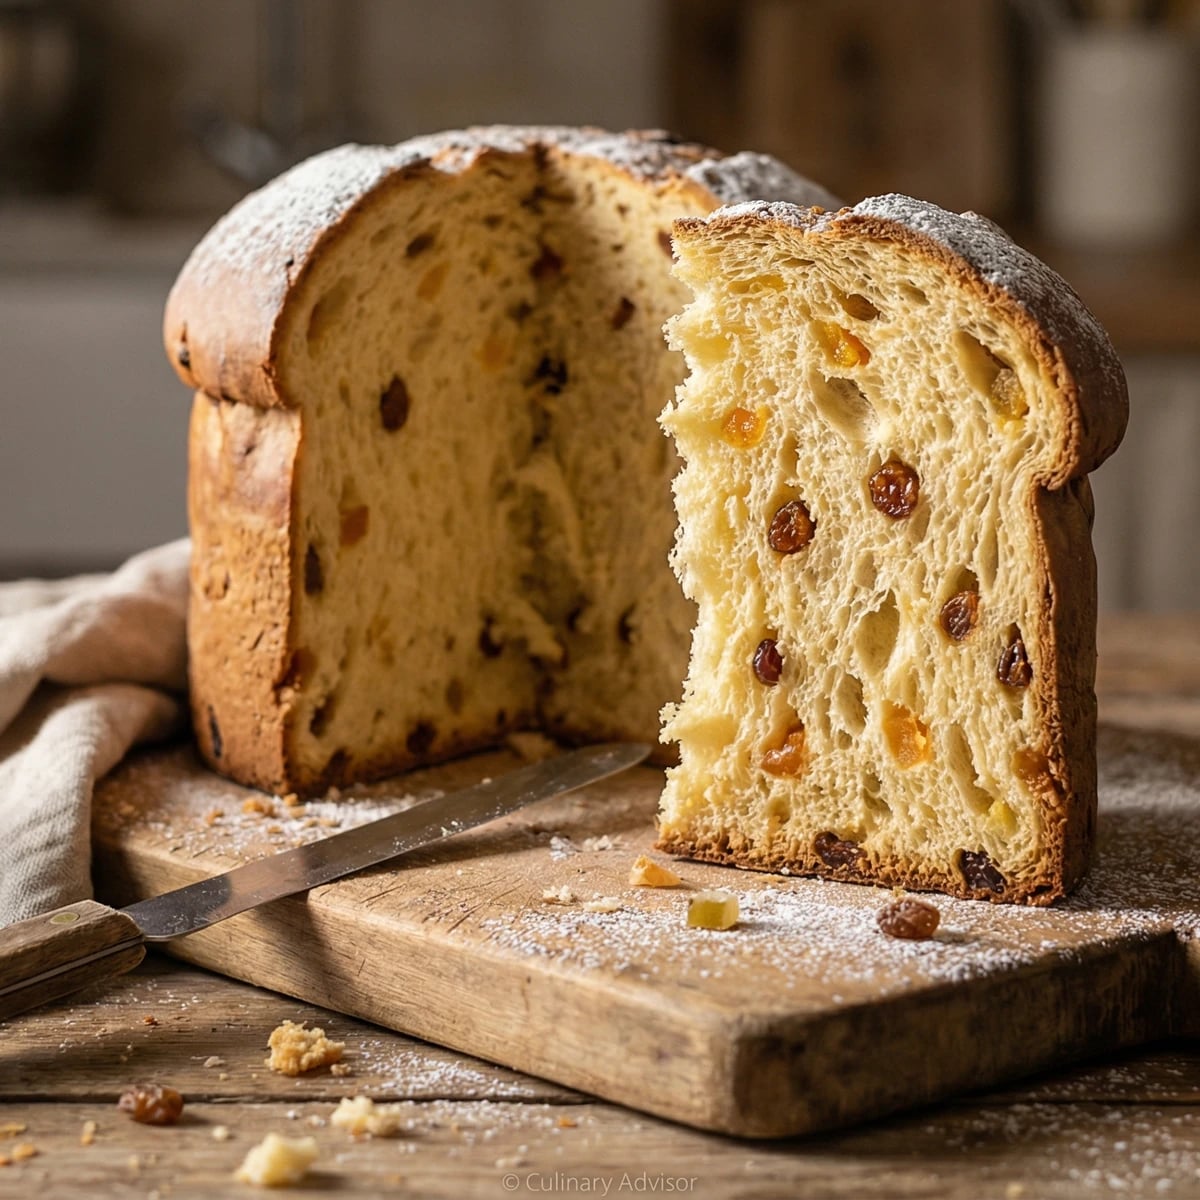
The great dome-shaped bread of Milan, raised slowly over days with natural yeast until the crumb becomes a web of golden strands. This is not a quick bread. It is a commitment.

Desserts
Italian, Lombard
Christmas
Holiday
Special Occasion
2 hr
Active Time
55 min cookP3D total
Yield2 panettone (about 750g each)

Panettone is not difficult because the steps are complicated. It is difficult because it demands time, attention, and the willingness to work with a living thing. The natural starter, which Italians call lievito madre, is not a convenience. It is the soul of true panettone. Without it, you have sweet bread. With it, you have something that has taken Milan three days to create.

The industrial panettone that fills supermarket shelves bears little resemblance to what Milanese bakers once made. Those factory versions rely on chemical leaveners and artificial flavors to approximate what only time can produce. The real thing pulls apart in soft, fragrant strands. It stays fresh for weeks without preservatives because the long fermentation creates its own natural preservation.

I will not pretend this is simple. You must feed your starter, mix your dough, wait, mix again, wait again, shape, proof, bake, and then hang the loaf upside down so it does not collapse under its own weight. If this sounds like too much trouble, buy your panettone from a good Italian bakery. But if you want to understand what this bread can be, if you want to bring something to your Christmas table that you made with your own hands over three days, then we begin.

Panettone emerged from Milan's bakeries in the late 19th century, though legends place its origins centuries earlier. The name likely derives from 'pan de Toni,' bread of Toni, honoring either a baker's apprentice or a nobleman's cook whose name is now lost. What is certain is that the Milanese claimed this bread as their own, and by the early 20th century, industrialists like Angelo Motta and Gino Alemagna transformed it from a regional specialty into Italy's national Christmas symbol.

The technique, the tradition, and the story behind every dish.

Discover Culinary Explorer

Ingredients

lievito madre (natural starter)

Quantity

200g

active and refreshed

strong bread flour

Quantity

500g

14% protein or Manitoba

granulated sugar

Quantity

200g

egg yolks

Quantity

6 large

fine sea salt

Quantity

1 teaspoon

vanilla bean

Quantity

1

seeds scraped

orange

Quantity

1

zested

lemon

Quantity

1

zested

unsalted butter

Quantity

250g

softened to room temperature

candied orange peel

Quantity

150g

cut into small dice

candied citron

Quantity

100g

cut into small dice

golden raisins

Quantity

150g

soaked in warm water 30 minutes and drained

honey

Quantity

2 tablespoons

whole milk

Quantity

100ml

lukewarm

Equipment Needed

  • Stand mixer with dough hook
  • Two paper panettone molds (6-inch diameter)
  • Instant-read thermometer
  • Long wooden skewers for hanging
  • Razor blade or very sharp knife

Instructions

  1. 1

    Prepare your starter

    Your lievito madre must be active and healthy. Feed it twice in the 24 hours before you begin, each time discarding half and adding equal weights of flour and water. When ready, it should double within 4 hours at room temperature and smell pleasantly yeasty, with no sharp acidity. If your starter is sluggish or smells of vinegar, do not proceed. The panettone will fail.

    If you do not have an established lievito madre, you must either cultivate one over several weeks or obtain some from a baker. There is no substitute. Commercial yeast produces a different bread entirely.
  2. 2

    Make the first dough

    In the bowl of a stand mixer fitted with the dough hook, combine 300g of the flour with the refreshed starter, 100g of the sugar, 3 of the egg yolks, and the lukewarm milk. Mix on low speed until a rough dough forms, about 3 minutes. Increase to medium speed and knead until the dough is smooth and pulls away from the sides of the bowl, about 10 minutes. The dough will be quite stiff.

  3. 3

    First fermentation

    Transfer the dough to a lightly oiled bowl and cover tightly with plastic wrap. Let it rise at room temperature, ideally 75 to 78 degrees, until tripled in volume. This takes 10 to 14 hours depending on the strength of your starter and the ambient temperature. Do not rush this step. The long fermentation develops both flavor and structure.

    Overnight fermentation works well. Mix the first dough in the evening and return to it the next morning.
  4. 4

    Make the second dough

    Return the risen dough to the mixer. Add the remaining 200g flour, remaining 100g sugar, remaining 3 egg yolks, the salt, vanilla seeds, and both citrus zests. Mix on low until combined, then increase to medium and knead for 10 minutes. The dough should become smooth and very elastic, pulling away from the bowl in long strands.

  5. 5

    Incorporate the butter

    With the mixer running on medium-low, add the softened butter one tablespoon at a time. Wait until each addition is fully absorbed before adding the next. This process takes 15 to 20 minutes and cannot be rushed. When all the butter is incorporated, add the honey and continue mixing until the dough is glossy, supple, and passes the windowpane test: a small piece stretched thin should become nearly translucent without tearing.

    The butter must be soft enough to blend smoothly but not melting. If your kitchen is warm, refrigerate the butter briefly between additions.
  6. 6

    Add the fruits

    Toss the drained raisins and diced candied fruits with a tablespoon of flour to prevent clumping. Add them to the dough and mix on low speed just until evenly distributed, about 2 minutes. Overmixing will smear the fruit and stain the dough.

  7. 7

    Second fermentation

    Transfer the dough to a lightly oiled container and cover tightly. Let rise until doubled, about 3 to 4 hours at room temperature. The dough should feel light and airy when you gently press it.

  8. 8

    Shape the panettone

    Turn the dough onto a lightly floured surface and divide it in half. Working with one piece at a time, fold the edges toward the center repeatedly, rotating the dough, to create surface tension. Flip the dough seam-side down and use cupped hands to rotate it against the work surface, forming a tight ball. The surface should be smooth and taut. Place each ball seam-side down into a paper panettone mold.

  9. 9

    Final proof

    Cover the molds loosely with plastic wrap and let rise until the dough reaches the top of the molds and is domed above the rim, about 5 to 7 hours at room temperature. The surface should spring back slowly when pressed gently with a fingertip. Do not let the dough overproof or it will collapse in the oven.

  10. 10

    Score and bake

    Position a rack in the lower third of your oven and preheat to 350 degrees. Using a very sharp knife or razor blade, score a deep X across the top of each panettone, about half an inch deep. Place a small piece of cold butter in the center of the X. Bake until deeply golden brown and an instant-read thermometer inserted into the center reads 190 degrees, about 50 to 55 minutes. The internal temperature is your guide. Color alone will deceive you.

    If the tops brown too quickly, tent loosely with foil after 30 minutes.
  11. 11

    Cool upside down

    Immediately upon removing from the oven, insert two long wooden skewers horizontally through the base of each panettone, about an inch from the bottom, creating a cross. Invert the panettone and suspend it between two tall objects, such as bottles or cans, so it hangs upside down without touching anything. Let cool completely, at least 8 hours or overnight. This critical step prevents the dome from collapsing under its own weight as the crumb sets.

    This looks alarming but is essential. The soft, butter-rich crumb cannot support itself while warm. Milanese bakers have done this for over a century.
  12. 12

    Store and serve

    Once completely cool, right the panettone and wrap it loosely in plastic. Stored at room temperature, it will remain fresh for up to two weeks thanks to the long fermentation. Slice into tall wedges to show the beautiful crumb structure. Panettone is traditionally served at Christmas breakfast and throughout the holiday season.

Chef Tips

  • The quality of your candied fruit matters enormously. Seek out candied citron and orange peel from Italian or specialty suppliers. The lurid green and red bits sold in supermarkets for fruitcake will ruin your panettone.
  • Manitoba flour, named for the Canadian wheat variety, is the traditional choice for its high protein content. Any strong bread flour with at least 13% protein will work. Weak flour produces flat, dense panettone.
  • Temperature control is everything. Too cold and fermentation stalls. Too warm and the butter softens, ruining the dough structure. A consistent 75 to 78 degrees is ideal throughout the process.
  • If you are intimidated by lievito madre, some bakers use a hybrid approach with a smaller amount of natural starter supplemented by a tiny amount of instant yeast. This is a compromise, not a tradition, but it produces acceptable results while you develop confidence.

Advance Preparation

  • Plan for three days: Day one for starter preparation and first dough, day two for second dough and shaping, day three for baking and cooling.
  • Candied fruits can be diced and raisins soaked several hours ahead. The fruits should be well-drained or they will make the dough sticky.
  • Baked panettone keeps beautifully for two weeks at room temperature, wrapped loosely. It can also be frozen for up to three months; thaw overnight at room temperature.

Frequently Asked Questions

Nutrition Information

1 serving (about 95g)

Calories
395 calories
Total Fat
15 g
Saturated Fat
9 g
Trans Fat
0 g
Unsaturated Fat
6 g
Cholesterol
100 mg
Sodium
155 mg
Total Carbohydrates
61 g
Dietary Fiber
1 g
Sugars
31 g
Protein
6 g

Note: Chef personas and recipes are created with AI assistance. Cook with care: follow safe food-handling practices, check doneness with a thermometer when needed, and adapt for allergies and your kitchen.

Where cooking meets culture.

Culinary guides, cultural storytelling, and the editorial depth that makes cooking meaningful.

Discover Culinary Explorer

More from Chef Graziella's Dessert Collection

Browse the full collection