
Chef Graziella
Tiramisù Classico
The authentic tiramisù of the Veneto, where mascarpone, eggs, espresso, and savoiardi create something that requires no improvement. What you keep out is as significant as what you put in.
A cooking platform built around craft, culture, and the stories behind what we eat.
Created by
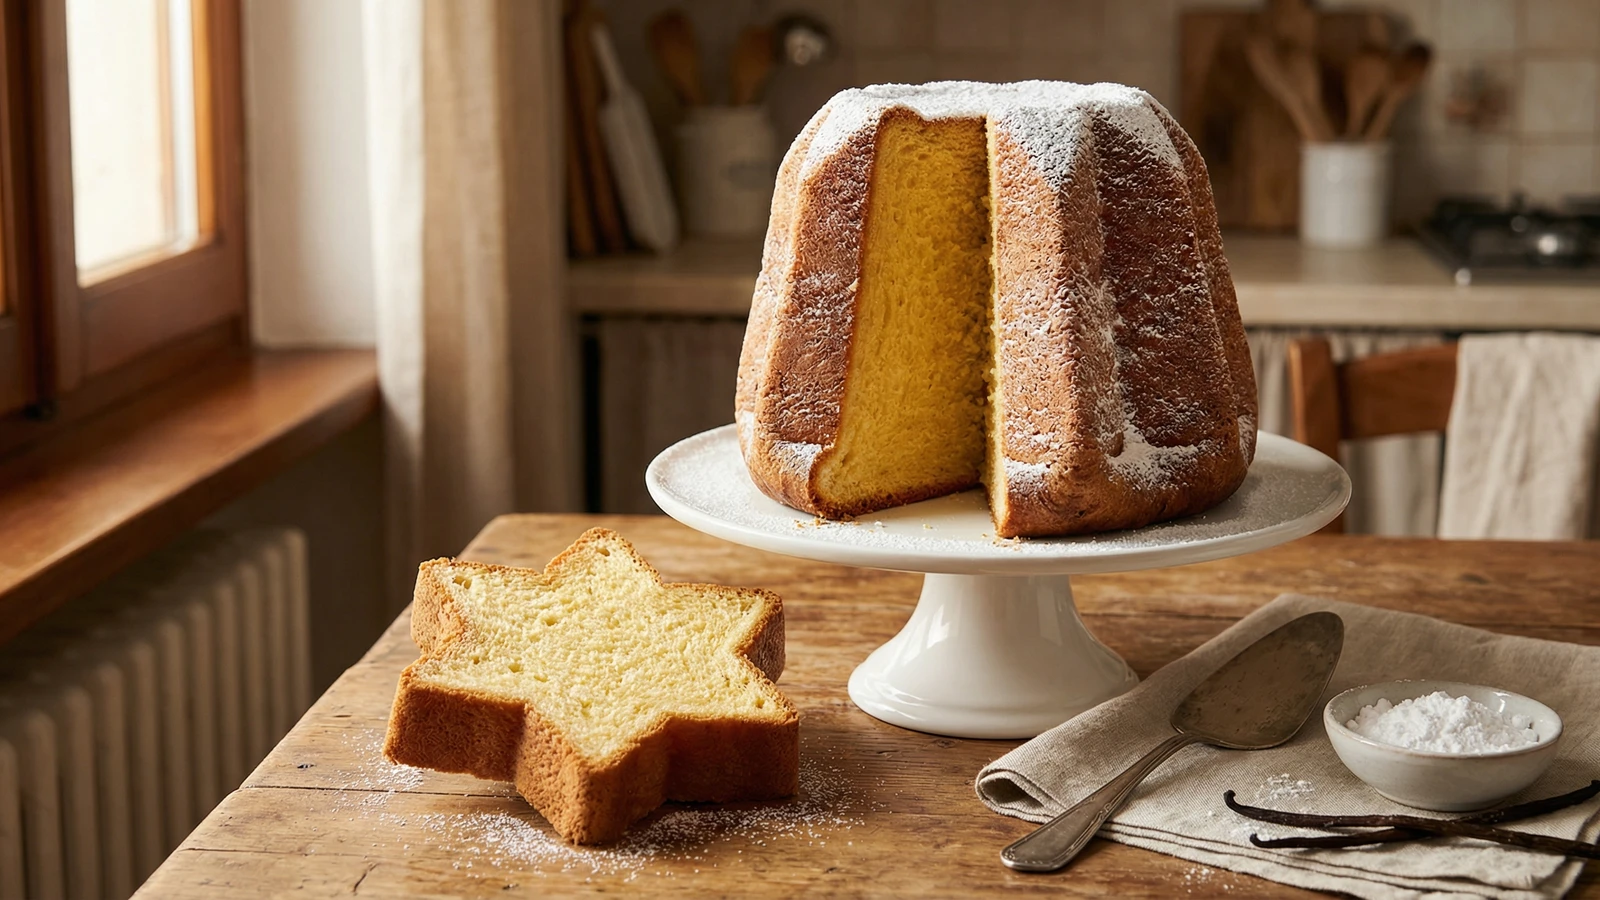
Verona's answer to panettone, a towering golden star of enriched dough that requires three days and rewards every hour of patience with buttery, vanilla-scented perfection.
Pandoro is not panettone. If you want candied fruits and raisins, go to Milan. Verona created something purer: a bread of butter, eggs, and vanilla, shaped like an eight-pointed star and dusted with powdered sugar until it resembles a snow-capped Alpine peak. The name means 'golden bread,' and when you slice it, you understand why.
This is not a recipe for the impatient. The dough requires two separate builds, two overnight rises, and a final proof that can stretch to six hours. The butter content approaches that of brioche. The technique demands attention. But there is no other way to achieve the fine, cotton-like crumb that distinguishes true pandoro from the industrial versions wrapped in cellophane.
I tell you plainly: you will need a pandoro mold. The star shape is not decorative. It creates the ratio of crust to crumb that defines this bread. The points become slightly crisp while the interior stays impossibly tender. Without the proper mold, you are making enriched bread. You are not making pandoro.
Pandoro was created and patented by Domenico Melegatti in Verona on October 14, 1894. He adapted the Viennese brioche tradition and designed the distinctive eight-pointed star mold himself. Before Melegatti, Veronese bakers made a Christmas bread called 'nadalin,' but pandoro's superior richness and theatrical shape conquered the city within a generation.
Quantity
100g
for starter
Quantity
50g (95°F)
for starter
Quantity
7g
for starter
Quantity
150g
for first dough
Quantity
50g
for first dough
Quantity
2
for first dough
Quantity
50g
softened, for first dough
Quantity
200g
for second dough
Quantity
100g
for second dough
Quantity
4
for second dough
Quantity
150g
softened, for second dough
Quantity
1 teaspoon
Quantity
1
seeds scraped
Quantity
1
zested
Quantity
100g
for finishing
Quantity
1/2
seeds scraped, for finishing sugar
| Ingredient | Quantity |
|---|---|
| bread flourfor starter | 100g |
| warm waterfor starter | 50g (95°F) |
| active dry yeastfor starter | 7g |
| bread flourfor first dough | 150g |
| sugarfor first dough | 50g |
| large egg yolksfor first dough | 2 |
| unsalted buttersoftened, for first dough | 50g |
| bread flourfor second dough | 200g |
| sugarfor second dough | 100g |
| large egg yolksfor second dough | 4 |
| unsalted buttersoftened, for second dough | 150g |
| fine sea salt | 1 teaspoon |
| vanilla beanseeds scraped | 1 |
| lemonzested | 1 |
| powdered sugarfor finishing | 100g |
| vanilla beanseeds scraped, for finishing sugar | 1/2 |
Dissolve the yeast in warm water and let it stand for 5 minutes until it becomes creamy. Stir in the flour until a shaggy dough forms. Cover with plastic wrap and let rise at room temperature until doubled, about 2 hours. The surface should be domed and bubbling. This starter is the foundation of everything that follows.
In the bowl of a stand mixer fitted with the dough hook, combine the risen starter with the flour and sugar for the first dough. Mix on low speed until combined. Add the egg yolks one at a time, mixing until each is absorbed. The dough will be sticky and rough. Continue mixing on medium speed for 8 minutes until the dough becomes smooth and elastic. Add the softened butter in three additions, mixing until fully incorporated after each. The dough will break apart, then come back together. This is correct.
Transfer the dough to a lightly oiled bowl, cover tightly with plastic wrap, and refrigerate for at least 12 hours or overnight. The cold fermentation develops flavor and makes the rich dough easier to handle. The dough should double in size, though this will happen slowly in the cold.
Remove the first dough from the refrigerator. Let it warm for 30 minutes. Return it to the mixer bowl with the dough hook. Add the flour and sugar for the second dough. Mix on low speed until combined. Add the egg yolks one at a time, then the salt, vanilla seeds, and lemon zest. Mix on medium speed for 10 minutes. The dough should become very smooth, pulling away from the sides of the bowl.
With the mixer running on medium-low, add the softened butter for the second dough, one tablespoon at a time. Wait until each piece is absorbed before adding the next. This takes patience. After all butter is incorporated, increase speed to medium-high and mix for another 5 minutes. The dough should be glossy, elastic, and pass the windowpane test: a small piece stretched thin should become translucent without tearing.
Transfer to a clean oiled bowl, cover tightly, and refrigerate for another 12 hours or overnight. The dough will again double. Two cold rises are essential. They build the structure that allows pandoro to rise tall without collapsing.
Generously butter a pandoro mold, reaching into every point of the star. Remove the dough from the refrigerator and let it warm for 20 minutes. Turn it onto an unfloured surface. The dough should be tacky but not sticky. Shape it into a smooth ball by tucking the edges underneath, then place it seam-side down into the prepared mold. The dough should fill the mold about one-third full.
Cover the mold loosely with plastic wrap and let rise in a warm place (75 to 78°F) until the dough reaches just below the rim of the mold. This takes 4 to 6 hours depending on temperature. Do not rush this. The dough must be fully proofed or it will not rise properly in the oven.
Preheat the oven to 350°F. Place the mold on the lower third of the oven. Bake for 10 minutes, then reduce the temperature to 325°F and bake for another 35 to 40 minutes. The top should be deeply golden, and an instant-read thermometer inserted into the center should read 190°F. If the top browns too quickly, tent loosely with foil.
Let the pandoro cool in the mold for 10 minutes, then invert onto a wire rack. It must cool completely before slicing, at least 4 hours. The interior continues to set as it cools. Cutting too soon results in a gummy crumb. Patience has brought you this far. Do not abandon it now.
Mix the powdered sugar with the remaining vanilla seeds. Place the cooled pandoro in a large bag or shake it in the box it came with, adding the vanilla sugar. The traditional presentation is to slice the pandoro horizontally into star-shaped layers, dust each layer generously with vanilla sugar, then reassemble. The mountain of golden stars dusted with snow is how Christmas morning should look.
1 serving (about 80g)
Culinary guides, cultural storytelling, and the editorial depth that makes cooking meaningful.
Discover Culinary ExplorerChef Graziella
The authentic tiramisù of the Veneto, where mascarpone, eggs, espresso, and savoiardi create something that requires no improvement. What you keep out is as significant as what you put in.

Chef Juliette
Five almond preparations, one discipline: remove the skins cleanly, dry every kernel through, then cut, toast, or cloak it in pale caramel without letting its fragrant oils escape.

Chef Juliette
A pastry pantry lesson in one tray: filberts warmed only until their red skins release, rubbed clean, cooled, and chopped into a fragrant mise-en-place for cakes, creams, pralines, and petits fours.

Chef Juliette
The smallest pâtisserie discipline decides whether a cake leaves its mould intact: clarified butter in every corner, followed by the lightest veil of dry flour or fécule.