Culinary Explorer

A cooking platform built around craft, culture, and the stories behind what we eat.
Discover Culinary Explorer
Grilled Sourdough Flatbread

Grilled Sourdough Flatbread

Created by

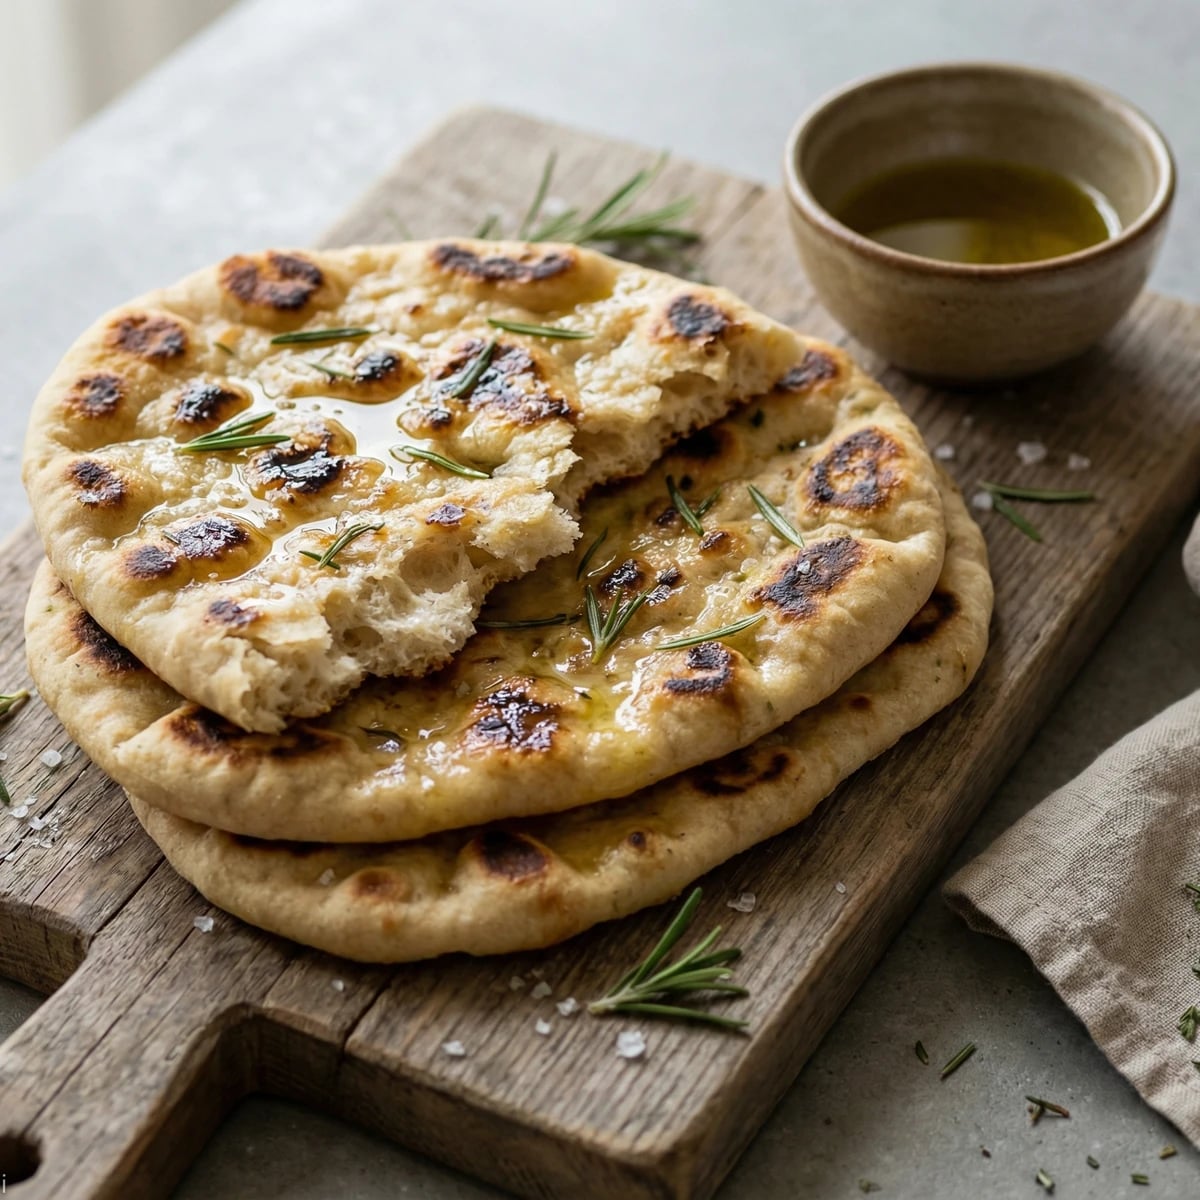
Rustic sourdough rounds kissed by open flame, their blistered surfaces crackling with char while the tangy crumb stays tender within. This is bread the way fire intended it.

Breads
American
BBQ
30 min
Active Time
20 min cook3 hr total
Yield8 flatbreads

Long before ovens existed, bread met flame directly. Flatbreads cooked on hot stones and iron griddles fed civilizations from the Fertile Crescent to the American frontier. Your backyard grill continues that ancient tradition. The sourdough tang, the wood smoke, the leopard-spotted char: this is bread with character.

I've watched students overthink this process. They fuss with temperatures and timers when they should be watching the dough. The grill speaks to you. Listen for the sizzle when the dough hits the grates. Watch for bubbles rising on the surface. Smell that toasted grain mixing with whatever wood or charcoal you're burning. These signals matter more than any recipe can capture.

This flatbread works whether you're hosting a summer gathering or feeding your family on a Tuesday night. Make the dough in the morning using your sourdough discard, shape it before guests arrive, and grill rounds as people gather around. The bread comes off hot, ready for torn pieces dragged through hummus, topped with grilled vegetables, or simply brushed with good olive oil and flaky salt. Nothing pretentious. Just honest bread from honest fire.

The technique, the tradition, and the story behind every dish.

Discover Culinary Explorer

Ingredients

active sourdough starter or discard

Quantity

1 cup (240g)

warm water

Quantity

1 cup (240ml)

90-100°F

all-purpose flour

Quantity

3 cups (375g)

fine sea salt

Quantity

1 1/2 teaspoons

extra-virgin olive oil

Quantity

2 tablespoons

honey or sugar

Quantity

1 teaspoon

flaky sea salt

Quantity

for finishing

fresh herbs (optional)

Quantity

for topping

Equipment Needed

  • Charcoal or gas grill
  • Rolling pin
  • Bench scraper
  • Long-handled tongs
  • Pastry brush
  • Wire cooling rack

Instructions

  1. 1

    Combine wet ingredients

    In a large mixing bowl, stir together the sourdough starter, warm water, olive oil, and honey until the starter loosens and the mixture looks slightly frothy. The warmth activates the wild yeast. You want cohesion here, not perfection.

    Unfed discard works beautifully here. The tangy flavor intensifies, which pairs well with smoke from the grill.
  2. 2

    Build the dough

    Add the flour and salt to the wet ingredients. Stir with a wooden spoon or Danish dough whisk until a shaggy mass forms. Turn the dough onto a lightly floured surface and knead for 6 to 8 minutes. The dough should become smooth, slightly tacky, and spring back when poked. If it sticks aggressively to your hands, dust with more flour. If it tears rather than stretches, you've added too much.

  3. 3

    First rise

    Shape the dough into a ball and place it in a lightly oiled bowl. Cover with a damp kitchen towel or plastic wrap. Let rise at room temperature until doubled in size, about 2 hours. In a warm kitchen during summer, this happens faster. In cooler conditions, be patient. The dough tells you when it's ready, not the clock.

    For deeper flavor, refrigerate the covered dough overnight after the first hour of rising. The cold fermentation develops complex tang. Bring to room temperature before shaping.
  4. 4

    Divide and shape

    Turn the risen dough onto a floured surface and divide into 8 equal pieces. A bench scraper makes this clean work. Roll each piece into a ball by cupping your hand over it and dragging it in tight circles against the counter. The surface tension creates structure. Cover the balls with a towel and let them rest for 15 minutes. This relaxes the gluten and makes rolling easier.

  5. 5

    Roll the flatbreads

    Working with one ball at a time, flatten it with your palm, then roll into a rough oval or circle about 1/4-inch thick and 7 to 8 inches across. Perfection is not the goal. Irregular edges char beautifully. Stack the rolled flatbreads between sheets of parchment paper on a baking sheet. They can sit at room temperature for up to 30 minutes before grilling.

  6. 6

    Prepare the grill

    Heat your grill to high, around 500°F. For charcoal, let the coals burn until covered with white ash and glowing orange beneath. For gas, preheat all burners on high for 10 minutes with the lid closed. Clean the grates thoroughly with a wire brush, then oil them by dipping a folded paper towel in vegetable oil and rubbing it across the hot grates using long tongs. This prevents sticking and promotes those coveted grill marks.

  7. 7

    Grill first side

    Lay a flatbread directly on the hot grates. Within 30 seconds, you'll hear an assertive sizzle. Watch the surface: bubbles will form and inflate like small balloons. The edges will begin to set and turn opaque. After 2 to 3 minutes, the bottom should show dark grill marks and release easily when you slide a spatula underneath. If it sticks, give it another 30 seconds.

    Grill 2 or 3 flatbreads at a time depending on your grate size. More than that makes timing difficult and leads to burnt bread.
  8. 8

    Flip and finish

    Using tongs or a spatula, flip the flatbread. The second side cooks faster, usually 1 to 2 minutes. Look for puffing and char spots. Some areas will blister dramatically while others stay pale. This uneven coloring is correct. It's the signature of fire-cooked bread. Remove to a wire rack or clean kitchen towel.

  9. 9

    Season and serve

    While still warm, brush each flatbread generously with olive oil and sprinkle with flaky sea salt. The oil soaks into the char, creating an almost smoky richness. Add fresh herbs if you have them: torn basil, chopped rosemary, or za'atar. Serve immediately, or keep warm wrapped in a clean towel while you finish grilling the remaining rounds. These are best within an hour of cooking.

Chef Tips

  • Your sourdough starter doesn't need to be at peak activity. Discard that's been sitting in the refrigerator for a week works perfectly. The wild yeast provides lift while the lactic acid delivers that distinctive tang.
  • Wood chips or chunks added to your charcoal intensify the smoky character. Fruit woods like apple or cherry complement the bread's mild sweetness. Mesquite overpowers.
  • Transform these into quick pizzas by adding toppings after the first flip: a smear of tomato sauce, fresh mozzarella, torn basil. Close the lid for a minute to melt the cheese.
  • Leftover flatbreads crisp beautifully when reheated directly on a gas burner or under a broiler. They also tear well into chips for dips the next day.
  • In the American Southwest tradition, brush with garlic butter and serve alongside carne asada. In the Southern style, pair with pimento cheese and sliced tomatoes. California calls for avocado and a squeeze of lime. The bread adapts.

Advance Preparation

  • Dough can be made up to 24 hours ahead and refrigerated after the initial rise. Cold dough is actually easier to roll. Let it warm for 30 minutes before shaping.
  • Rolled flatbreads can be stacked between parchment and refrigerated for up to 4 hours before grilling. Bring to room temperature for 15 minutes first.
  • For parties, shape all the dough balls in advance and keep covered. Roll and grill to order so guests get bread straight from the fire.

Frequently Asked Questions

Nutrition Information

1 flatbread (about 95g)

Calories
210 calories
Total Fat
4 g
Saturated Fat
0.5 g
Trans Fat
0 g
Unsaturated Fat
3 g
Cholesterol
0 mg
Sodium
1000 mg
Total Carbohydrates
37 g
Dietary Fiber
1 g
Sugars
0.5 g
Protein
5 g

Note: Chef personas and recipes are created with AI assistance. Cook with care: follow safe food-handling practices, check doneness with a thermometer when needed, and adapt for allergies and your kitchen.

Where cooking meets culture.

Culinary guides, cultural storytelling, and the editorial depth that makes cooking meaningful.

Discover Culinary Explorer

More from American Summer

Browse the full collection