Culinary Explorer

A cooking platform built around craft, culture, and the stories behind what we eat.
Discover Culinary Explorer
Bolo Mesclado

Bolo Mesclado

Created by

You don't need a bakery hand for marble cake. Make one plain batter, tint a little with cocoa, swirl it once, and the afternoon coffee looks like you tried harder.

Desserts
Brazilian
Comfort Food
Budget Friendly
Make Ahead
20 min
Active Time
40 min cook1 hr 15 min total
Yield10 slices

You hear 'mesclado' and that little voice starts with its nonsense: 'isso não é pra mim.' I know that voice. I met it in my own kitchen in my late twenties, staring at a cake that had glued itself to the pan like it paid rent. Anota aí: this is one batter, one small bowl of cocoa, and a spoon dragged through the pan. Cozinhar não é dom, é um aprendizado.

A gente talks a lot about the pê-efe, rice, beans, meat or egg, something green, because that plate quietly keeps a country itself. But the Brazilian home table has another ordinary piece of survival and pleasure: bolo de lanche, the cake under a towel for cafezinho, for a neighbor, for the child who came home hungry, for the adult who also came home hungry and pretends not to be.

The reason this cake works is boring, which I love. Oil keeps it soft. Milk loosens the batter. Baking powder gives lift. Cocoa gets mixed with a little milk before it touches the batter because cocoa drinks moisture and clumps if you throw it in dry. Then you swirl only a few times, because too much enthusiasm turns ribbons into beige confusion.

Comida de verdade is not punishment. It has rice and beans, and it also has cake made from eggs, flour, milk, sugar, and cocoa, not a box pretending to be your grandmother. By the end, you'll have a soft, marbled bolo that slices cleanly and makes the kitchen smell like someone in the house knows what they're doing. That someone is you.

Marble cakes belong to a European family of bakes documented in nineteenth-century German and Austrian kitchens, where part of a simple cake batter was darkened to create a streaked slice. In Brazil, bolo mesclado became bolo de lanche, the everyday cake served with cafezinho at home and in neighborhood bakeries, usually plain, without filling or frosting. The common forma com furo no meio is practical, not decorative: the hole sends heat through the center, which helps a simple home oven bake the cake evenly.

The technique, the tradition, and the story behind every dish.

Discover Culinary Explorer

Ingredients

neutral oil or softened butter

Quantity

1 tablespoon

for greasing the pan

all-purpose flour

Quantity

1 tablespoon

for dusting the pan

all-purpose flour

Quantity

2 cups

spooned and leveled

baking powder

Quantity

1 tablespoon

fine salt

Quantity

1/2 teaspoon

eggs

Quantity

3 large

at room temperature

sugar

Quantity

1 cup

neutral oil

Quantity

1/2 cup

whole milk

Quantity

1 cup

at room temperature

vanilla extract

Quantity

2 teaspoons

unsweetened cocoa powder

Quantity

3 tablespoons

sugar

Quantity

1 tablespoon

for the chocolate batter

milk

Quantity

2 tablespoons

for the cocoa paste

Equipment Needed

  • 22 cm (9-inch) ring pan, about 10-cup capacity
  • Balloon whisk or hand mixer
  • Rubber spatula
  • Wire rack
  • Toothpick or thin skewer

Instructions

  1. 1

    Prepare the pan

    Heat the oven to 180°C (350°F). Grease a 22 cm (9-inch) ring pan well with oil or softened butter, getting into the center tube and all the corners, then dust it with flour and tap out the excess. Do this before you mix the batter, because once baking powder meets liquid, the cake should go into a hot oven, not sit on the counter losing lift.

    No ring pan? Use a 23 x 13 cm (9 x 5-inch) loaf pan and start checking at 40 minutes. The center bakes more slowly without the hole, so patience does the job.
  2. 2

    Mix the dry

    In a bowl, whisk the flour, baking powder, and salt for about 20 seconds. Look for an even white mixture with no little hills of baking powder. This tiny step saves you from bitter pockets and gives the cake a more even rise, which is much cheaper than blaming the oven.

  3. 3

    Start the batter

    In a large bowl, whisk the eggs and 1 cup sugar until the mixture looks a little paler and foamy around the edges, about 1 minute by hand. Add the oil and vanilla, then whisk until glossy and even. The oil needs to disappear into the eggs and sugar so the cake bakes soft instead of greasy in spots.

  4. 4

    Add flour and milk

    Add half the flour mixture and stir gently until almost gone, then add half the milk and stir again. Repeat with the remaining flour and milk, scraping the bottom of the bowl. Stop as soon as you have a thick, pourable batter with no dry flour showing. Beat it after the flour is wet and the cake gets tough, because flour likes to remind you who's boss.

  5. 5

    Make chocolate batter

    In a small bowl, stir the cocoa, 1 tablespoon sugar, and 2 tablespoons milk into a smooth dark paste. Scoop about 1 1/2 cups of the vanilla batter into that paste and fold until the color is even. Cocoa clumps when it goes in dry and it steals moisture from the batter, so making a paste first keeps the chocolate part soft and properly mixed.

    Use unsweetened cocoa, not chocolate drink mix. Drink mix brings extra sugar and filler, then gives you a pale cake that only whispers chocolate. We are not here for whispers.
  6. 6

    Pour and swirl

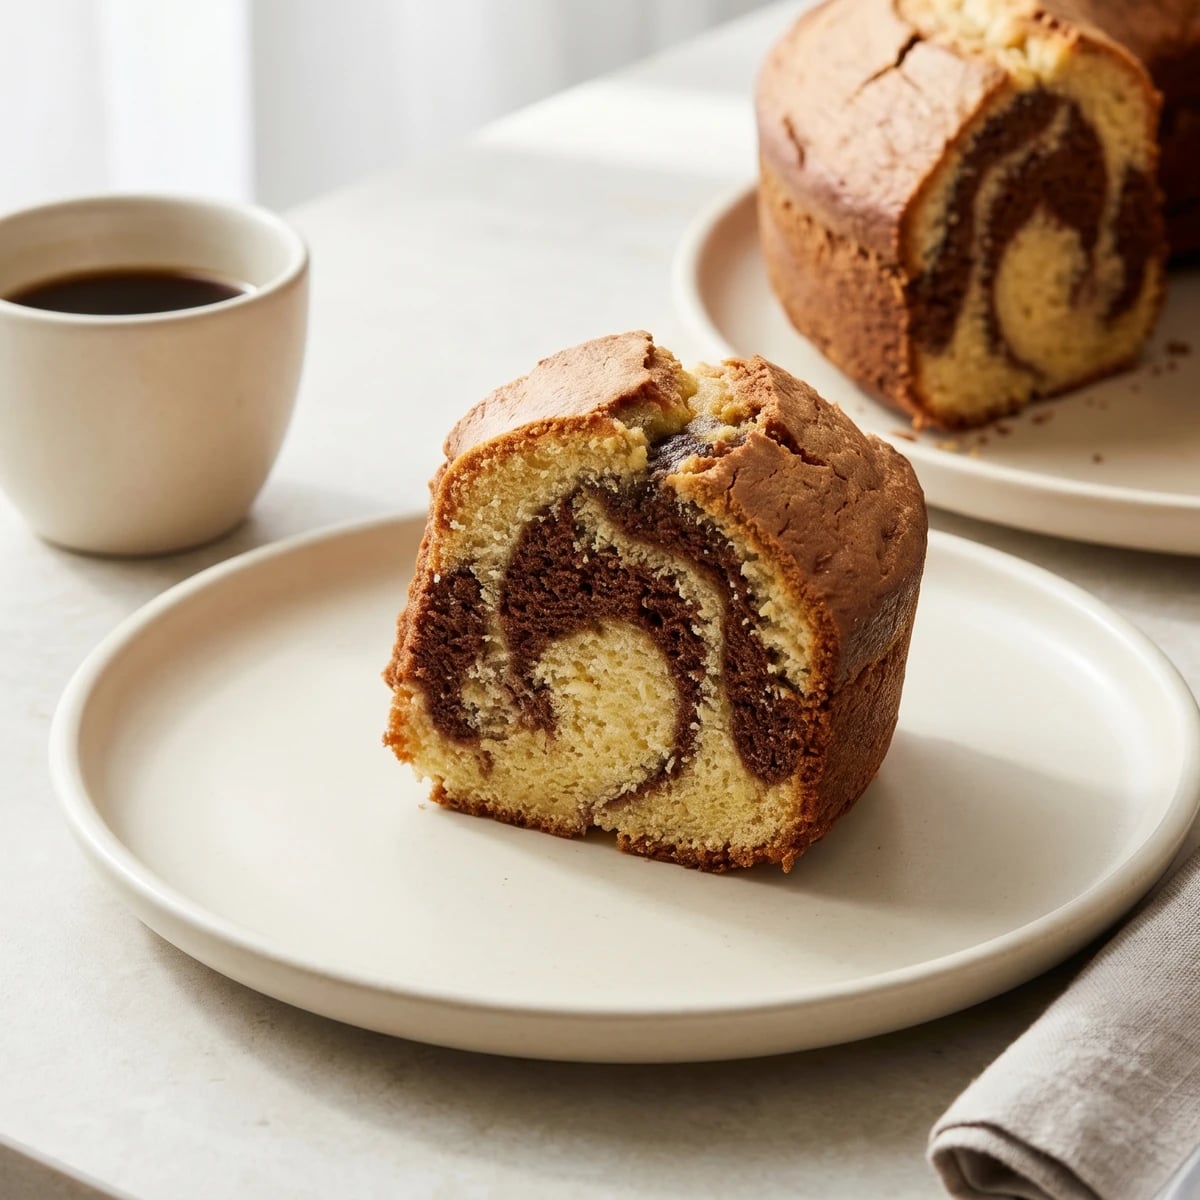
    Pour half of the remaining vanilla batter into the prepared pan. Spoon the chocolate batter over it in 6 to 8 dollops, then cover with the rest of the vanilla batter. Drag a butter knife or the handle of a spoon through the batter in 4 or 5 big loops, then stop. You want ribbons, not one confused brown batter.

    The marble happens because you do less. If you keep swirling until it looks perfect on top, the inside is already overmixed.
  7. 7

    Bake until set

    Bake for 35 to 42 minutes, without opening the oven for the first 30 minutes. The cake is ready when the top is golden, the edges pull slightly from the pan, and a toothpick inserted near the center comes out clean or with a few moist crumbs. Open the oven too early and the middle can sink before it has the strength to stand.

  8. 8

    Cool and unmold

    Let the cake cool in the pan for 15 minutes. Run a thin knife around the outer edge and the center tube if anything looks stuck, then invert it onto a rack or plate. Too hot and it can break; too cold and the sugar grips the pan like a grudge. Let it cool at least 30 more minutes before slicing so the crumb settles and cuts cleanly.

  9. 9

    Serve for coffee

    Slice the bolo into thick home pieces and serve with cafezinho. The cut face should show pale vanilla crumb crossed with cocoa ribbons, soft but not gummy. Cover what is left once fully cool, because a cake left uncovered dries out and then everybody pretends they only wanted a tiny slice anyway.

Chef Tips

  • Measure the flour by spooning it into the cup and leveling it off. If you scoop straight from the bag and pack it down, you add too much flour, and the cake comes out heavy. Then the poor recipe gets accused.
  • Room-temperature eggs and milk mix more smoothly into the batter. Cold ingredients make the oil tighten up and the batter looks split. If you forgot, put the eggs in a bowl of warm water for 10 minutes and warm the milk just until it loses the fridge chill.
  • Oil gives the softest keep-on-the-counter crumb. Melted butter tastes lovely, but the cake firms up faster the next day. A Tuesday is a Tuesday; choose the one that solves your house.
  • Check your baking powder. Stir 1/2 teaspoon into a little hot water; if it bubbles hard, it is alive. If it sits there looking tired, buy a new one before you blame yourself.
  • This cake needs no frosting. The point is the slice, the marble, the cafezinho, and the fact that you made it from pantry ingredients without a box doing the thinking for you.

Advance Preparation

  • Take the eggs and milk out of the fridge 30 minutes before baking so the batter comes together smoothly.
  • The cake can be baked 1 day ahead. Once fully cool, cover it tightly and keep it at room temperature.
  • Slices freeze well for up to 2 months. Wrap individual slices, freeze, and thaw at room temperature for cafezinho without drama.

Frequently Asked Questions

Nutrition Information

1 serving (about 95g)

Calories
295 calories
Total Fat
13 g
Saturated Fat
2 g
Trans Fat
0 g
Unsaturated Fat
10 g
Cholesterol
60 mg
Sodium
250 mg
Total Carbohydrates
41 g
Dietary Fiber
1 g
Sugars
23 g
Protein
5 g

Note: Chef personas and recipes are created with AI assistance. Cook with care: follow safe food-handling practices, check doneness with a thermometer when needed, and adapt for allergies and your kitchen.

Where cooking meets culture.

Culinary guides, cultural storytelling, and the editorial depth that makes cooking meaningful.

Discover Culinary Explorer

More from Bolos Caseiros & Lanche da Tarde

Browse the full collection